Overview
This documentation explains how to install, configure and upgrade Smart Tenant, and describes what the system does: user roles, every main feature, the owner website, the mobile apps, settings and languages.
Server Requirement
Laravel requires certain minimum PHP versions and extensions. Make sure your web server supports the following:
- PHP >= 8.1
- cURL PHP
- DOM PHP
- Fileinfo PHP
- Filter PHP
- GD PHP (or Imagick) - images and PDF signatures
- Hash PHP
- Mbstring PHP
- OpenSSL PHP
- PCRE PHP
- PDO PHP
- Session PHP
- Tokenizer PHP
- XML PHP
Minimum PHP Version:
Required PHP Extensions:
How to Create Database
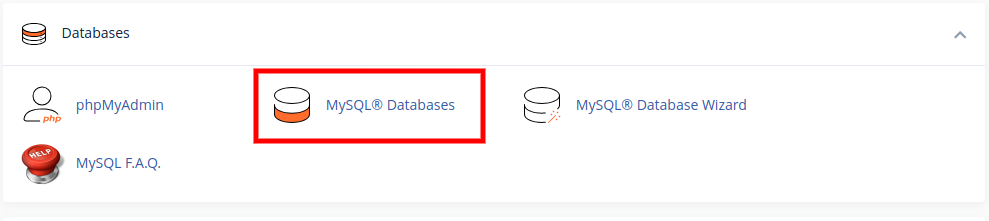
Step 1: Access the Database Creation Tool
First, navigate to the Databases section of your hosting panel. Click on MySQL® Databases to begin the process. This tool allows you to create and manage your databases and database users.
Step 2: Create a New Database
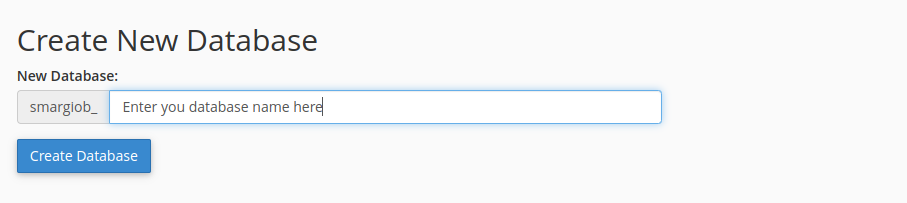
On the next screen, you will be able to create a new database. You will see a field to enter the name of your new database. The hosting provider automatically adds a prefix to the database name for security. After entering the name, click Create Database.
Step 3: Create a New User
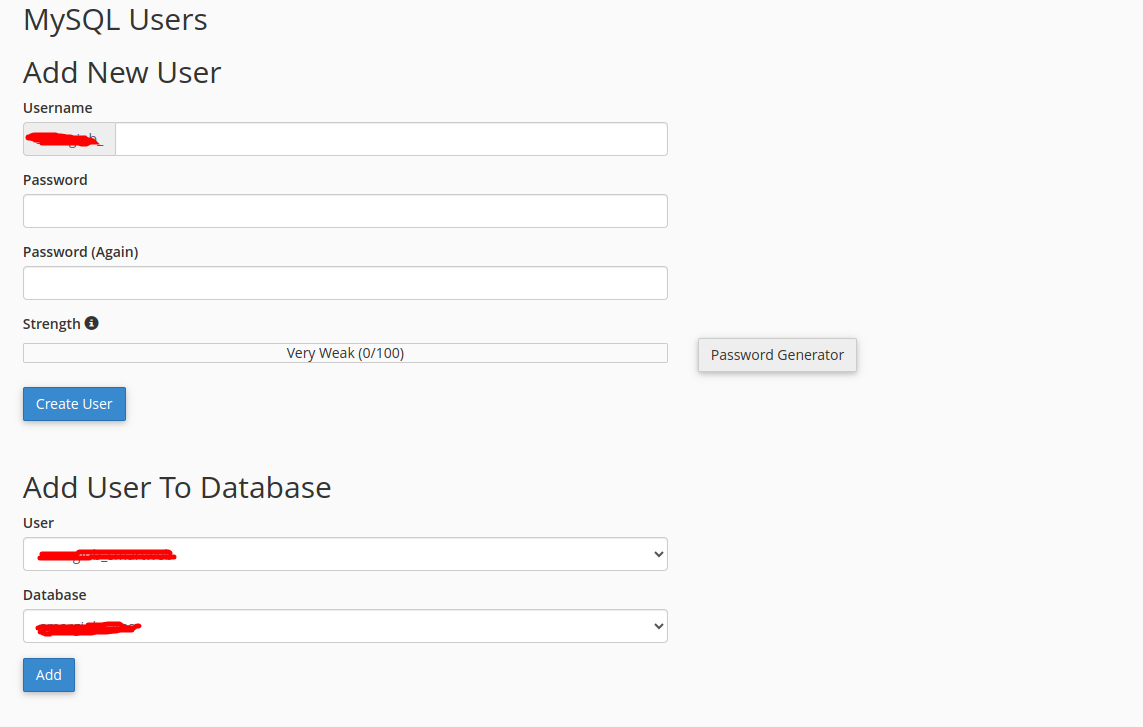
After creating the database, you'll need to create a user for it. Scroll down on the same page to the Add New User section. Enter a Username and a strong Password in the provided fields. Use the Password Generator tool to create a secure password. Click Create User to save the new user.
Step 5: Assign Privileges
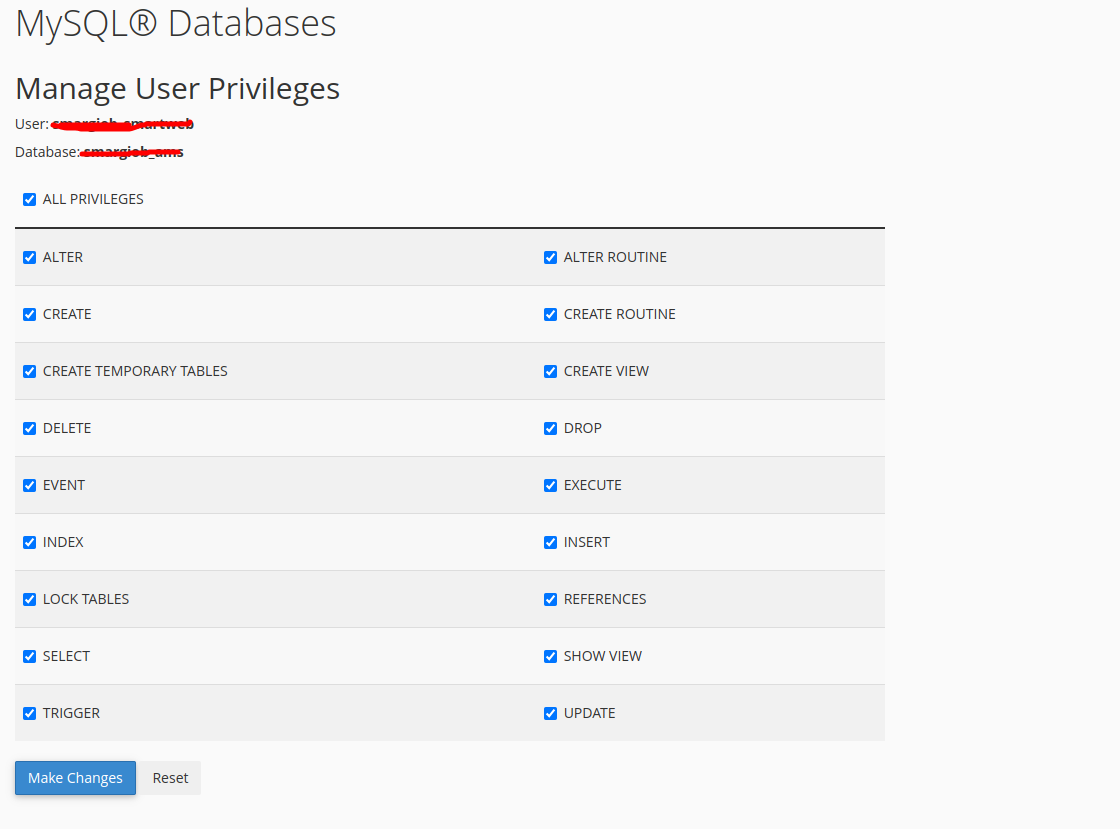
The final step is to grant the new user permissions to manage the database. On the Manage User Privileges page, check the box for ALL PRIVILEGES. This gives the user full control over the database, allowing them to create, modify, and delete tables and data. Click Make Changes to finalize the process. Your database and user are now set up and ready to use.
How to Upload Files
Step 1: Access the File Manager
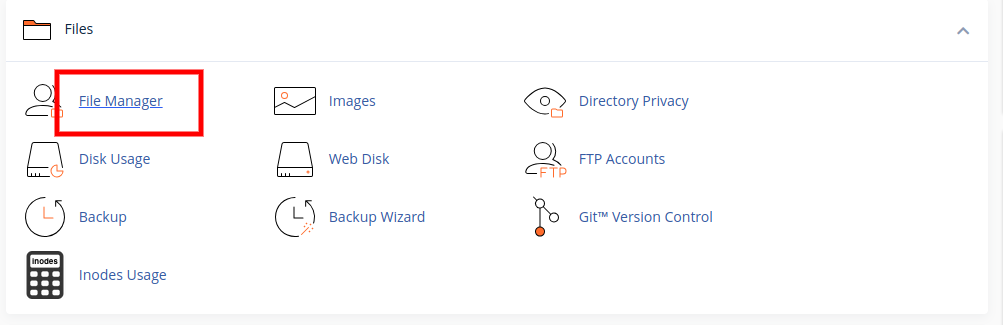
Log in to your cPanel account. In the main menu, look for the Files section and click on File Manager. This will open the file manager interface in a new tab.
Step 2: Navigate to the Correct Folder
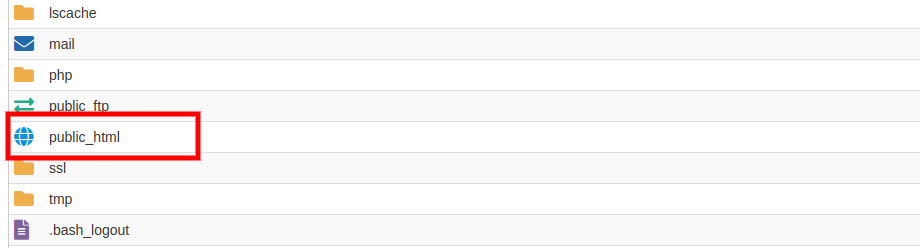
In the File Manager, navigate to the folder where you want to upload your files. For a primary domain, this is typically the public_html folder. This folder is the "web root" and contains all the files that are accessible to the public on your website.
Step 3: Select and Upload Files
Once you are in the correct directory, click the Upload button in the toolbar at the top of the page. This will open a new window where you can drag and drop your files or click Select File to browse for files on your computer.
Step 4: Verify the Upload
After the upload is complete, you should see a 100% progress message. The uploaded file should now appear in the folder you selected in the File Manager.
How to Install
Step 1: Start the Installation
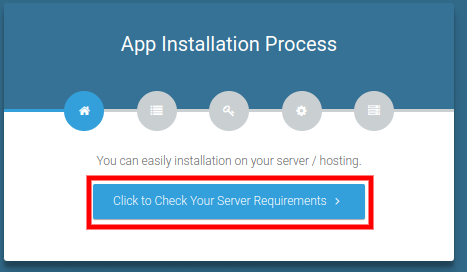
Open a web browser and navigate to your website's installation URL, which is typically yourdomain.com/install. This action will initiate the installation process and lead you to the App Installation Process page.
Step 2: Check Server Requirements
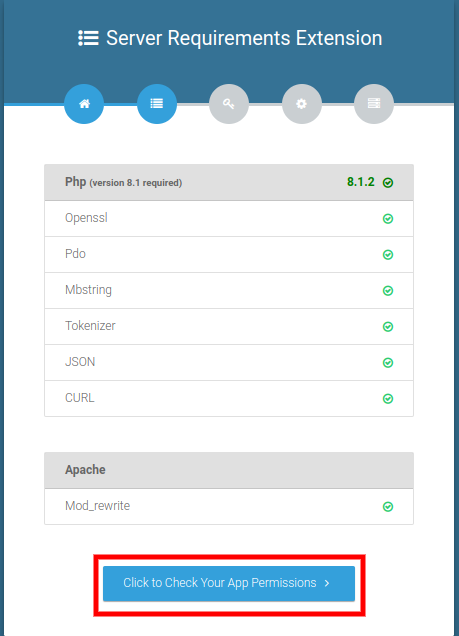
The next step is to ensure your server meets all the necessary requirements for the application. Click the "Click to Check Your Server Requirements" button to proceed.
Step 3: Verify App Permissions
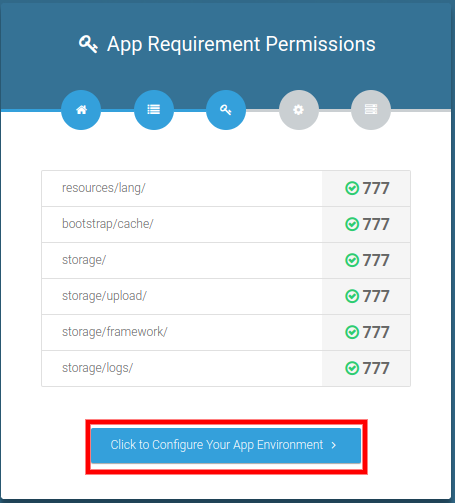
After confirming the server extensions, the installer will check the necessary directory permissions. Ensure all permissions are correct (often shown with a green checkmark next to them) and then click "Click to Configure Your App Environment".
Step 4: Configure App Environment
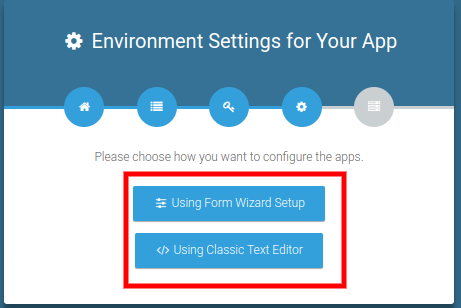
You will be given options to configure the app's environment. For a straightforward installation, select "Using Form Wizard Setup".
Step 5: Enter App and Database Details
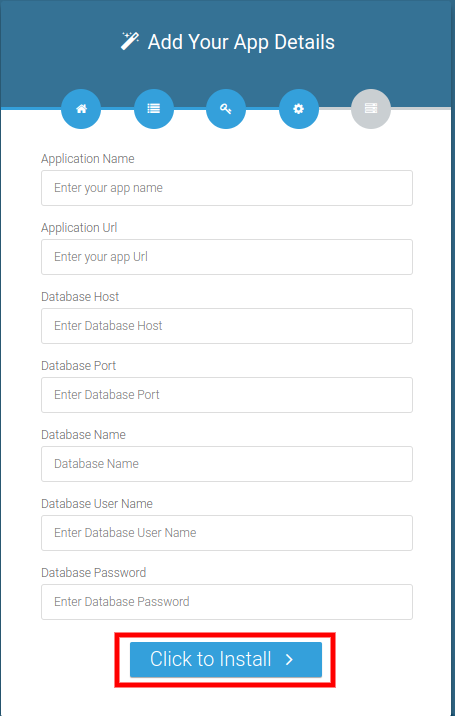
This is a critical step where you link the application to your database. Fill in the required fields with the information you gathered when setting up your database. This includes the Database Host, Database Name, Database User Name, and Database Password. You will also need to enter an Application Name and Application Url. Once all the details are entered, click "Click to Install".
Step 6: Finalize Installation
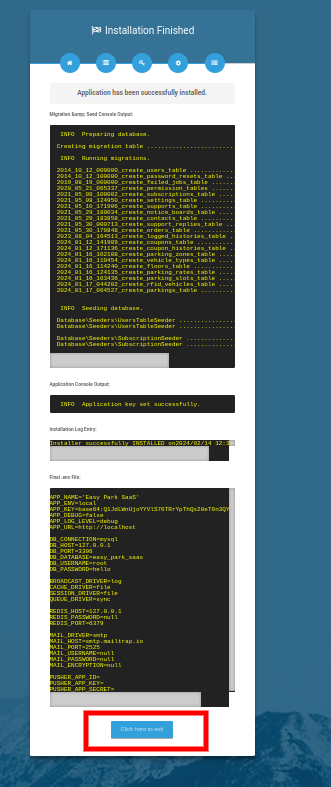
The installer will now run the installation process, which includes preparing the database and running migrations. Once you see the "Application has been successfully installed" message, you have successfully completed the process. Click "Click here to exit" to finish.
Default User Login Details
Email : owner@gmail.com
Password : 123456
Email : manager@gmail.com
Password : 123456
Email : tenant@gmail.com
Password : 123456
Email : maintainer@gmail.com
Password : 123456
Email : landlord@gmail.com
Password : 123456
Cron Job Setup (Required)
Many features run automatically once a day: recurring invoices, reminders, late fees and more. For these to work, the server must open the system's cron job link every day. Set this up right after installation.
Step 1: Create the cron job key
Log in as the Owner, open Settings → Cronjob Settings and click Generate. The page then shows a ready-made command such as:
wget -q -O /dev/null https://yourdomain.com/cronjob?key=YOUR_KEY
Step 2: Add it to your hosting panel
In cPanel, open Cron Jobs, choose Once Per Day (or once per hour for faster reminders), paste the command and save. The Cronjob Settings page shows the time of the last run, so you can check that it works.
What the daily run does
- Applies scheduled rent increases, then creates recurring invoices
- Adds late fees to overdue invoices (when the owner has turned late fees on)
- Sends payment reminders, lease expiry reminders and document expiry reminders
- Updates lease status and expires old leads
- Charges tenants who have turned on autopay (Stripe / Razorpay)
- Creates preventive maintenance requests that are due
- Emails new matching properties to website visitors who signed up for listing alerts
Keep the key private. If it is ever shared by mistake, click Remove and generate a new one.
System Overview
Smart Tenant is a property and rental management system for one business. It is installed for a single Owner (a landlord or property management company), who runs everything from one account. There are no subscriptions or plans, and nobody can sign up as a new owner: every other account (staff, tenants, maintainers, landlords) is created by the owner.
How it fits together
- Owner – the landlord or property management company that runs the system. Manages properties, tenants, money, maintenance, staff, the website and all settings.
- Staff – managers, accountants, front desk and any custom roles the owner creates, each with chosen permissions.
- Tenants, maintainers and landlords – log in to their own portal to see only what belongs to them.
- Public website – a property listing website that visitors can browse without logging in.
- Mobile apps – Android and iPhone apps for tenants and maintainers, connected through the built-in API.
A typical day for an owner
- Add properties and units, then publish them on the public website.
- Visitors enquire, book viewings and apply online; these arrive as leads and applications.
- Approve an application and the tenant account is created, with lease dates and rent.
- Invoices are created every month; tenants pay online, by pay link or by autopay.
- Tenants report repairs; maintainers update progress until the job is done.
- Reports show income, expenses, arrears and profit at any time.
User Roles
Every user has a role. A role decides which menus a user sees and what they are allowed to do. Owners can edit the permissions of each role, or create new roles, under Staff Management → Roles.
| Role | What they can do |
|---|---|
| Owner | Full access to everything: properties, tenants, finance, maintenance, reports, website, landing page (CMS), staff, roles and all settings. There is exactly one owner account. |
| Manager | Day-to-day work: tenants, maintainers, properties, units, maintenance and invoices. No access to roles, reports or company settings by default. |
| Accountant | Created by default. Focused on invoices, expenses and reports. |
| Front Desk | Created by default. Focused on leads, applications, visitors and tenants. |
| Landlord | For property owners whose homes you manage. Sees only their own properties, a statement of income and expenses, and payouts. |
| Tenant | Sees their own property and unit, invoices (and pays them online), agreement (signs it online), repair requests, notices and community features. |
| Maintainer | Sees only the repair jobs assigned to them, updates status, adds costs, photos and comments. |
Login details for each demo role are listed in the Default User Login Details section.
Properties & Units
| Feature | What it does |
|---|---|
| Properties | Add each building or house with type, address, photos, description, amenities and advantages. Mark it for rent or for sale and show it on the website. |
| Units | Each property can have many units (flats, rooms, shops) with bedrooms, bathrooms, kitchen, rent, deposit and rent type. |
| Bulk units | Create many units at once using a floor and number pattern (for example A-101 to A-120), up to 500 at a time. |
| AI listing writer | Writes a property description from the facts you entered. Works with AI turned on, or with a built-in template without AI. |
| Types, amenities, advantages | Your own lists of property types, amenities (pool, gym, parking) and advantages, managed under System Configuration. |
| Occupancy | Each unit shows whether it is free or let. The dashboard shows the vacancy rate. |
Where: Real Estate → Properties / Units; System Configuration → Types, Property Amenity, Property Advantages.
Tenants & Leases
| Feature | What it does |
|---|---|
| Tenant profiles | Personal details, property and unit, lease start and end dates, rent and documents. A login is created so the tenant can use their portal and the mobile app. |
| Agreements | Create rental agreements with your terms. The tenant signs online; a PDF copy with the signature is emailed and kept with a record of who signed and when. |
| Security deposits | A deposit ledger records money received, deductions and refunds for each tenant. |
| Document vault | Store tenant documents (ID, contract, insurance) with expiry dates. Reminders are sent before a document expires. |
| Move-in checklist | A checklist for each new tenant (keys, meter readings, documents) that you tick off as you go. |
| Rent increases | Schedule a new rent from a future date. It is applied automatically and future invoices use the new amount. |
| Lease renewal and exit | Renew a lease with new dates, or record a tenant leaving with the exit amount, charges and reason. |
| Calendar | One calendar with lease start and end dates, invoices due, maintenance, viewings, inspections and bookings, with filters. |
Where: Business Management → Tenants; Agreement; Calendar.
Invoices, Payments & Expenses
| Feature | What it does |
|---|---|
| Invoices | Create invoices for rent and other charges. The status (open, partially paid, paid) updates itself as payments come in. |
| Recurring and bulk invoices | Monthly rent invoices are created automatically for each tenant. You can also generate one month’s rent for all tenants in one click. |
| Online payment | Tenants pay with Stripe, PayPal, Flutterwave, Paystack, Razorpay or bank transfer, using the gateways the owner has set up. |
| Pay links | Send a secure link so a tenant can pay an invoice without logging in. |
| Autopay | Tenants can save a card (Stripe) or set up Razorpay so rent is charged automatically on the due date. |
| Late fees | A fixed amount or percentage is added to overdue invoices automatically, using the owner’s rules. |
| Receipts, credit notes and refunds | Download PDF receipts, issue credit notes and record refunds. Refunds reduce income in the reports. |
| Reminders | Payment reminders by email (and SMS / WhatsApp when Twilio is set up). |
| Expenses | Record costs per property with receipts. One expense can be split across several properties. |
| Utility billing | Record meter readings (water, electricity, gas) and turn the usage into an invoice. |
Where: Finance → Invoices / Expense / Utility Billing; Autopay (tenant menu).
Maintenance
| Feature | What it does |
|---|---|
| Repair requests | Tenants report problems with photos and a preferred date and time. Staff assign the job to a maintainer. |
| Job progress | Maintainers mark jobs as in progress and completed, add the cost, labour hours, an invoice and before/after photos. An "On my way" button lets the tenant know they are coming. |
| Ratings | Tenants rate the work when a job is completed. |
| AI triage | Suggests the category and urgency of a new request (when AI is turned on). |
| Preventive maintenance | Schedule regular jobs (for example servicing the lift every 3 months). Requests are created automatically when due. |
| Inspections | Room-by-room inspections with conditions, notes and photos, signed by the tenant. |
| Vendors | Keep a list of outside companies and link them to jobs. |
Where: Maintenance → All Requests / Pending / In Progress / Preventive Maintenance / Inspections / Vendors.
Leads & Rental Applications
| Feature | What it does |
|---|---|
| Leads | Enquiries from the website, phone or walk-ins in one list with status, notes and follow-up. |
| Viewings | Visitors book a viewing time on the website from the free slots you set (days, hours, length, visitors per slot). |
| Applications | Visitors apply online for a unit and upload documents. Approving an application creates the tenant for you. |
| Lead expiry | Old leads are closed automatically after the number of days you choose. |
Where: Leads; Applications.
Community Features
| Feature | What it does |
|---|---|
| Notice board | Post notices that tenants, staff and maintainers see on their dashboard. |
| Facilities | Tenants book shared facilities (gym, hall, BBQ area) in free time slots; double bookings are prevented. |
| Visitor passes | Tenants create a pass for a guest; staff at the gate check it on the Gate / Visitors page. |
| Parking | Manage parking slots and assign them to tenants. |
| Polls | Ask tenants a question; each tenant votes once and you see the results. |
| Reviews | Tenants write a review that, once you approve it, can be shown on your website. |
| Contact diary | An address book of useful contacts for your team. |
Where: Community → Facilities / Visitor Passes / Parking / Polls; Notice Board; Contact Diary.
Dashboards & Reports
Each role has its own dashboard. The owner's dashboard shows totals for properties, units and tenants, this month's income and expenses, pending payments, vacancy rate, overdue invoices, open repair requests and revenue charts.
| Report | Shows |
|---|---|
| Income / Expense / Profit & Loss | Money in and out by period and property. |
| Property Unit | Occupancy and rent for every unit. |
| Tenant History | Past and current tenants with lease dates. |
| Maintenance | Requests by status, cost and maintainer. |
| Ledger | Every charge and payment for a tenant or property, like a bank statement. |
| Tax Summary | Income and expenses grouped for tax filing. |
| Arrears Ageing | Unpaid rent grouped by how late it is (0–30, 31–60, 61–90, 90+ days). |
| Rent Roll | All units with tenant, rent, lease dates and balance. |
| Landlord Payouts | What is owed to each landlord after expenses and fees. |
Most reports can be downloaded as CSV or PDF.
Notifications, AI & Automation
| Feature | What it does |
|---|---|
| Email notifications | Ready-made email templates for new tenants, invoices, payments, repairs and more. Owners can edit the wording. |
| SMS and WhatsApp | Send messages through Twilio when it is set up in Settings. |
| Push notifications | Browser notifications on the website, and phone notifications in the mobile apps (Firebase). |
| AI tenant assistant | Tenants chat with an assistant that answers questions about their rent, invoices and repairs. Owners can read the chats under Tenant Chats. |
| AI writer | Helps write descriptions, notices and emails on many forms. |
| AI providers | Works with OpenAI, Anthropic Claude or Google Gemini, with an optional backup provider if the first one fails. |
| n8n webhooks | Send events (new user, new tenant, new maintainer, repair completed) to n8n to build your own automations. |
| Activity log | Logged History shows who logged in, when and from where. |
Where: System Configuration → Email Notification; Settings → Twilio / AI Settings; N8N; Assistant / Tenant Chats.
Owner Website
The system includes a public website at yourdomain.com/web/OWNER-CODE (or on your own domain). Visitors who open yourdomain.com are sent there automatically when the landing page is turned off. Visitors can browse properties, enquire and apply without logging in. The owner builds it under System Configuration → Frontend Manager.
| Feature | What it does |
|---|---|
| Home page builder | Turn sections on or off and drag them into order: banner with search, highlights, numbers, featured properties, amenities, about, team, listings, gallery, video, promo, call to action, testimonials, partners, FAQ and map. |
| Pages | Add your own pages (About Us, Services, House Rules, Privacy Policy...) and show them in the menu. |
| Design | Choose colours, font, layout style (classic, modern, minimal), button shape and light/dark mode. Visitors can switch to dark mode. |
| Property search | Search by location, rent or buy, type, bedrooms and price, with list and map views. On phones, extra filters fold away behind "More filters". |
| Property pages | Photo gallery, facts, description, amenities, units, map, enquiry form, viewing booking, Apply button, sharing and similar properties. |
| Visitor tools | Save favourite properties, compare up to 3 side by side, and sign up for email alerts when new matching properties are listed. |
| Contact | Contact page with address, phone, email, opening hours and WhatsApp, plus a floating WhatsApp button. |
| Blog | Publish articles to attract visitors and help search engines find you. |
| Reviews | Show testimonials and approved tenant reviews. |
| Languages | Offer the website in several languages with a language switcher; Arabic is shown right-to-left. |
| SEO | Page titles and descriptions, share images, clean property web addresses, sitemap, structured data for Google, Google Analytics and Facebook Pixel. |
| Custom domain | Connect your own domain (for example www.myrentals.com). Your server must point the domain to the system and provide SSL. |
| Website stats | See property page views and how many turned into enquiries, viewings and applications. |
| Cookie notice | A cookie consent notice with a link to the privacy page. |
The website works on phones, tablets and computers.
Mobile Apps
The package includes the source code of a Flutter mobile app for tenants and maintainers, in two separate projects: mobile_app/android_app and mobile_app/iphone_app. You build it with your own app name, logo and colours and publish it under your own developer account.
| Who | What they can do |
|---|---|
| Tenants | Home screen with what is due, invoices and receipts with a Pay now button (opens the secure payment page), repair requests with photos and ratings, agreement and inspection signing, deposit, documents, meter readings, notices, facility bookings, visitor passes, polls and the AI assistant chat. |
| Maintainers | Assigned jobs and schedule, status updates, "On my way", costs, photos and comments. |
| Push notifications | Phone notifications with an in-app inbox, set up from Settings → Mobile App using your Firebase project. |
| Same accounts | Users log in with the same email and password they use on the website. |
| Languages | The app follows the user’s language. |
Step-by-step build and publishing guides are inside each project's documentation folder (android.html and ios.html).
Owner Administration
This edition is for a single business, so the Owner is also the system administrator. There is no super admin, no subscription plans and no public sign-up page.
| Feature | What it does |
|---|---|
| Staff users | Add managers, accountants, front desk staff or users with your own roles. Tenants, maintainers and landlords are added from their own menus. |
| Roles & permissions | Choose exactly what each role can see and do. Ready-made Manager, Accountant, Front Desk, Tenant, Maintainer and Landlord roles are included. |
| No limits | Add as many users, properties, units and tenants as you need. Every feature is available; nothing depends on a plan. |
| No public registration | Only the owner creates accounts. The registration page is switched off and cannot be turned on. |
| Feature switches | Under Settings → General the owner can turn the Landing Page, AI features and n8n automation on or off. |
| CMS | Edit the landing page, custom pages, FAQ, footer and login page. |
| Logged History | See every login: who, when, IP address and device. |
| Updates | After uploading a new version, log in as the owner and the update wizard runs the database changes for you. |
Where: Staff Management → Users / Roles / Logged History; CMS; Settings → General.
Settings & Integrations
| Settings tab | Used for |
|---|---|
| General / Company | App name, logo, favicon, currency, date and time format, timezone, invoice prefixes, late fee rules, and the Landing Page, AI and n8n switches. |
| SMTP details for sending emails, with a test email button. | |
| Payment | Payment gateway keys: Stripe, PayPal, Flutterwave, Paystack, Razorpay and bank transfer, used for tenant rent and invoice payments. |
| Site SEO | Title, description and share image for the landing website. |
| Google reCAPTCHA | Protects the login and public forms from bots. |
| 2 Factors Authentication | Extra login security with an authenticator app (Google Authenticator and similar). |
| Cloud Storage | Store uploaded files on the server, Amazon S3 or Wasabi. |
| Agreement | Default terms and conditions used in rental agreements. |
| Twilio Settings | SMS and WhatsApp messages. |
| AI Settings | Choose the AI provider (OpenAI, Anthropic Claude, Google Gemini), model and backup provider. |
| Mobile App | The API address the apps connect to, and the Firebase settings for phone push notifications. |
| Cronjob Settings | The key and command for the daily cron job (see Cron Job Setup). |
Which tabs a user sees depends on their role. The owner sees every tab; other users see only their own profile, password and 2FA settings.
Languages
The system comes in 12 languages: English, Arabic, Danish, Dutch, French, German, Italian, Japanese, Polish, Portuguese, Russian and Spanish. Arabic is shown right-to-left.
- Each user chooses their language from the language menu at the top of the page.
- Owners choose the main language of their website and which other languages visitors can switch to (Frontend Manager → Design).
- Text the owner writes (website sections, pages, header and footer) can be entered once per language.
Changing or adding translations
Translations are stored in main_file/resources/lang, one JSON file per language (for example french.json). Edit the right-hand text to change a translation. To add a new language, copy english.json and the english folder to the new language name and translate them. Back up your changes before upgrading (see Software Upgrade Process).
Software Upgrade Process
Before proceeding with the update, ensure that you have completed a full backup of your software.
Important Notes:
1. Language Files Modifications:
- If you have modified any language files, your changes will be overwritten. The new version will come with updated language files, and your previous customizations in resources/lang will be lost.
- It's highly recommended that you back up your edited language files for future reference.
2. File Modifications:
- Any changes made to the software's core files will be lost after the update. Ensure that you have backed up any customizations or modifications.
3. Disclaimer:
- We are not responsible for any data loss that occurs during a manual update. Please ensure that you follow the backup instructions carefully.
Backup Instructions:
1. Files to Back Up:
- .env file
- .htaccess file
- storage directory
2. Update Process:
- Upload and replace all the files & folders on your server with the contents of the main_file folder from the new version.
- Restore your .env, .htaccess, storage files and folder back onto your server.
- Log in to the software and follow the steps in the update wizard to complete the process.
Support
If you have any queries, please create a support ticket, and our support team will respond as soon as possible.