Overview
This documentation provides a step-by-step guide for installing, configuring, and upgrading the software. It also includes server requirements, database setup, file upload instructions, login credentials, the required cron job, and a feature-by-feature guide to documents, approvals, e-signatures, sharing, reminders, AI, security, the mobile apps and SaaS administration.
Server Requirement
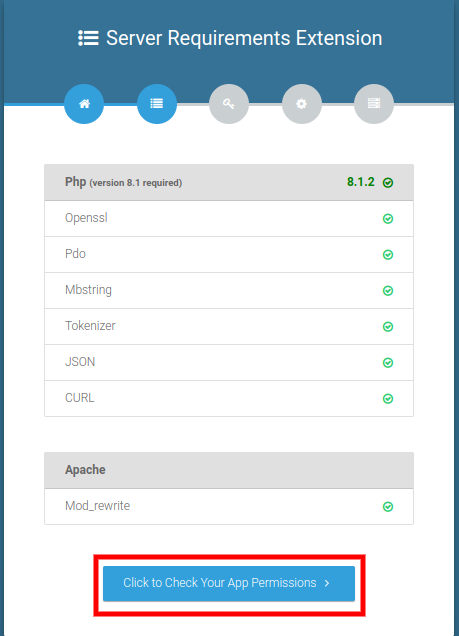
Laravel requires certain minimum PHP versions and extensions. Make sure your web server supports the following:
- PHP >= 8.1
- cURL PHP
- DOM PHP
- Fileinfo PHP
- Filter PHP
- Hash PHP
- Mbstring PHP
- OpenSSL PHP
- PCRE PHP
- PDO PHP
- Session PHP
- Tokenizer PHP
- XML PHP
Minimum PHP Version:
Required PHP Extensions:
How to Create Database
Step 1: Access the Database Creation Tool
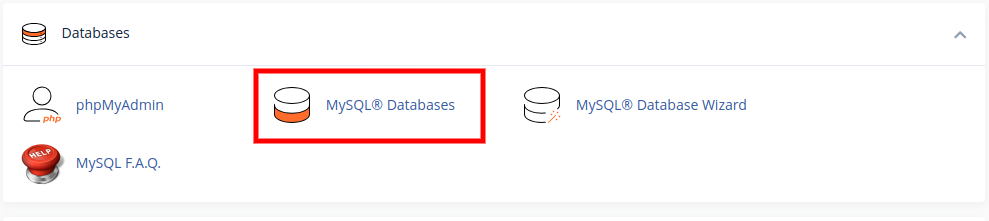
First, navigate to the Databases section of your hosting panel. Click on MySQL® Databases to begin the process. This tool allows you to create and manage your databases and database users.
Step 2: Create a New Database
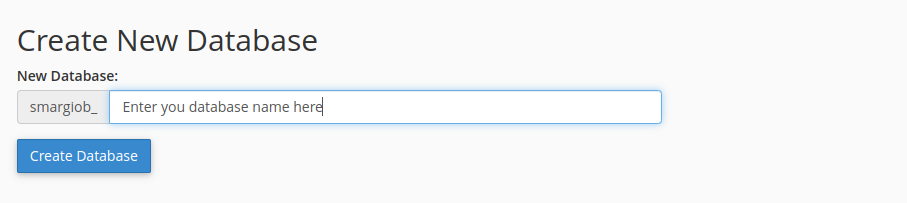
On the next screen, you will be able to create a new database. You will see a field to enter the name of your new database. The hosting provider automatically adds a prefix to the database name for security. After entering the name, click Create Database.
Step 3: Create a New User
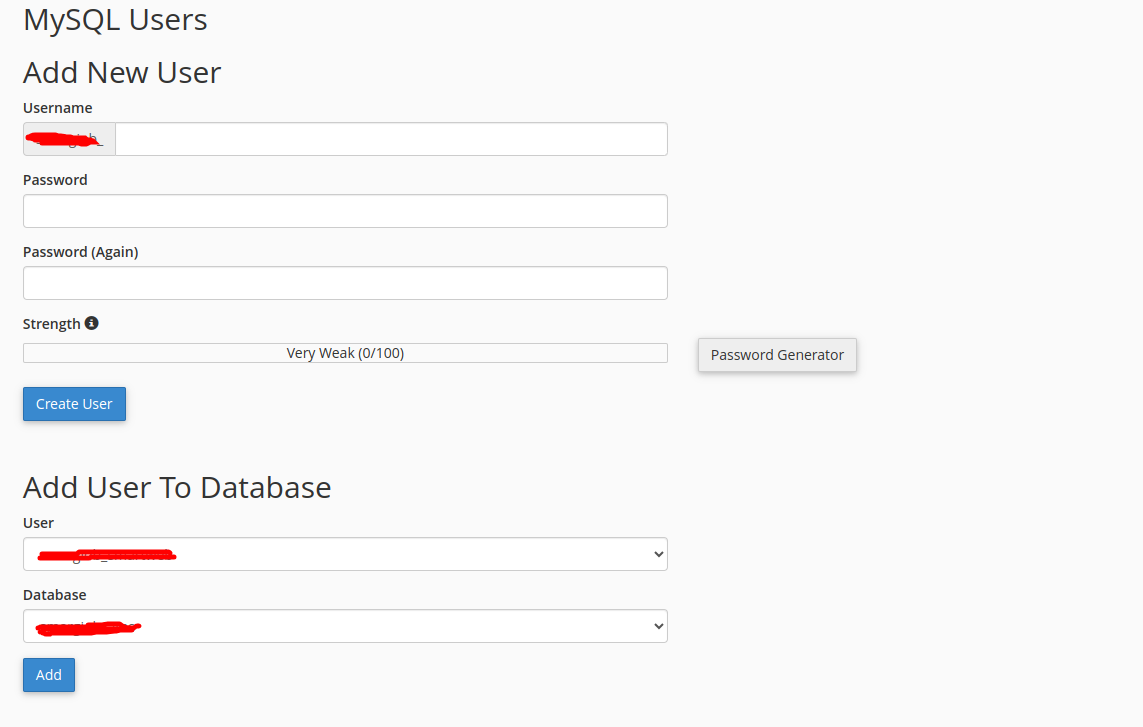
After creating the database, you'll need to create a user for it. Scroll down on the same page to the Add New User section. Enter a Username and a strong Password in the provided fields. Use the Password Generator tool to create a secure password. Click Create User to save the new user.
Step 5: Assign Privileges
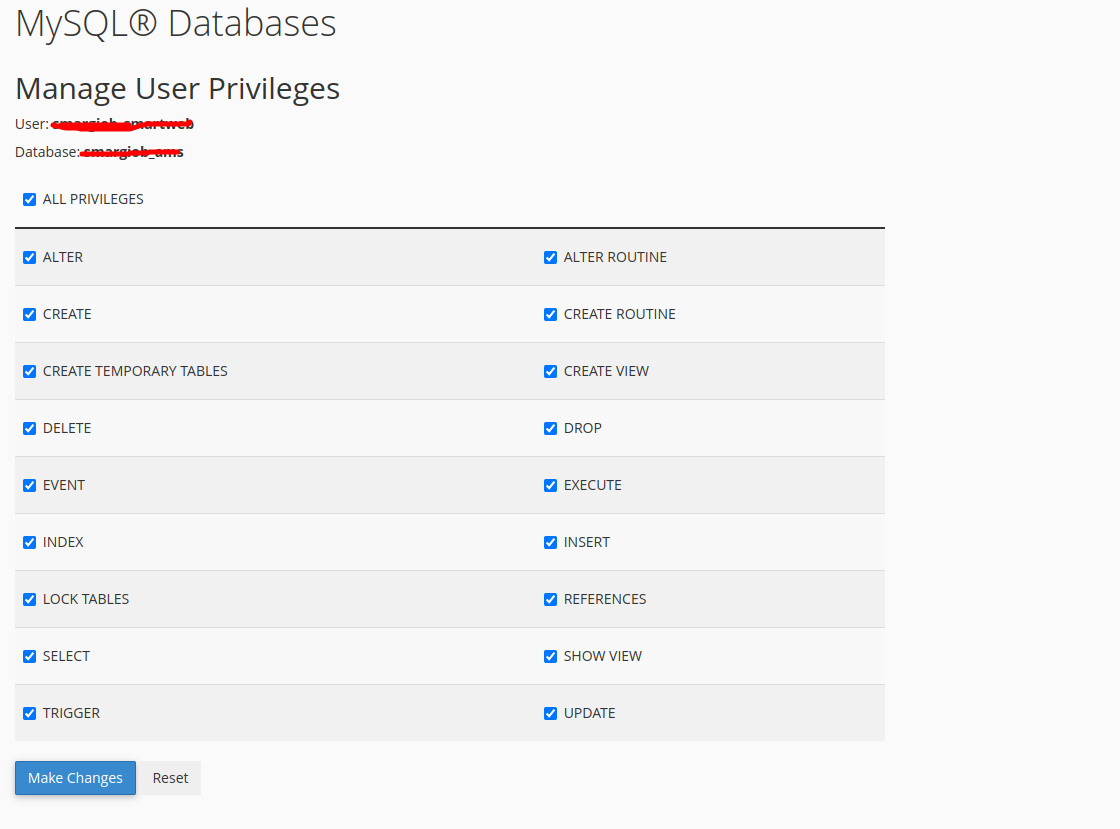
The final step is to grant the new user permissions to manage the database. On the Manage User Privileges page, check the box for ALL PRIVILEGES. This gives the user full control over the database, allowing them to create, modify, and delete tables and data. Click Make Changes to finalize the process. Your database and user are now set up and ready to use.
How to Upload Files
Step 1: Access the File Manager
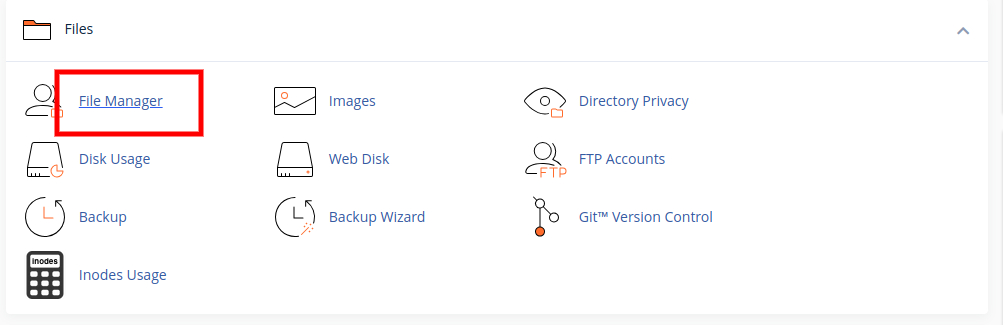
Log in to your cPanel account. In the main menu, look for the Files section and click on File Manager. This will open the file manager interface in a new tab.
Step 2: Navigate to the Correct Folder
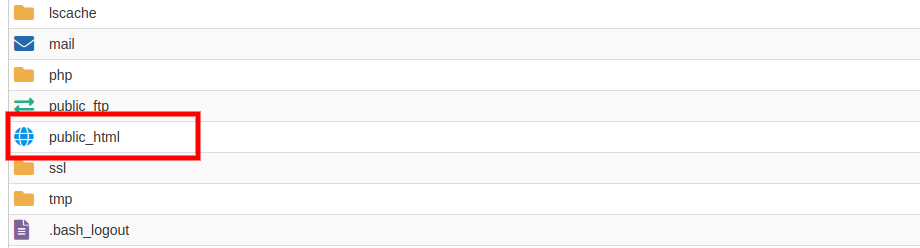
In the File Manager, navigate to the folder where you want to upload your files. For a primary domain, this is typically the public_html folder. This folder is the "web root" and contains all the files that are accessible to the public on your website.
Step 3: Select and Upload Files
Once you are in the correct directory, click the Upload button in the toolbar at the top of the page. This will open a new window where you can drag and drop your files or click Select File to browse for files on your computer.
Step 4: Verify the Upload
After the upload is complete, you should see a 100% progress message. The uploaded file should now appear in the folder you selected in the File Manager.
How to Install
Step 1: Start the Installation
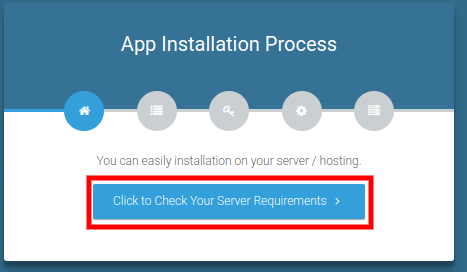
Open a web browser and navigate to your website's installation URL, which is typically yourdomain.com/install. This action will initiate the installation process and lead you to the App Installation Process page.
Step 2: Check Server Requirements
The next step is to ensure your server meets all the necessary requirements for the application. Click the "Click to Check Your Server Requirements" button to proceed.
Step 3: Verify App Permissions
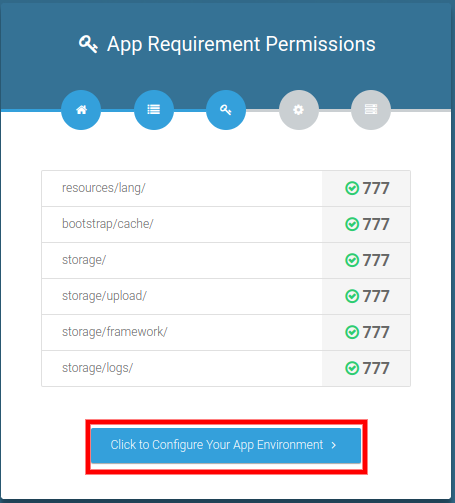
After confirming the server extensions, the installer will check the necessary directory permissions. Ensure all permissions are correct (often shown with a green checkmark next to them) and then click "Click to Configure Your App Environment".
Step 4: Configure App Environment
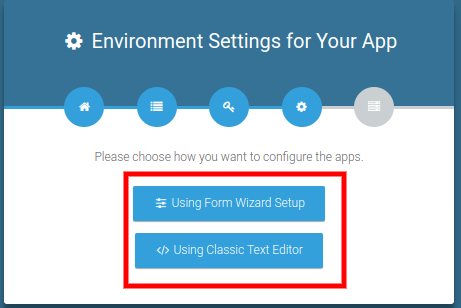
You will be given options to configure the app's environment. For a straightforward installation, select "Using Form Wizard Setup".
Step 5: Enter App and Database Details
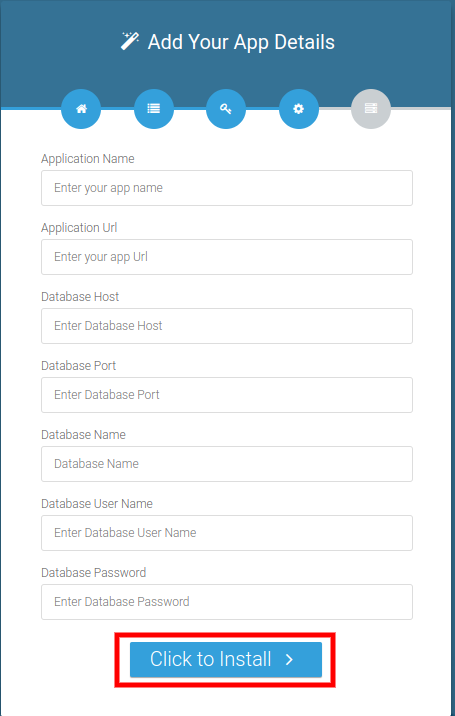
This is a critical step where you link the application to your database. Fill in the required fields with the information you gathered when setting up your database. This includes the Database Host, Database Name, Database User Name, and Database Password. You will also need to enter an Application Name and Application Url. Once all the details are entered, click "Click to Install".
Step 6: Finalize Installation
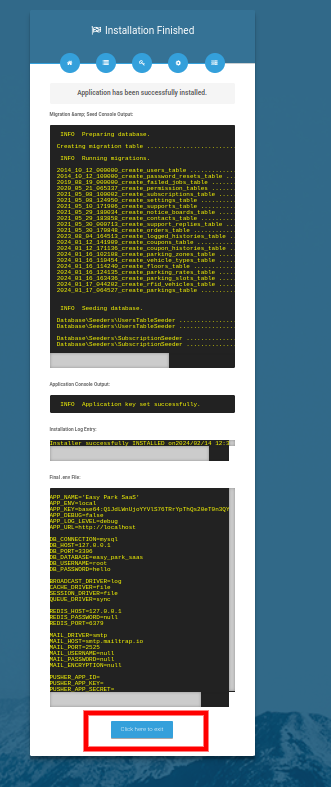
The installer will now run the installation process, which includes preparing the database and running migrations. Once you see the "Application has been successfully installed" message, you have successfully completed the process. Click "Click here to exit" to finish.
Default User Login Details
Email : superadmin@gmail.com
Password : 123456
Email : owner@gmail.com
Password : 123456
Email : manager@gmail.com
Password : 123456
Email : employee@gmail.com
Password : 123456
Email : client@gmail.com
Password : 123456
Cron Job Setup (Required)
Reminders, expiry alerts, plan renewals, trash clean-up and several other features run on a schedule. For them to work, the server must run Laravel's scheduler every minute. Set this up right after installation.
Step 1: Add one cron entry
In cPanel open Cron Jobs, choose Once Per Minute and paste the command below (change the path to your main_file folder and use the PHP 8.1+ binary of your hosting):
* * * * * cd /home/youraccount/public_html/main_file && php artisan schedule:run >> /dev/null 2>&1
On your own server (VPS), add the same line with crontab -e for the user that owns the storage folder. That user must be the same one the web server writes files as, otherwise cache and upload folders can become read-only for the website.
Step 2: What runs automatically
| When | What it does |
|---|---|
| Every minute | Sends due reminders and moves repeating reminders to their next date. |
| 01:00 | Downgrades expired plans and e-mails owners 7, 3 and 1 day before their plan ends. |
| 02:00 | Deletes documents that have been in the Trash longer than the retention period (30 days by default). |
| 03:00 | Applies each company's retention policies: archives or trashes old documents. Documents on legal hold are never touched. |
| 04:30 | Indexes new and changed documents for "Ask documents" (companies that turned AI on). |
| 08:00 | Document expiry alerts: 30, 7 and 1 day before and on the expiry date (companies can choose their own days). |
| 09:00 - 09:30 | Reminds approvers, people who still have to sign and people who owe documents on a file request. |
| Monday 07:00 | Weekly summary e-mail for owners who turned it on. |
| Sunday 05:00 | Checks every company's audit trail and files for changes and alerts the owner if something does not match. |
Notifications only go out over the channels (e-mail, SMS, WhatsApp) a company enabled in Email Notification. If every channel is off nothing is sent, by design. For a faster page response you can also run php artisan queue:work and set QUEUE_CONNECTION=database in .env (optional).
System Overview
Smart DMS is a document and records management system sold as a SaaS (software as a service). You (the Super Admin) run the platform. Companies sign up, choose a plan and manage their own documents inside it. Each company's data is kept completely separate from other companies.
How it fits together
- Super Admin – runs the platform: plans and pricing, coupons, the landing website, payment gateways and global settings.
- Owner – the company. Manages documents, folders, people, workflows and settings.
- Staff – managers, employees and any custom roles the owner creates, each with chosen permissions.
- Clients – the owner's customers. They log in to a simple portal and see only the documents assigned to them.
- People outside the company – can open a document through a share link, or upload files through a file request link, without an account.
- Mobile apps – Android and iPhone apps (add-on) connected through the built-in mobile API.
A typical day for an owner
- Create folders, categories and stages once, then upload documents (or scan paper with the camera, import a ZIP, or e-mail them in).
- Ask a colleague to approve a contract, then ask the client to sign it online.
- Share a document with someone outside the company through a password-protected link that expires.
- Set a reminder or an expiry date; the system tells the right people in time.
- Ask the AI assistant "Which documents expire this month?" or search inside the text of all files.
- Open Reports to see activity, approvals and the audit trail, and download the audit report as a PDF.
User Roles
Every user has a role. A role decides which menus a user sees and what they are allowed to do. Owners can edit the permissions of each role, or create new roles, under Staff Management → Roles.
| Role | What they can do |
|---|---|
| Super Admin | Runs the SaaS platform: customers (owners), packages, coupons, transactions, the landing website (CMS) and system settings. Can log in as any owner to help them (impersonate). |
| Owner | Full access to their own company: documents, folders, approvals, signatures, reminders, reports, security, API tokens, staff and settings. |
| Manager | Day-to-day work with documents, clients, approvals, signatures and reminders. No access to company settings and plan pages by default. |
| Employee | Works with the documents they created or that were shared with them. Cannot see other people's documents unless the owner changes the permissions. |
| Custom roles | Owners can create any number of roles and tick exactly which actions each role may do (view, create, edit, delete, archive, share, approve and more). |
| Client | Sees only documents assigned to them in a simple portal. Can open and share them, upload files to the company, and sign documents or answer signature requests. |
Good to know: staff see the documents they created plus anything shared with them; the owner sees every document of the company. A restricted document or folder can only be opened by the owner, its creator and the people it was shared with.
Documents & Folders
| Feature | What it does |
|---|---|
| Documents | Each document has a name, number, category, sub-category, tags, stage, description, optional expiry date and optional client. One document can hold several files (up to 10 per upload). The document number prefix can be changed in Settings. |
| Folders | A folder tree up to 5 levels deep. A folder can be restricted so only chosen members (and the owner) can enter it. Choosing a folder in a list also shows everything inside it. |
| Categories, tags & stages | Your own lists: categories with sub-categories, colour tags and workflow stages (for example Draft, In Review, Approved). Managed under System Configuration. |
| Search & filters | One search bar looks at the name, number, description, category, tags and the text inside files. Filter by category, folder, client, tag, stage and date range, and save a filter combination to reuse it with one click. |
| Bulk actions | Tick many documents and archive, unarchive, change the stage, move to a folder or move to the Trash in one step. |
| Versions | Upload a new version of a file at any time. See the version history, compare two versions side by side, and restore an older one. Every version is fingerprinted so changes can be detected later. |
| Comments | Team members can discuss a document in its comment thread. |
| Archive and Trash | Archive documents you no longer use but want to keep. Deleted documents go to the Trash and can be restored until the retention period ends (30 days by default). |
| Scan to PDF | Take photos of pages (JPG, PNG, WebP or HEIC, up to 20 pages) and join them into one PDF document. The mobile app does this with the phone camera and edge detection. |
| Import | Bring many documents in at once from a ZIP file with an optional CSV manifest (name, category, tags, stage, expiry date), or send documents by e-mail to a private address and they become documents. |
| Cloud import | Each person can connect Google Drive, OneDrive or Dropbox and import chosen files (up to 20 at a time, 20 MB each). Google Docs, Sheets and Slides are copied as PDF. |
| Document templates | Write a template with merge fields (such as the client name and date) and generate a PDF document from it in one click. An AI draft helper can write a first version. |
| Document request | Ask a person outside your company to upload files (ID, licence, signed forms) through a public link with a checklist and due date. Uploads wait for your approval, and reminders go out before the due date. |
| Duplicates | The duplicate finder lists files that are exactly the same so you can clean them up. |
| Limits | Plans can limit the number of documents and the storage used; uploads are refused with a clear message when a limit is reached. Uploaded files are scanned for viruses when scanning is installed on the server. |
Where: Documents → All Documents / My Documents / Folders / Document Request / Scan to PDF / Import / Cloud import / Templates / Archive Documents / Trash; System Configuration → Category, Sub Category, Tags, Document Stage.
Approvals & E-Signatures
| Feature | What it does |
|---|---|
| Approval requests | On a document choose Ask for approval, pick one or more approvers from your team, add a note and a due date. Approvers are told by e-mail and in the app and decide with Approve or Reject (a reason is needed to reject). |
| Approval chains | Turn on One after the other and each person is asked only when the one before has approved. Optionally move the document to a chosen stage when everyone approved. |
| Reminders for approvers | Approvers whose request is due tomorrow or overdue get a reminder automatically. |
| Signature requests | On a PDF choose Ask for signatures, pick staff and clients, set the order (one after another or any order), a due date and a message. Each signer draws a signature, chooses the page and position and signs; they can also decline with a reason. |
| Signed copy and certificate | The signature is stamped into the PDF. When everyone has signed, a signing certificate (who signed, when, from which address and the file fingerprint) can be downloaded, and all parties are told. |
| Replaced files | If the document gets a new version after the request was sent, the old request can no longer be signed, so nobody signs an outdated file. |
| Client portal signing | Clients can also sign a PDF assigned to them straight from their portal. |
| Watermark | Add a text or image watermark to protect a document; it is stamped on shared and signed copies. |
Where: Workflow → Approvals / Signatures; on a document use the action menu: Ask for approval, Ask for signatures, Watermark.
How to ask for a signature
- Open the document and choose Ask for signatures (the file must be a PDF).
- Choose the signers in the order you want. Switch on One after the other if needed.
- Add a due date and a message and press Send. The first signer is asked right away.
- Follow the progress under Workflow → Signatures. Cancel the request if it is no longer needed.
Sharing & Client Portal
| Feature | What it does |
|---|---|
| Share with your team | Give chosen team members access to a document for a period of time. They see it in their list while the share is active. |
| Public share links | Make a link anyone can open without an account. Options: end date, password, maximum number of views, allow or block download, and a list of allowed e-mail addresses (each person gets a one-time code by e-mail). Switch a link off at any time; the page shows how often it was viewed. |
| Personal data check | Before you share, the system warns when the text looks like it contains personal data (ID numbers, card numbers). |
| Client portal | Clients log in to a simple page: their documents, upload to the company, signature requests and messages. They cannot see any other document or menu. |
| Assign to a client | Choose a client on the document to make it appear in their portal. A document can belong to one client at a time. |
| Restricted documents | Mark a document as restricted so only the owner, its creator and the people it was shared with can open it. |
Where: On a document: Share, Share link; Documents → Document Request; Clients under Home.
Reminders & Notifications
| Feature | What it does |
|---|---|
| Reminders | Create a reminder with a subject, message, date and time, optionally linked to a document and assigned to team members. Repeat it daily, weekly, monthly or yearly. A calendar view shows all reminders. |
| Expiry alerts | Give a document an expiry date and the owner gets an alert 30, 7 and 1 day before and on the day (each company can choose its own days). |
| Inbox | The bell shows messages for approvals, signatures, reminders, expiry and client activity. Each person chooses which kinds of messages they want in the app and which by e-mail under Notification settings. |
| E-mail, SMS and WhatsApp | Notification templates can be edited and switched on or off per channel. SMS and WhatsApp use your Twilio account. |
| Weekly summary | Owners can receive a short summary of the week every Monday. |
| Push notifications | The mobile app shows every inbox message as a phone notification (needs the Firebase set-up of the mobile app). |
Where: Workflow → All Reminders / My Reminders; System Configuration → Email Notification; Inbox (bell) → Notification settings; Settings → Twilio.
AI Assistant & Search
| Feature | What it does |
|---|---|
| AI assistant | A chat button on every page. It answers questions about the person's own documents and quotes its sources, explains how to do things in the system, gives counts (approvals, expiring documents, signatures) and turns "remind me on 1 March to renew the Acme contract" into a reminder you confirm. |
| Ask documents | Search the meaning of your documents in plain language, not just words. Documents are indexed in the background. |
| Summaries & extraction | Write a short AI summary of a document and pull out key facts. Results are saved on the document. |
| AI templates | Describe a document and let AI write a first draft of a template. |
| Several AI providers | Each company chooses OpenAI (ChatGPT), Anthropic Claude or Google Gemini and an optional backup provider that takes over when the first one fails. The company's own API key and model name are entered under Settings. |
| Privacy | The assistant asks the person for permission before it reads their documents, and the permission can be withdrawn. Each person has a daily limit so costs stay under control. |
| OCR | Scanned pages and images can be read with the optional OCR tool (Tesseract) so their text becomes searchable. |
Where: Insights & AI → Ask documents (AI); chat button at the bottom right; Settings → OpenAI / AI.
Plan control: AI features follow the package; the Super Admin can turn them on or off per plan.
Security, Compliance & Audit
| Feature | What it does |
|---|---|
| Roles and permissions | Fine-grained permissions per role; clients and staff only see what they should. |
| Two-factor authentication | Every user can turn on 2FA with an authenticator app. Owners can require it for the whole company. |
| Single sign-on | Let the team sign in with your own identity provider (any OpenID Connect provider: Google Workspace, Microsoft Entra ID, Okta, Keycloak). Only people who already have an account can sign in. |
| Audit trail | Every action on a document (create, view, edit, share, sign, delete) is written to the Document History. Each entry is chained to the one before it, so any change or deletion afterwards is detected. |
| Integrity check | Check at any time that the history and the stored files are untouched. A weekly automatic check alerts the owner when something does not match. Download the audit trail as a PDF. |
| Retention policies | Archive or trash documents automatically after a number of days, per category. Choose the days for expiry alerts. |
| Legal hold | Put a document on legal hold and it cannot be deleted, replaced or removed by a policy until the hold is lifted. |
| Privacy tools | Each person can download their personal data or ask for it to be erased, and the system keeps dated consent records. |
| Safe uploads and links | File types are checked by content, scripts are never executed, documents are served only after an access check, and share links can be switched off. |
| Sign-in protection | Repeated wrong passwords lock the sign-in for a short time; Google reCAPTCHA can be turned on for the login and register pages. |
Where: Security & Automation → Security / Retention; Insights & AI → Document History / Reports; Settings → 2FA, Google reCAPTCHA.
API, Webhooks & Imports
| Feature | What it does |
|---|---|
| REST API | Owners and staff can create personal access tokens (read, or read and write) under API Tokens and use them to list, search, create, update and download documents from other software. A staff token can never do more than its user. |
| Webhooks and n8n | Send events (document created, approved, signed, expiring...) to n8n or any URL. Outgoing calls are signed so the receiver can check them. |
| Mobile API | The Android and iPhone apps use a separate mobile API with a login token for each phone, push notification support and remote sign-out. |
| Cloud storage | Keep files on the server (Local), on AWS S3 or on Wasabi. |
| Payments | Stripe (with Checkout and plan upgrade proration), PayPal, Flutterwave, Paystack, Razorpay and Bank Transfer for subscription plans. |
| E-mail to document | Each company gets a private address; mail sent to it creates documents from the attachments. |
Where: Security & Automation → API Tokens / N8N; Documents → Import / Cloud import; Settings → Storage, Payment.
Technical guides for developers are in documentation/guides: API.md, MOBILE_API.md, WEBHOOKS.md and DEPLOYMENT.md.
Dashboards & Reports
| Feature | What it does |
|---|---|
| Dashboard | Different for every role. Owners see document counts and the change since last month, a "Needs your attention" list (approvals, signatures, expiring documents, files to review, unread messages), a chart of documents added, plan usage and the most active people. Staff see their own work and clients see their portal. |
| Reports | Documents, activity per person, approvals (how many, how fast), expiring and expired documents, storage and the audit trail, for any date range. |
| Exports | Export lists and reports to Excel/CSV, PDF or copy to clipboard. |
| Document history | A searchable log of all actions, filterable by person, action and date, with CSV export. |
Where: Home → Dashboard; Insights & AI → Reports / Document History.
Mobile Apps
The Smart DMS mobile app (add-on) is a Flutter app for owners, staff and clients, delivered as two separate projects: android_app and iphone_app. You build it with your own app name and publish it under your own developer account. The same app works for every company: each company sees its own name, colour and logo.
| Area | What it does |
|---|---|
| Connect | On the website open Mobile app in the menu and scan the QR code with the app (or tap the invite link on the phone). The app remembers the website address, so nobody types it. |
| Sign in | Same email and password as on the website; two-factor codes are asked for when switched on. A fingerprint or face lock can protect the app. |
| Home | What needs attention: approvals, signatures, messages, expiring documents, reminders and the latest documents, with quick actions. |
| Documents | Search, filters, folders, PDF and image viewer, comments and activity. Edit details, upload a new version, archive, move to trash and restore, write an AI summary, make share links, keep files on the phone for offline reading. |
| Scan and upload | Scan paper with the camera (pages are straightened and joined into a PDF), turn photos into a PDF or upload a file. Clients can send documents to the company. |
| Approvals and signatures | Approve or reject in one tap, ask colleagues for approval, ask people to sign, sign with a finger and choose the page and position. |
| Assistant and reminders | Chat with the AI assistant, set reminders (also from a sentence) and manage them. |
| Inbox and push | All messages with push notifications; each person chooses which kinds they want. |
| Account | Edit profile, change password (other phones are signed out), see signed-in phones and sign any of them out. |
| Branding | The owner sets the app name, main colour and logo under More → Branding in the app. |
Step-by-step build and publishing guides are inside each project's documentation folder (android.html and ios.html). The website needs the mobile API (included) and an HTTPS address. Push messages need your own Firebase project: set FCM_CREDENTIALS in .env to the service-account file.
SaaS Administration (Super Admin)
| Feature | What it does |
|---|---|
| Customers | All companies (owners) on the platform. Create an owner, assign a package, activate or block, and log in as them to help (impersonate). |
| Packages | Create plans with a price, billing interval (monthly, quarterly, yearly or unlimited), free trial days and limits on users, documents and storage. |
| Package features | Turn features on per plan, such as AI, n8n and logged history. |
| Coupons | Percentage or fixed discount codes with limits, expiry and a history of who used them. |
| Transactions | All payments. Bank transfers wait for your approval; payments can be reviewed and refunds noted. |
| Payment gateways | Stripe, PayPal, Flutterwave, Paystack, Razorpay and Bank Transfer. Upgrading to a bigger plan credits the unused time of the old one. |
| Landing page CMS | Edit the public website: home sections, menu, pricing, FAQ, privacy policy, terms and the login page picture. Turn the landing page and the register page on or off. |
| Owner e-mail verification | Choose whether new owners must verify their e-mail address. |
| Pricing on/off | Hide pricing and give every owner all features when you do not want to sell plans. |
Where: Super Admin menu → Customers, Packages, Coupons, Transactions, Home Page, FAQ, Pages, Auth Page, Settings.
Settings & Integrations
| Feature | What it does |
|---|---|
| Account | Name, e-mail, phone, profile picture and password. Two-factor authentication. |
| Company | Company name, address, logo, favicon, date and time format, time zone, document number prefix and default language. |
| Email (SMTP) | Your mail server for all notifications, with a test button. |
| Payment | Keys for each payment gateway (Super Admin). |
| Site SEO | Meta title, description and image for the public pages. |
| Google reCAPTCHA | Protect the login and register forms. |
| Storage | Local, AWS S3 or Wasabi, with allowed file types and maximum size. |
| Twilio | SMS and WhatsApp credentials. |
| AI | Choose the AI provider, keys, models and a backup provider; turn the AI features on or off. |
| Theme | Light or dark mode, layout, font style, several colour presets and a custom colour picker, brand logo. |
| Languages | Choose the language of your own account from the language menu. |
Where: Settings (gear icon, top right) → the tab you need; System Configuration for lists such as categories and stages.
Languages
The system comes in 12 languages: English, Arabic, Danish, Dutch, French, German, Italian, Japanese, Polish, Portuguese, Russian and Spanish. Arabic is shown right-to-left.
- Each user chooses their language from the language menu at the top of the page.
- The mobile app follows the user's language when it is available in the app.
- Public pages (landing, privacy, terms) can be edited once per language.
Changing or adding translations
Translations are stored in main_file/resources/lang, one JSON file per language (for example french.json). Edit the right-hand text to change a translation. To add a new language, copy english.json and the english folder to the new language name and translate them. Back up your changes before upgrading (see Software Upgrade Process).
Software Upgrade Process
Before proceeding with the update, ensure that you have completed a full backup of your software.
Important Notes:
1. Language Files Modifications:
- If you have modified any language files, your changes will be overwritten. The new version will come with updated language files, and your previous customizations in resources/lang will be lost.
- It's highly recommended that you back up your edited language files for future reference.
2. File Modifications:
- Any changes made to the software's core files will be lost after the update. Ensure that you have backed up any customizations or modifications.
3. Disclaimer:
- We are not responsible for any data loss that occurs during a manual update. Please ensure that you follow the backup instructions carefully.
Backup Instructions:
1. Files to Back Up:
- .env file
- .htaccess file
- storage directory
2. Update Process:
- Upload and replace all the files & folders on your server with the contents of the main_file folder from the new version.
- Restore your .env, .htaccess, storage files and folder back onto your server.
- Log in to the software and follow the steps in the update wizard to complete the process.
Support
If you have any queries, please create a support ticket, and our support team will respond as soon as possible.