
ClubLink documentation
Everything you need to install, set up and run your membership business: members and plans, payments and renewals, events and tickets, facility booking, rewards, the member portal, your own club website, the Android and iPhone app, and the AI tools.
Overview
ClubLink is a complete membership management system. Run it for your own club, or as a SaaS: clubs, gyms and associations sign up, pick a plan and manage members, payments, events and bookings in one place, with their data kept completely separate.
How the pieces fit together
| Part | What it is | Who uses it |
|---|---|---|
| Admin panel | The back office: members, plans, payments, events, facilities, reports and settings. | Super admin, owner, staff |
| Member portal | The member's own view: digital card, dues, tickets, bookings, rewards and messages. | Members |
| Club website | A public website per club with membership plans, events, enquiries and its own domain. | Visitors and prospects |
| Mobile app | A Flutter app for Android and iPhone: members get their card and bookings, staff get a dashboard and a QR scanner. | Members and staff |
| API | REST API (/api/v1) used by the app and open to your own tools. | Developers |
Quick-start checklist
- InstallCheck the requirements, create the database, upload the files and run the installer.
- Log in and secure the accountsUse the default logins once, then change every password.
- Switch on the background workAdd the cron line so reminders, late fees and renewal invoices run.
- Club and emailIn Settings fill in the company and email (SMTP) tabs. See Settings.
- Describe what you offerAdd your membership plans, then your members.
- Open for businessPublish your website, schedule an event and let members sign in to their portal.
Server requirements
ClubLink is built with Laravel. Make sure your hosting meets the following before you start.
- PHP
- 8.1 or newer (8.2 or 8.3 is fine)
- Database
- MySQL 5.7+ (8 recommended) or MariaDB 10.3+
- Web server
- Apache (with
mod_rewrite) or Nginx - HTTPS
- Strongly recommended. Required for the mobile app, online payments, camera scanning in the browser and push notifications.
- Cron
- One cron line, see Background work
Required PHP extensions
Folders that must be writable
storage, bootstrap/cache and public/uploads (website pictures). The installer checks these too.
PHP upload limits
Member documents can be up to 5 MB and website pictures up to 2 MB. Set upload_max_filesize = 8M and post_max_size = 16M in php.ini if the defaults are lower.
Create the database
The steps below use cPanel. Other hosting panels offer the same options under similar names.
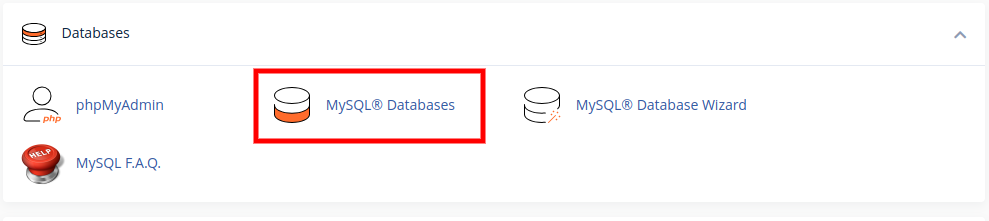
- Open the database toolIn your hosting panel go to Databases and click MySQL® Databases.
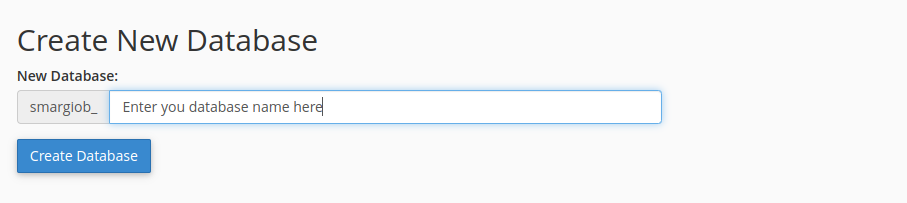
- Create the databaseType a name and click Create Database. Your host adds a prefix to the name; write the full name down.
- Create a database userIn Add New User enter a user name and a strong password (use the generator) and click Create User.
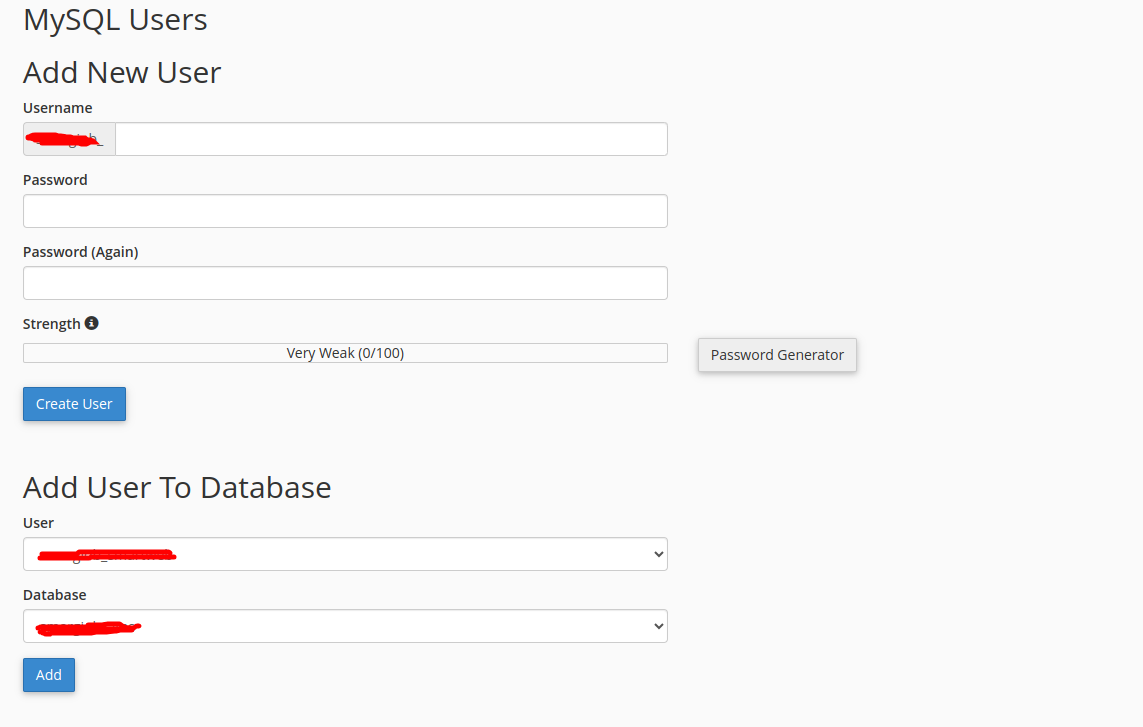
- Add the user to the databaseIn Add User To Database choose the user and the database, then click Add.
- Give all privilegesTick ALL PRIVILEGES and click Make Changes.
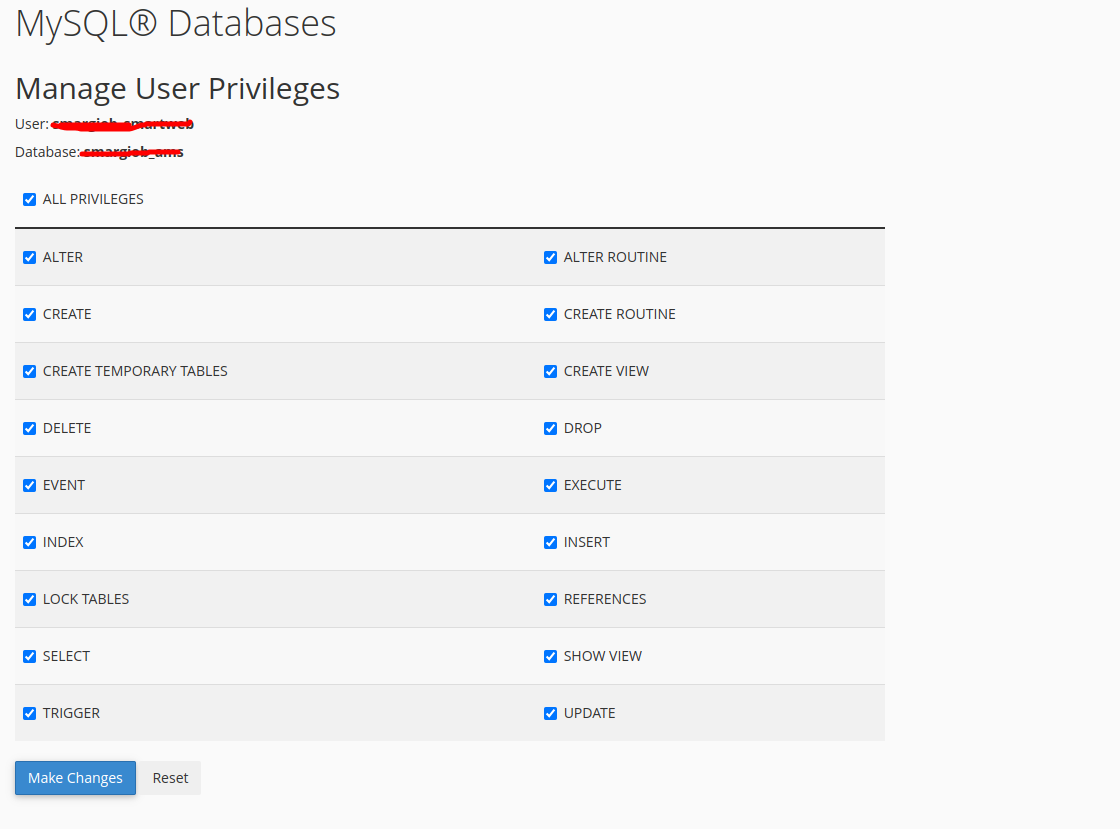
localhost), database name, user name and password. The installer asks for them in step 5.Upload the files
Upload the contents of the main_file folder from your download to your web root.
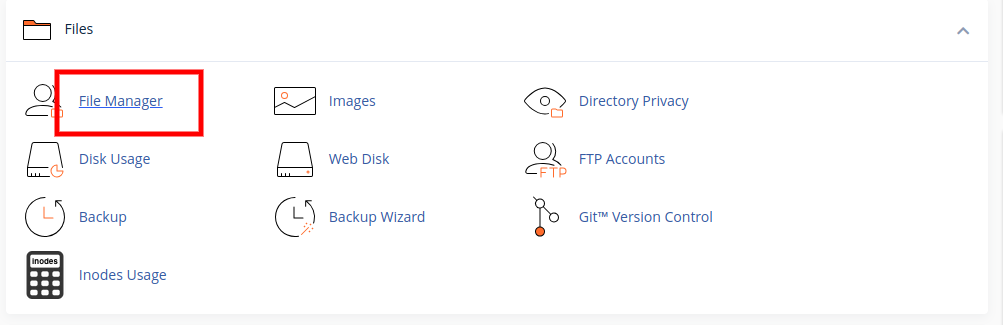
- Open the File ManagerLog in to cPanel and open File Manager under Files.
- Go to the right folderFor your main domain this is
public_html. For a sub-domain or sub-folder, open that folder instead.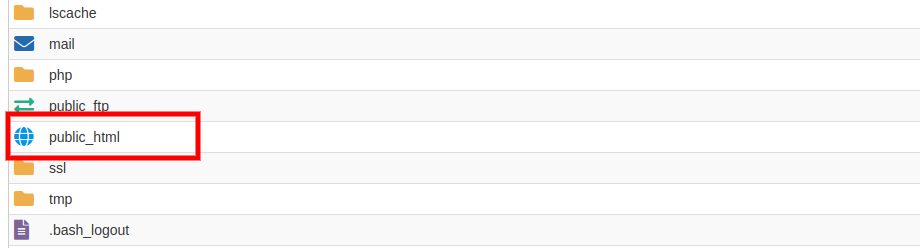
- Upload and extractClick Upload, choose the zip file, wait for 100%, then right-click it and choose Extract. Make sure the files from
main_file(including the hidden.htaccess) end up directly in the folder. - CheckYou should see
app,bootstrap,config,public,storage,artisanand the other Laravel folders.
documentation or mobile_app folders to the web root. They are for you, not for visitors.Run the installer
A web installer sets up the application in a few minutes.
- StartOpen
https://yourdomain.com/installin your browser. This starts the App Installation Process.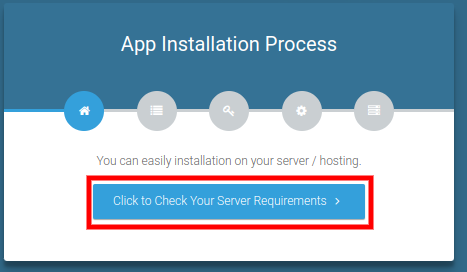
- Check the serverClick Click to Check Your Server Requirements. Everything should be ticked.
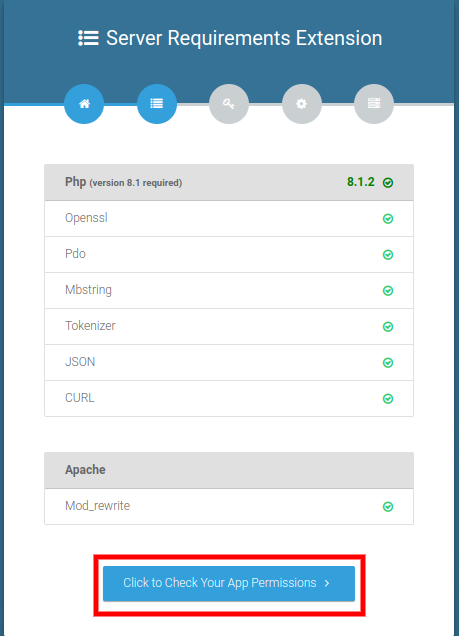
- Check permissionsThe installer checks the folder permissions. When all are fine, click Click to Configure Your App Environment.
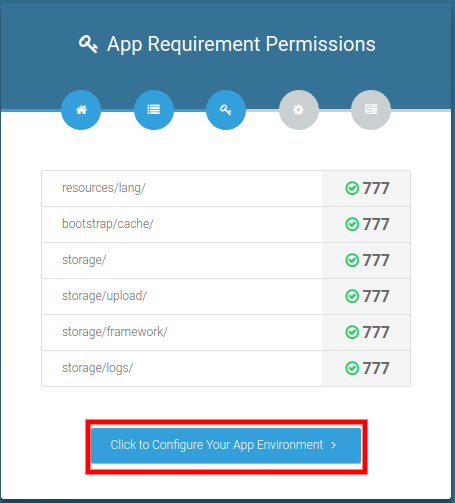
- Choose the setup typeSelect Using Form Wizard Setup.
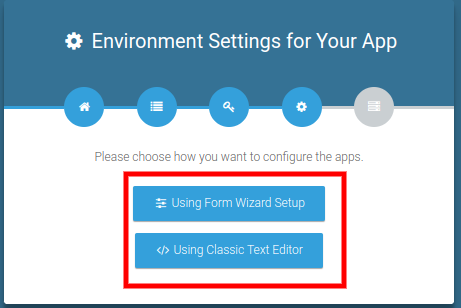
- Enter the app and database detailsFill in the database host, name, user and password from the previous step, plus an application name and the application URL. Click Click to Install.
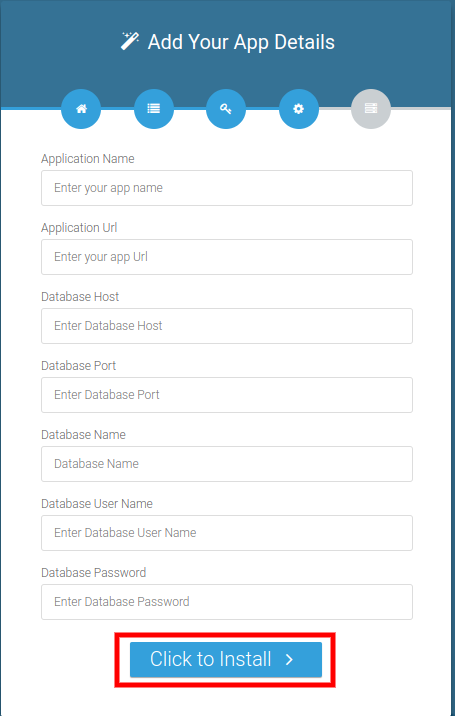
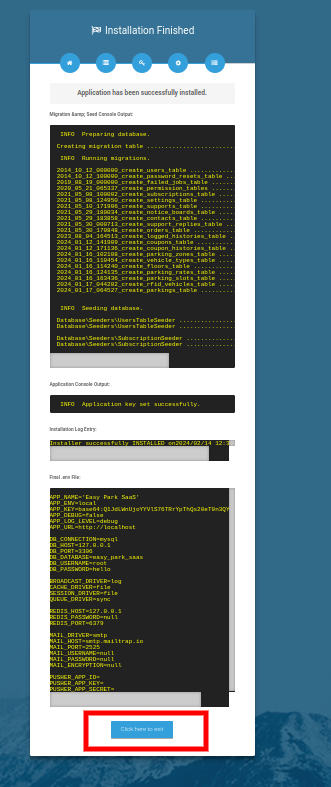
- FinishWhen you see Application has been successfully installed, click Click here to exit.
After installation
A few minutes of setup now saves problems later.
- Log inOpen your site and sign in with a default account.
- Change the passwordsOpen Settings → Password for each default account.
- Add the cron lineSee Background work. Without it renewal and payment reminders, late fees and renewal invoices do not run.
- Set up emailSettings → Email SMTP, then send a test message. Reminders, receipts and broadcast messages all use it.
- Fill in the company detailsName, logo, address, currency and date format under Settings. The name and address also appear on your website and in the app.
- Turn debug offIn
.envsetAPP_ENV=productionandAPP_DEBUG=false. See Going live.
Background work (cron job)
ClubLink does some work on its own: membership and payment reminders, late fees, renewal invoices, event reminders and releasing seats nobody paid for. A single cron line makes it all run.
The scheduler
In cPanel open Cron Jobs and add this line to run every minute. Replace the path with the folder that contains artisan.
* * * * * cd /home/youraccount/public_html && php artisan schedule:run >> /dev/null 2>&1
| Task | When | What it does |
|---|---|---|
Daily tasks (app:run-daily-task) | Every day at 00:00 | Runs all the tasks below in one go and then sends the queued messages. |
| Membership renewal reminders | Daily | Tells members whose membership is about to end (email, SMS and WhatsApp if switched on). |
| Membership expired alerts | Daily | Tells members whose membership has ended. |
| Payment reminders | Daily | Reminds members about unpaid invoices. |
| Event reminders | Daily | Reminds registered members before an event. |
| Late fees | Daily | Adds the late fee to overdue invoices and instalments, following your payment rules. |
| Renewal invoices | Daily | Creates the next invoice for members who switched on automatic renewal. |
| Instalment reminders | Daily | Reminds members the day before an instalment is due. |
| Weekly summary | Mondays | Emails owners a short summary (AI-written when AI is on). |
Release unpaid seats (--release-seats) | Every hour | Gives seats held for unpaid paid-event tickets to the waiting list. |
You can also run a single task by hand, for example php artisan app:run-daily-task --payment-reminder (other options: --membership-renewal-reminder, --membership-expired, --event-reminder, --billing, --weekly-insights).
QUEUE_CONNECTION=database messages are sent in the background; the daily task also works the queue. With the default sync everything is sent immediately while the task runs.Default logins
The installer creates three accounts so you can look around straight away.
| Role | Password | |
|---|---|---|
| Super admin | superadmin@gmail.com | 123456 |
| Owner (club) | owner@gmail.com | 123456 |
| Member | member@gmail.com | 123456 |
Roles and how it fits together
Everyone sees only what belongs to them. The menu changes with the role and with the permissions the owner has given.
| Role | What they can do |
|---|---|
| Super admin | Runs the platform: customers (owners), subscription packages, coupons, transactions, the landing page (CMS) and platform settings. Cannot see a club's members. |
| Owner | The club. Has the full admin panel for their own club and their own data only. |
| Staff | Created by the owner. Permissions come from the role the owner gives them (Staff & Access → Role), so a front-desk person can scan cards without seeing finances. |
| Member | The customer. Uses the member portal or the app. Can have family members under the same membership. |
The owner's menu
| Group | Contains |
|---|---|
| Home | Dashboard and AI Assistant |
| Staff & Access | Staff (users) and Roles with permissions |
| Members | Members, Memberships, Suspensions, Contact Diary |
| Events & Activities | Events (list and calendar), Activity Tracking, QR Check-In, Facilities (list and bookings) |
| Finance | Payments, Expenses, Rewards & Referrals, Payment Rules |
| Communication | Broadcast, My Website, Notice Board, Email Notification |
| Reports & Automation | Reports: Insights, More Reports, Income, Expense, Membership; N8N |
| System Configuration | Membership Plans, Document Types, Expense Types |
| System Settings | Pricing (your subscription) and Settings |
Adding staff and roles
- Create a roleUnder Staff & Access → Role add a role (for example Front desk) and tick the permissions it needs.
- Add the personUnder Staff create the user, choose the role and set a password. They sign in with the same login page.
- CheckSign in as that person once to confirm the menu shows only what you intended.
Setting up your club
A few settings describe your club. Do these first and everything else builds on them.
The usual order
- Company settingsSettings → Company: club name, logo, address, phone, email, currency and date format. These appear on your website and in the app.
- Membership plansSystem Configuration → Membership Plans: see Plans & memberships.
- Document typesSystem Configuration → Document Types: the documents you ask members for (ID, medical form, consent).
- Expense typesSystem Configuration → Expense Types: categories for your expenses.
- Payment rulesFinance → Payment Rules: late fees and automatic renewal invoices, see Payments & billing.
- Payments and messagesConnect your payment gateways and email under Settings.
- Add membersOne by one or with the CSV import.
Members and documents
Everything about a person in one place.
Members → Members. Search the list, then open a member to see their page. A member has a login (their email), a profile, a family, documents, a membership history and a payment history.

Adding members
- One at a time – Create: first and last name, email (this is their login), phone, date of birth, address and a password. Choose a plan and the dates to start their membership straight away, and enter a referral code if they came from a friend.
- In bulk – Members → Import: download the sample CSV, fill it in and upload it. Rows with problems are listed so you can fix and retry. Your subscription's member limit applies.
- Themselves – visitors can ask to join through the enquiry form on your website; you then create their account.
The member page
The top strip shows four things at a glance: the membership (plan, status and days left), money (paid, outstanding and overdue), attendance (visits in 30 days, last visit, events, upcoming bookings) and rewards & referrals (points, referral code, referred by). Below are tabs:
| Tab | What it holds |
|---|---|
| Member Profile | Contact details, date of birth, address, emergency contact and notes. Staff can export or erase the person's data here (privacy tools). |
| Family Member | People who share the membership. The number allowed depends on the plan. |
| Document | Uploaded documents with their type and status. Staff review them; members can upload their own from the portal. |
| Membership History | Every membership with start and expiry dates. |
| Membership Payment History | Invoices and payments for this member. |
| Activity | A timeline of check-ins, event sign-ups, bookings and payments. |

The digital card
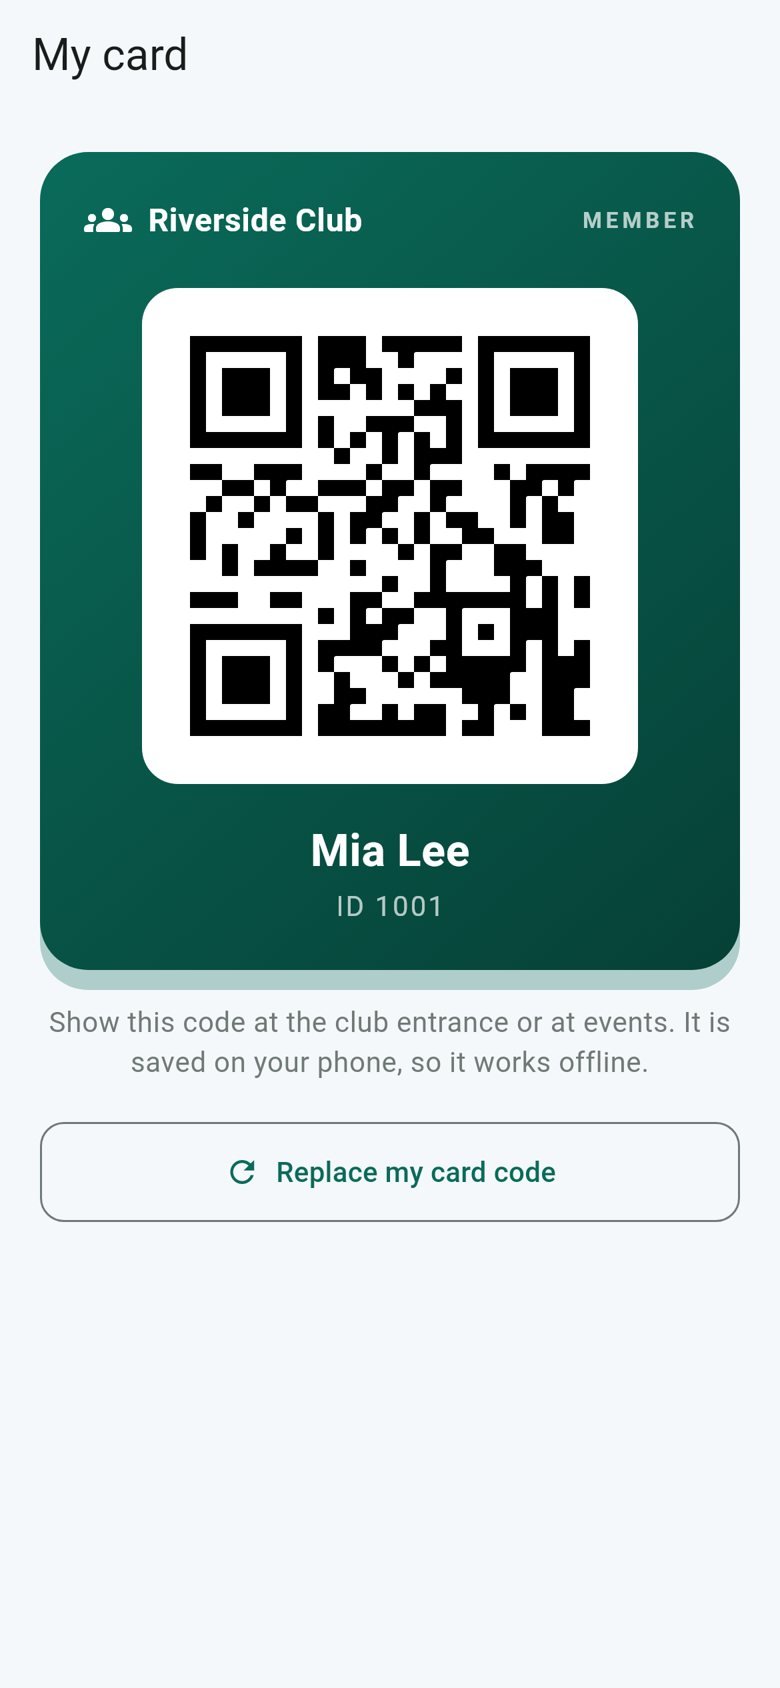
Every member has a card with a QR code in the portal (My Card) and in the app. Staff scan it at the door or at an event (see Check-in). If a card is lost the member can replace the code, and the old one stops working.
Privacy
On a member page, Export data downloads everything held about the person, and Erase data anonymises their personal details and documents while keeping invoices for your records. Members can also export, and delete, their own data from the portal and the app.
Plans and memberships
A plan is what you sell. A membership is a member's current subscription to a plan.
Membership plans
System Configuration → Membership Plans.
| Field | Meaning |
|---|---|
| Name and price | Shown to members and on your website. |
| Duration | Monthly, 3-Month, 6-Month or Yearly. Sets the expiry date when a payment is made. |
| Billing frequency | How often the member is billed. |
| Family member limit | How many family members can share the plan (0 means unlimited). |
| Description | What the plan includes. Write one item per line: each line becomes a tick on your website and in the app, and the monthly price of longer plans is worked out for you. |

Memberships
Members → Memberships lists every membership with its dates and status. The status is judged by the expiry date, so a membership that has lapsed shows as expired without anyone touching it. Members who switch on automatic renewal in the portal get their next invoice created before expiry (see Payments).
Pausing a membership
Members can ask for a pause (freeze) from the portal or the app, giving dates and a reason. The request appears under Members → Suspensions; approve or reject it. A pending request can be withdrawn by the member.
Payments and billing
Invoices, instalments, late fees and renewals, whichever way the money arrives.
Finance → Payments lists every invoice with its member, amount, due date, method and status (Paid, Unpaid or Pending for a bank transfer waiting for approval).

Ways to pay
- Online – members pay from the portal with Stripe, PayPal, Flutterwave, Paystack or Razorpay, or send a bank transfer that you approve. Set the gateways up under Settings → Payment.
- In the app – members pay an invoice by card (Stripe) and get a receipt PDF. See Mobile app.
- With points – members can pay all or part of an invoice with reward points.
- At the desk – staff mark an invoice paid with the method (cash, card, cheque...). From the app: More → Payments, tap an unpaid invoice. The late fee is collected with it and the member gets a message.
Instalments
Open an invoice and split it into instalments with their own due dates. Each instalment is paid and reminded separately; the invoice is paid when all are.
Payment rules: late fees and renewals
Finance → Payment Rules.
| Setting | What it does |
|---|---|
| Late fee on/off | Adds a fee to overdue invoices and instalments. |
| Fee type and amount | A fixed amount or a percent of the amount due. |
| Grace days | How many days after the due date before the fee applies. |
| Maximum times | How often the fee may repeat (at most once a month). Each instalment gets one fee. |
| Renewal invoice lead time | How many days before expiry the renewal invoice is created for members on automatic renewal. |
Events and tickets
Free or paid events with seat limits, waiting lists and QR tickets.
Events → Events (list) or Calendar. An event has a name, date and time, location, seats, a per-member limit, a booking deadline, a status (Open, Full, Cancelled) and a description.

| Option | Meaning |
|---|---|
| Free / paid | Paid events charge a fixed price per person, or different prices for adults and children. |
| Per-member limit | How many places one member can book (themselves plus guests). 0 means no limit. |
| Waiting list | When the event is full, members can join a list. If someone cancels, or an unpaid seat is released, the first on the list is offered the place and told. |
| Payment hold (hours) | How long a seat is kept for an unpaid ticket before it goes back to the waiting list. 0 keeps it for ever. |
The event page
The top strip shows seats filled, the waiting list, checked in against registered, and the money collected. Below are the details, the event QR code (print it), the list of registrations and the waiting list.
What members do
Members sign up from the portal or the app, add guests, and get a QR ticket (after paying, for paid events). They can cancel free or unpaid tickets themselves; a paid ticket is cancelled by the club. After the event they can rate it, with an optional photo, and you see the average and the comments on the event.
Check-in and activity
Know who is actually there.
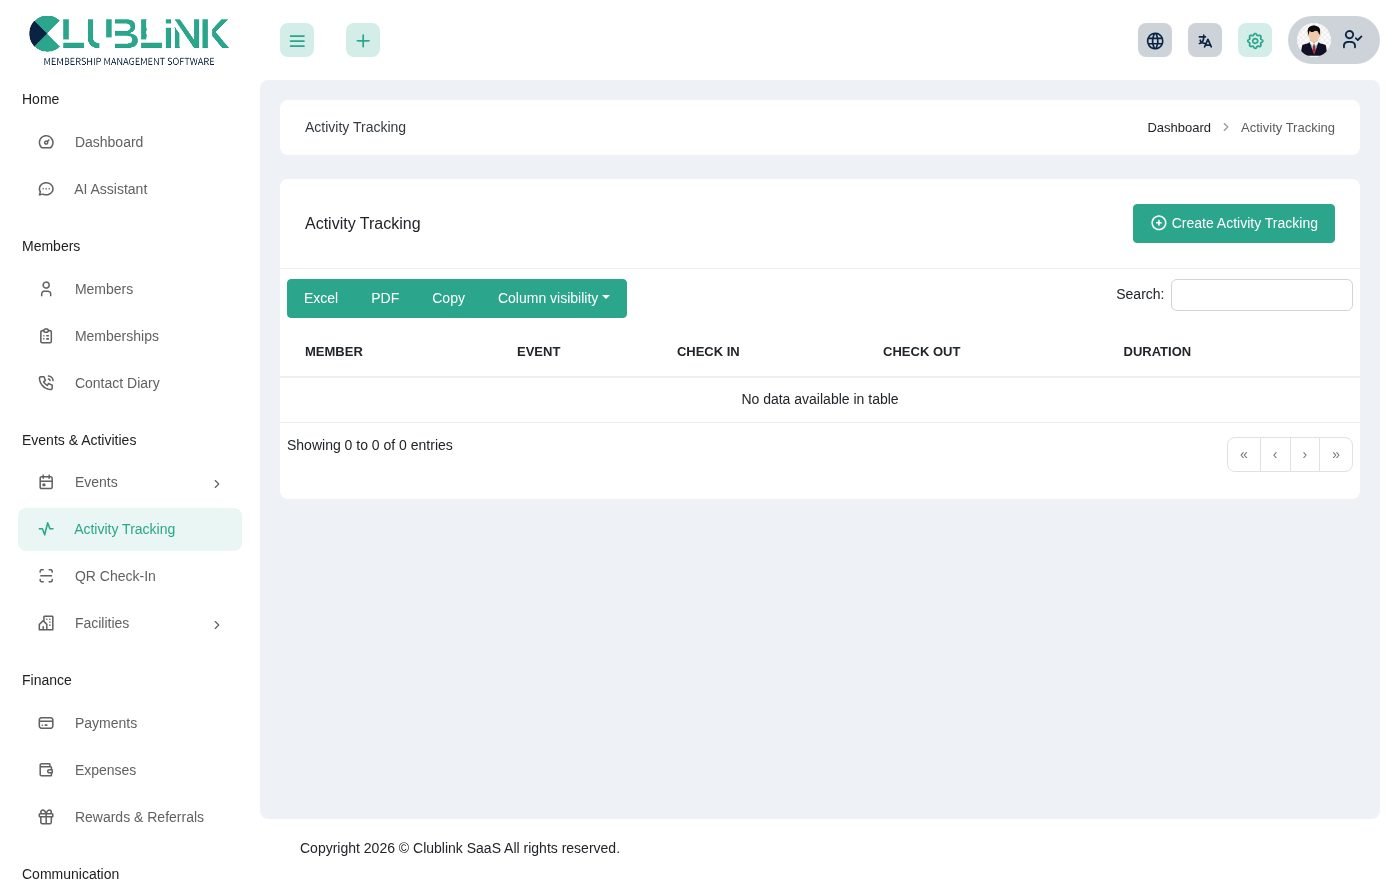
- Activity Tracking – Events & Activities → Activity Tracking lists check-ins and check-outs with the time and the member. You can add one by hand.
- QR Check-In – open the QR check-in page on a phone or tablet, choose the event and point the camera at a member's card or ticket. The result is green (checked in), amber (for example the membership has expired or the member is already in) or red (not registered, payment due or unknown card).
- At the door – the app's Scan tab also checks a card without an event and shows whether the membership is active and what is owed. It keeps working without a connection and sends the scans when you are back online.
Facility booking
Courts, rooms, studios and equipment that members book by the hour.
Events & Activities → Facilities.
| Setting | Meaning |
|---|---|
| Units | How many of this facility you have (for example 3 courts). Two people can book the same hour while a unit is free. |
| Slot length | The length of one slot in minutes (15 to 480). |
| Open and close time, open days | When slots exist. |
| Price per slot | 0 for free. |
| Booking window | How many days ahead members may book, and how many slots in one booking. |
| Cancellation window | Members can cancel up to this many hours before the start. |
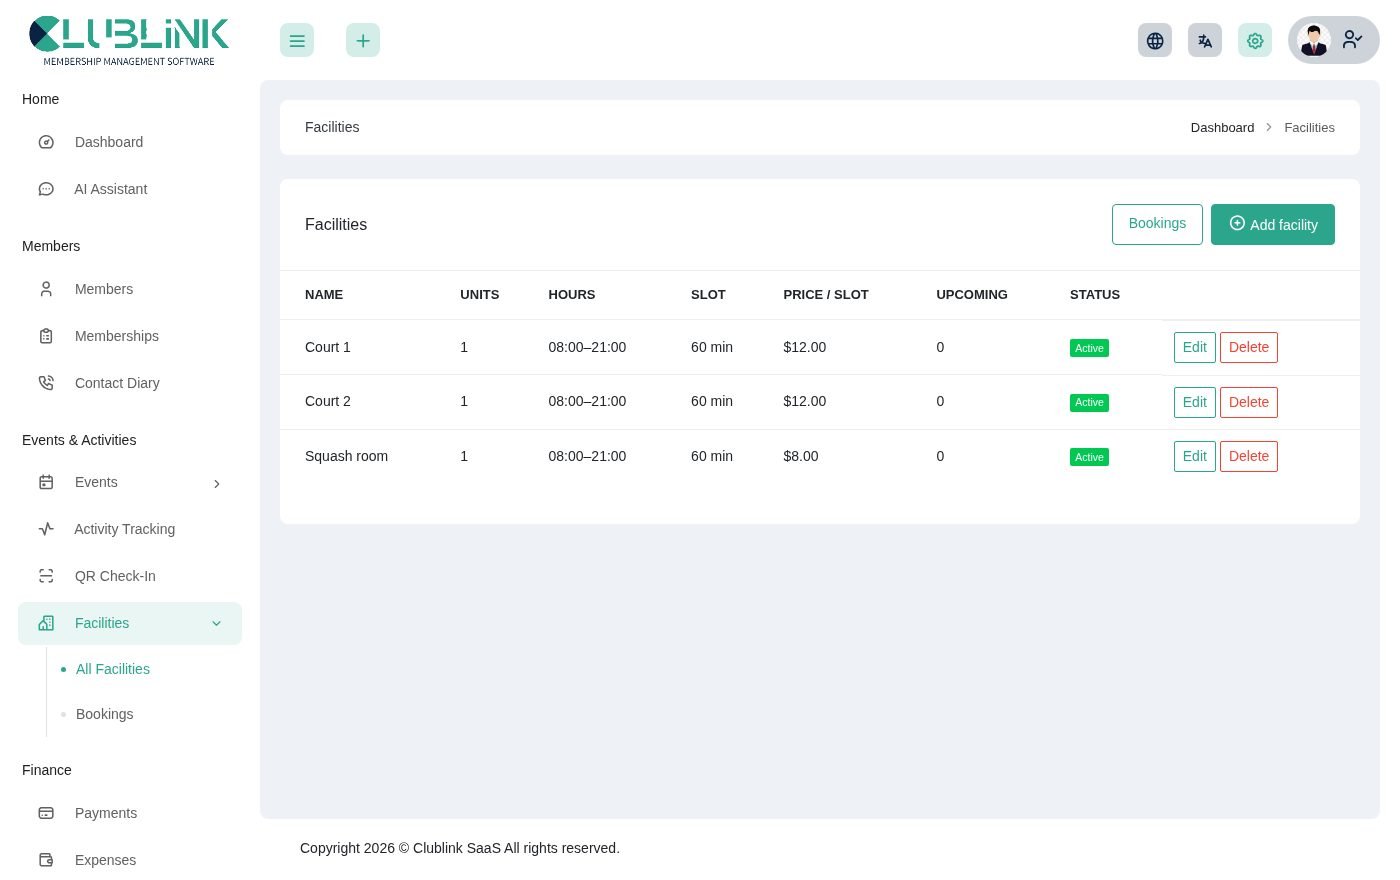
Facilities → Bookings shows every booking, and staff can book for a member. Members book from Book a Facility in the portal or the Book tab of the app, choosing a day and a time; taken times are greyed out, and double bookings are prevented.
Rewards and referrals
Thank members for paying and for bringing friends.
Finance → Rewards & Referrals.
- Earning – switch it on and choose how many points a member earns for each unit of currency paid.
- Value – what one point is worth when a member pays an invoice with points.
- Referrals – every member has a referral code. When someone joins with it and makes their first payment, the referrer gets points and the new member a welcome bonus. You set both amounts.
- Adjust points – staff can add or remove points with a reason (for example a goodwill gesture). Everything is recorded in the history.
- Overview – top balances, recent activity, and how many referrals were made and rewarded.

Expenses, contacts and notices
The small things that keep a club running.
- Expenses – Finance → Expenses: record what the club spends, with a type (set up under Expense Types), date, amount and a receipt. They feed the income-versus-expense reports.
- Contact Diary – Members → Contact Diary: keep a note of people you talk to (suppliers, partners, prospects).
- Notice Board – Communication → Notice Board: post a notice with an optional attachment. Members see it on their dashboard and in the app (Club news).
- Broadcast – Communication → Broadcast: see Messages & automation.
Reports and insights
Numbers you can act on, with CSV export.
| Report | What it shows |
|---|---|
| Insights | Members, active memberships, expiring in 30 days, unpaid dues, revenue this month and churn. Lists of outstanding dues, members at risk of leaving (with the reasons), memberships expiring and revenue by plan. |
| More Reports | Income versus expenses for 12 months, unpaid invoices by age, collection rate, payments by method, member growth and facility use. The date range applies to the money reports. |
| Income, Expense, Membership | The classic reports with filters by date range. |

Every table has an Export CSV button. Exports are safe to open in a spreadsheet: values that start with a formula character are neutralised.

Dashboards
Each role lands on a page made for them.
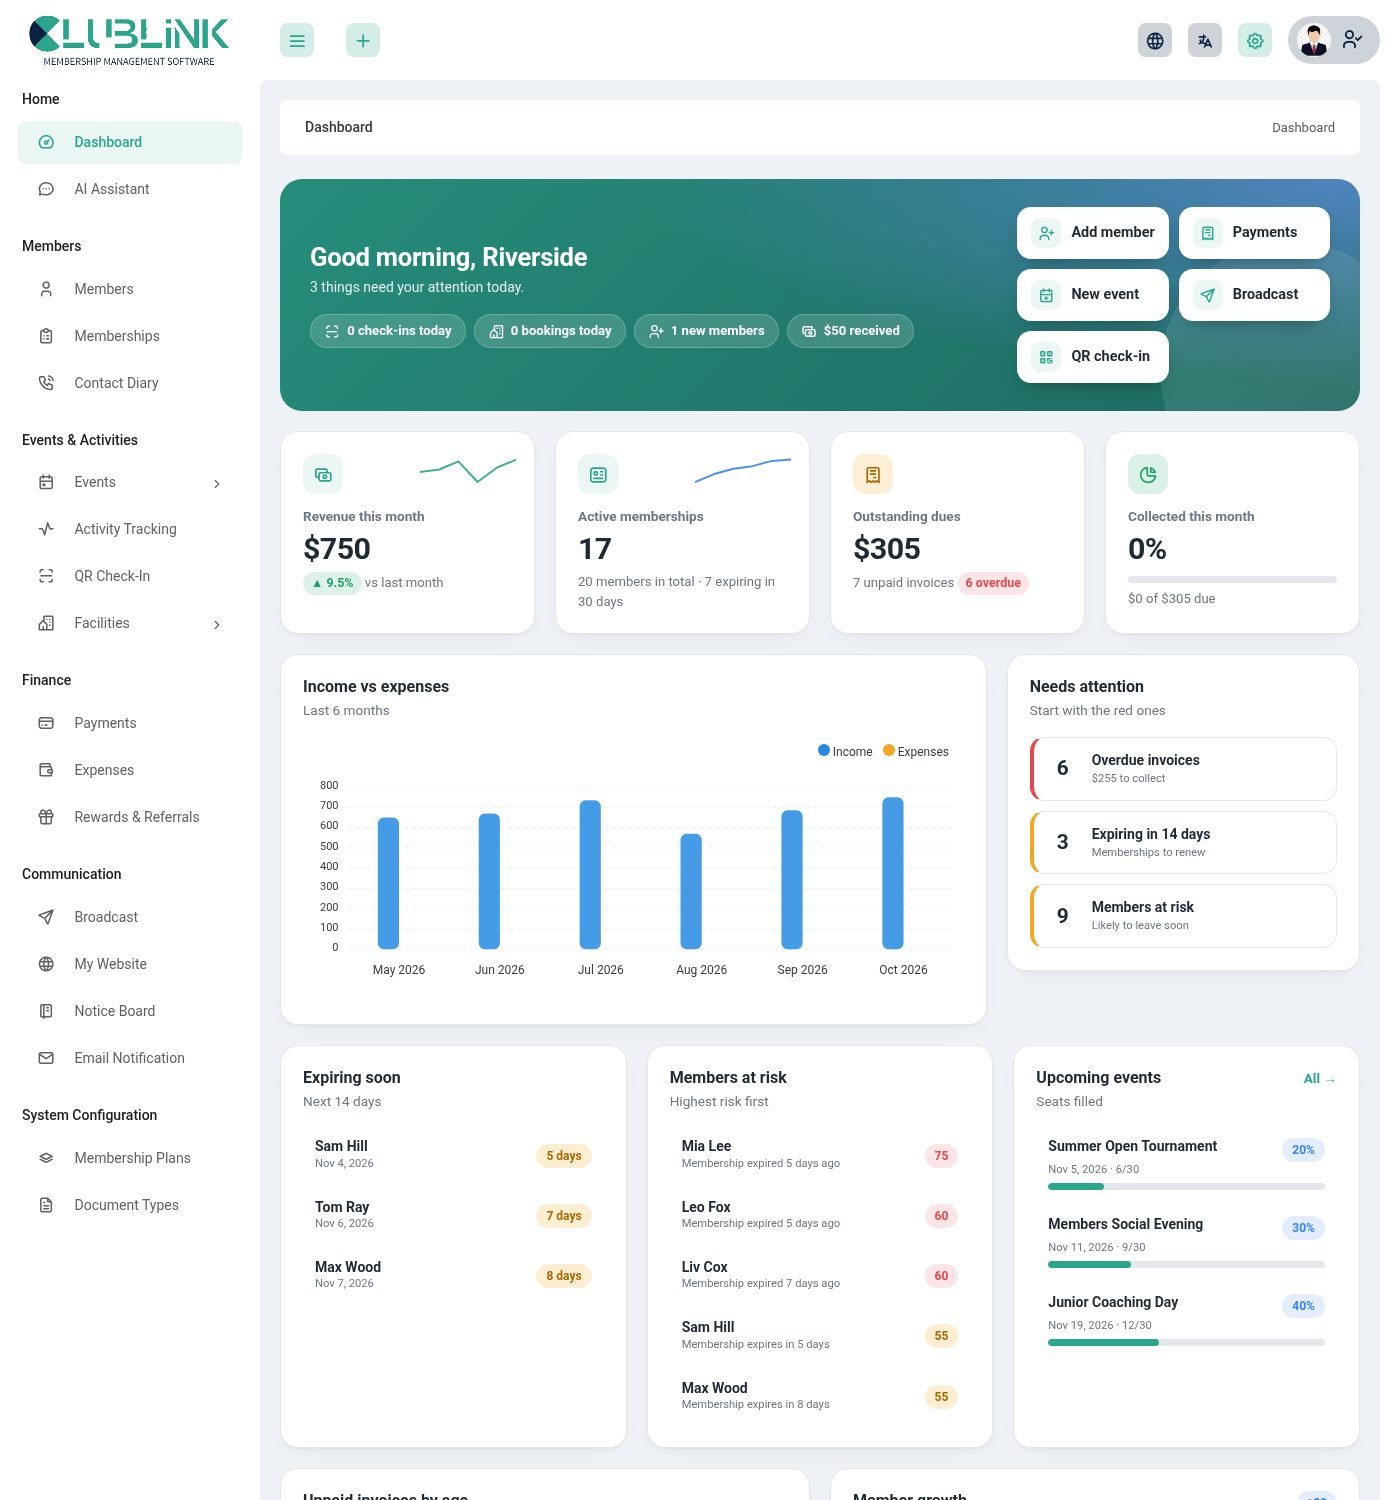
- Owner – a greeting with quick actions (add member, payments, new event, broadcast, QR check-in), revenue, active memberships, outstanding dues and collection this month, an income-versus-expense chart, a Needs attention panel (overdue invoices, memberships expiring, members at risk), expiring soon, upcoming events, unpaid invoices by age and member growth.
- Member – membership status and days left, amount due, upcoming events and bookings, notices and quick links. See Member portal.
- Super admin – customers, subscription income, plans and recent signups. See SaaS administration.
Member portal
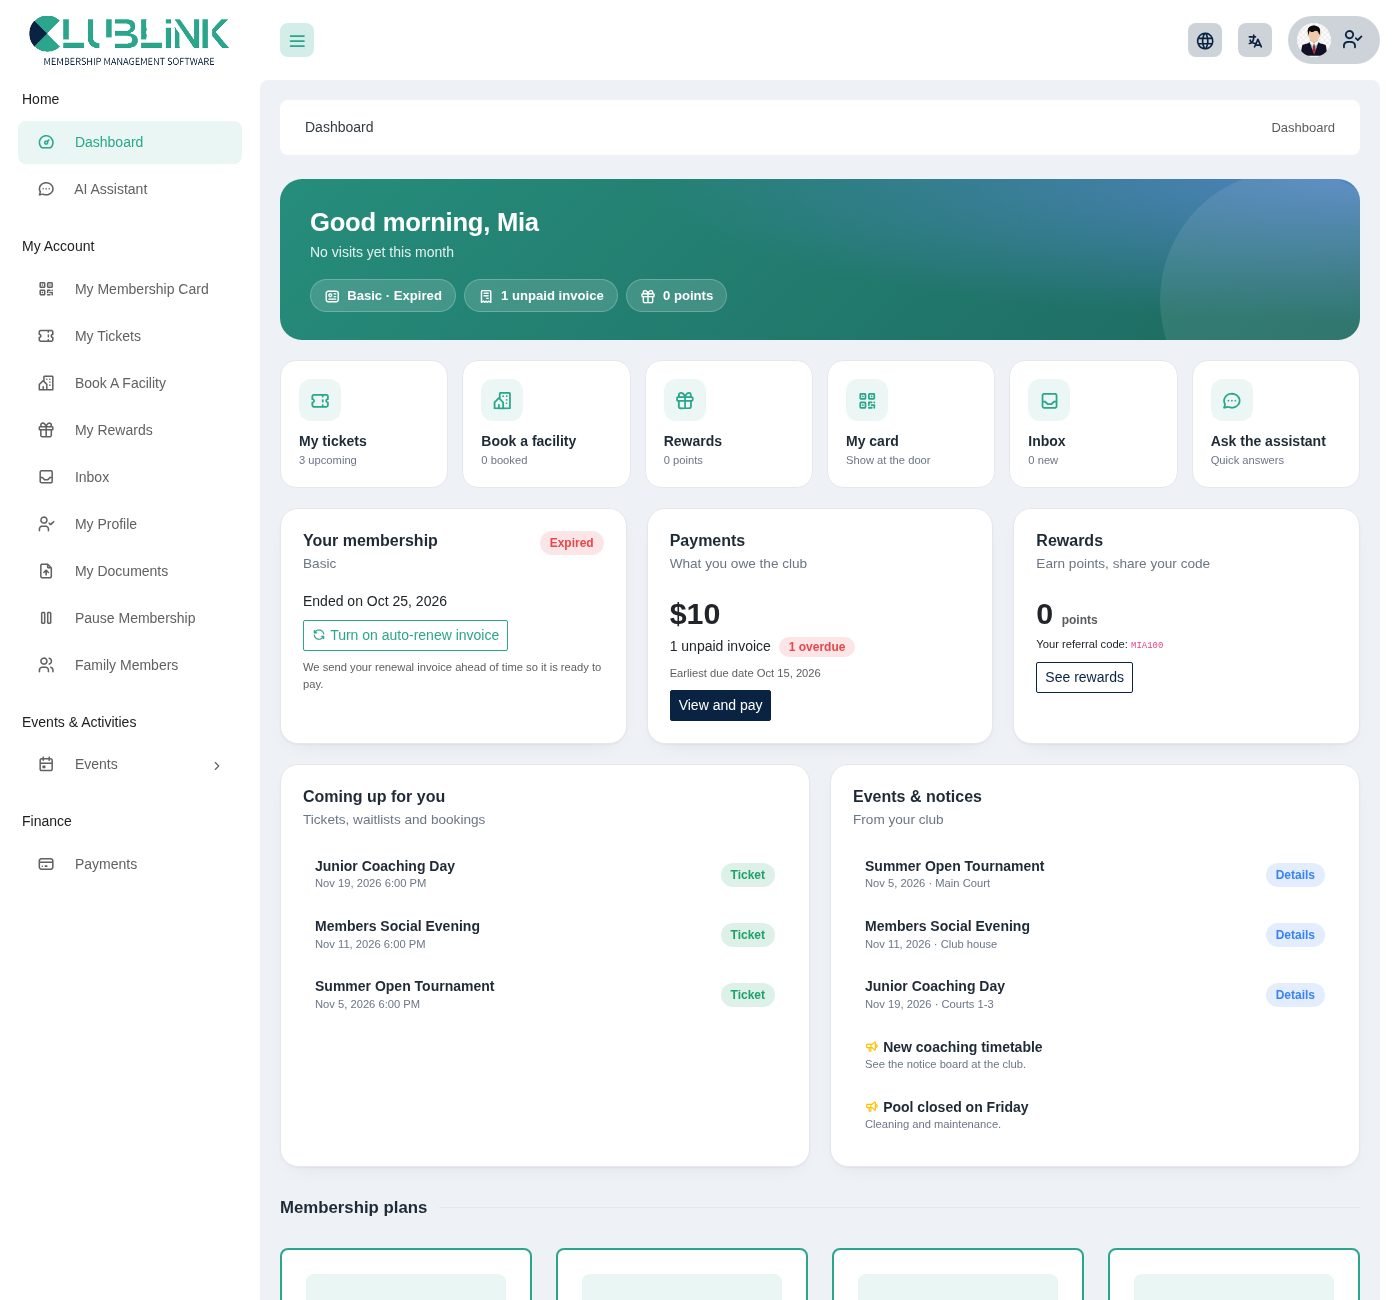
Members sign in with their email and manage their own side of things.
| Page | What the member does |
|---|---|
| Dashboard | Sees their membership and days left, what they owe, upcoming events and bookings and the notices. |
| My Card | Shows the QR card for the door and events, and can replace the code. |
| Membership and payments | Sees invoices and pays them online, switches automatic renewal on or off, and uses points on an invoice. |
| Events and My Tickets | Registers (with guests), joins a waiting list, sees QR tickets, cancels free or unpaid tickets and rates past events. |
| Book a Facility | Picks a facility, a day and a time, sees and cancels their bookings. |
| My Rewards | Sees points, history and their referral code. |
| Family | Adds and edits family members within the plan limit. |
| Pause (Freeze) | Asks the club to pause the membership, and withdraws the request. |
| Messages | Reads reminders and messages from the club (also sent as email, SMS or WhatsApp if the member allows). |
| My Documents and Profile | Uploads documents, edits contact details and chooses which notifications to receive. |
| My Data | Downloads a copy of everything held about them. |
Club website
Every club gets a public website without any coding: pages built from blocks, your membership plans and events, an enquiry form and an optional own domain.
Communication → My Website. The first time you open it, ClubLink creates six starter pages (Home, About us, Memberships, Events, Join us, Contact) with your club name filled in, so you only edit and publish.

Publishing and addresses
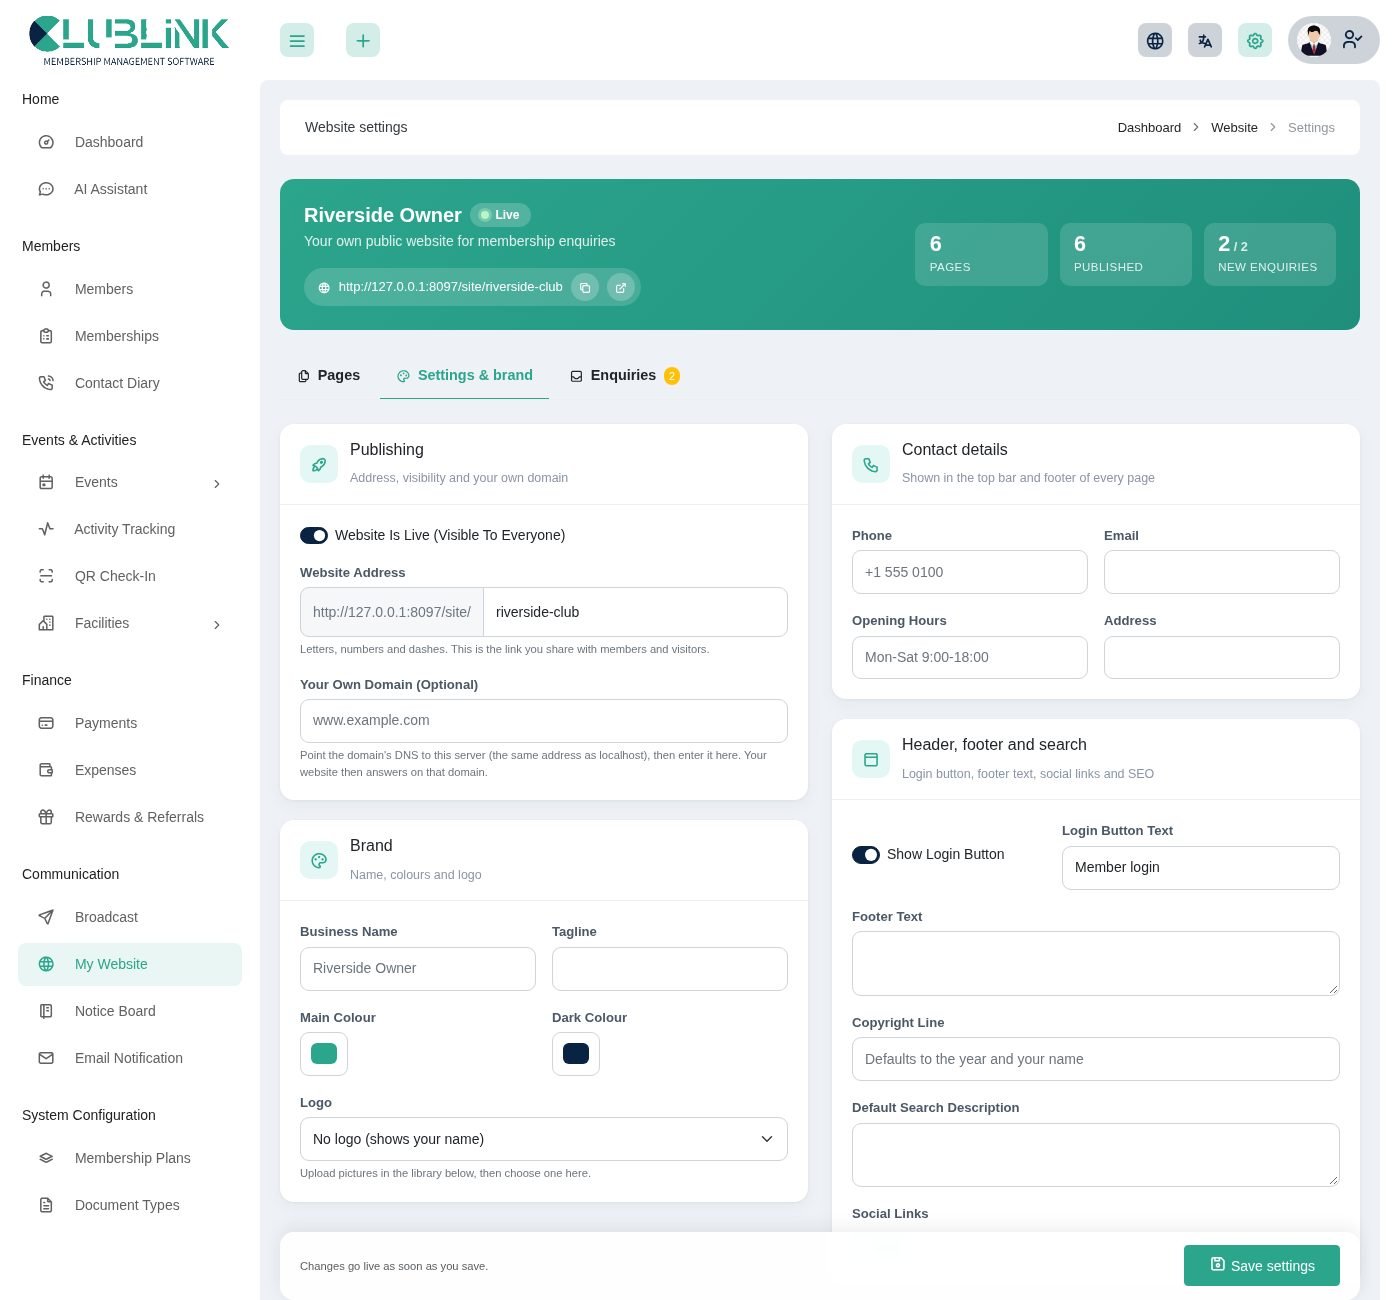
- Address – your site lives at
https://yourdomain.com/site/your-club. Choose the last part under Settings & brand → Publishing. - Live or draft – until you switch Website is live on, only your own staff can see the site (as a preview that search engines ignore). Pages can be published or hidden one by one.
- Own domain – enter a domain such as
www.myclub.com, point its DNS at your server and add it as a host in your web server. The site then answers on that domain. - The header link – the My website menu at the top of every admin page shows your addresses with copy and open buttons.
Pages and blocks
Open a page to edit it. A page is a list of blocks you can add, reorder, hide or remove. Everything you type is cleaned before it is shown, so a typo can never break the page.
| Block | What it shows |
|---|---|
| Hero banner | Big headline, buttons and an optional quick enquiry form or picture. |
| Text | A heading and paragraphs with an optional picture. |
| Feature cards, Numbers strip, Numbered steps | Icon cards, big numbers and "how it works". |
| Membership plans | Your plans with prices, filled in automatically. Each plan links to its own details page. |
| Plan comparison table | All plans side by side (price, billing, length, family members). |
| Upcoming events | Your next events with date, place and price, filled in automatically. |
| Picture cards, Team, Photo gallery | Facilities, coaches and committee, and pictures. |
| Our story timeline, Member stories | Milestones by year and quotes from members. |
| Questions and answers | An expandable FAQ. |
| Get our app | A QR code with your company code and the Google Play / App Store buttons, filled in automatically. |
| Call to action, Contact details, Enquiry form | A coloured banner, your phone, email and hours, and a form that lands in your enquiries. |
New pages start from a template (Home, About, Memberships, Events, Join, Contact, FAQ, Facilities, Gallery, Our team or Blank). The home page has one address; every other page lives at /site/your-club/page-name and can be shown in the menu with a menu number.
Plan details pages
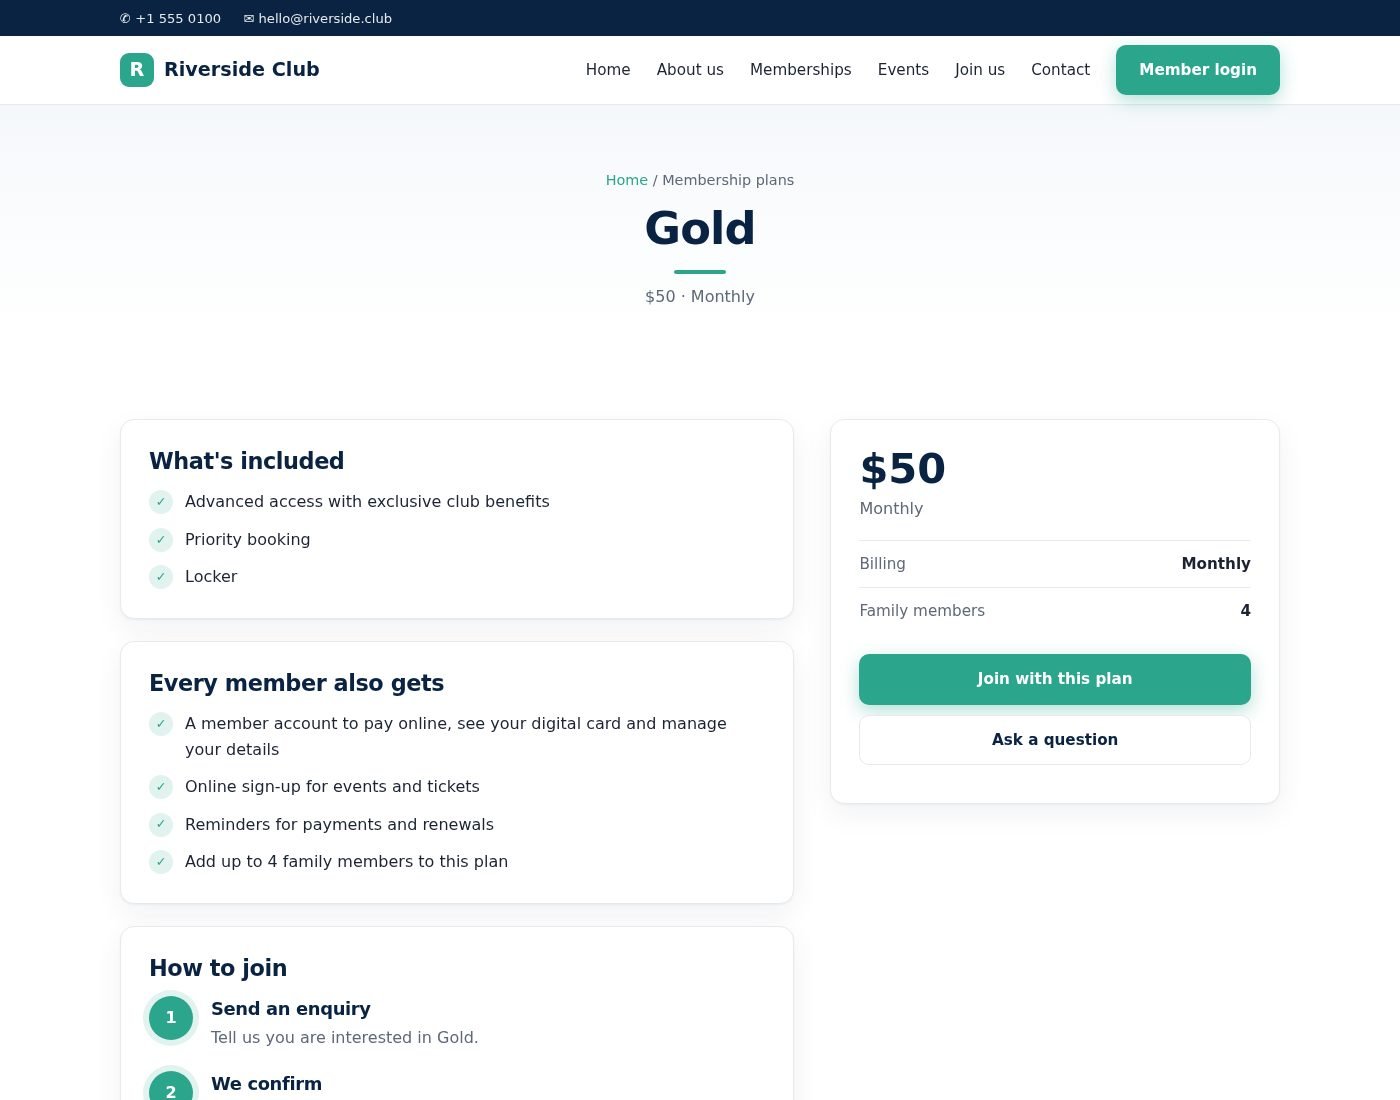
Each membership plan has its own page at /site/your-club/plan/<id> with the price, billing, length, family members, what is included (taken from the plan description, one line each), how to join, other plans and an enquiry form with that plan already chosen.
Settings and brand
The Settings & brand tab holds the club name, tagline, main and dark colours, logo, phone, email, address, opening hours, the member login button text, footer text, copyright line, social links and the default search description. The footer shows your plans, next events and contact details by itself, and falls back to your company settings when the website fields are empty.
Picture library
Upload PNG, JPG, WebP or GIF pictures (2 MB each, 60 per club) in the library at the bottom of the settings tab, then choose them in the logo field and in blocks. Pictures are kept per club.
Enquiries
Every form on the site creates an enquiry in the Enquiries tab with the name, contact details, plan and message, and emails the club. Mark each one New, Contacted or Closed, filter the list and export it as CSV. The forms are protected by a hidden field and a rate limit against bots.

Search engines
Each page has its own title and description, the site publishes /site/your-club/sitemap.xml and structured data for the club, and draft sites are marked noindex.
Mobile app
One Flutter app for Android and iPhone. After signing in, the account decides what is shown: members get the member screens, owners and staff get the staff screens. The app uses the club's name and colour.
mobile_app folder: clublink_app/android_app and clublink_app/iphone_app.
Finding your club: company code and QR code
The app is published once for every club. It starts by asking which club, so a member never has to know a server address.
- The member installs the appFrom Google Play or the App Store. The links are the ones the platform owner set (see below) and are shown on your website, the invite page and Mobile App.
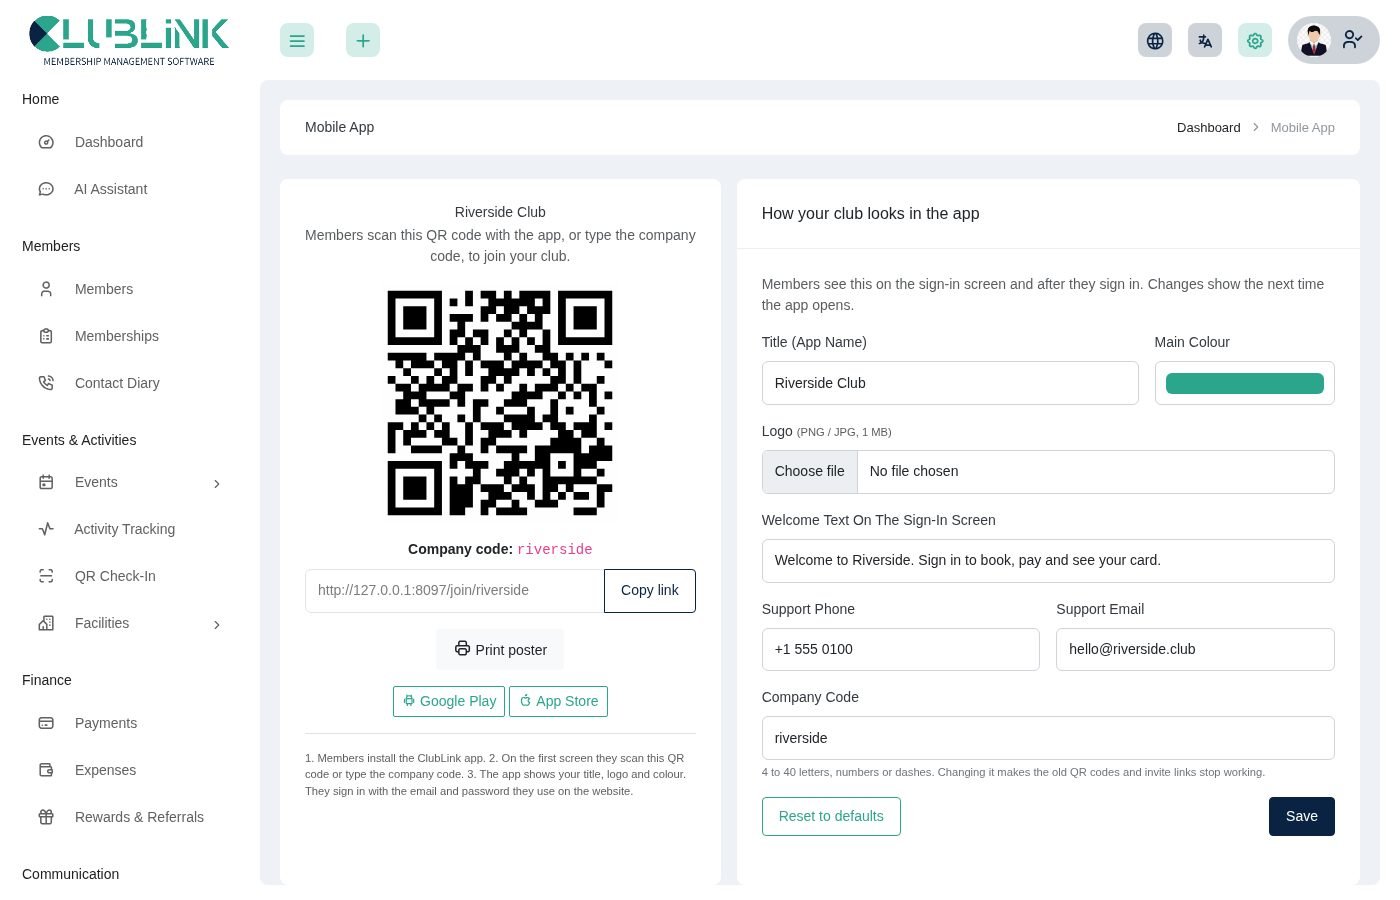
- Scans your QR code, or types your company codeThe QR code holds the invite link
https://your-site/join/<code>, which also contains the server address. When typing, the member enters the code (and the website address if the app has not been given it). - Sees your brandingThe sign-in screen shows your title, logo, colour and welcome text, and after signing in the app keeps showing them.
- Signs inWith the email and password used on the website. Only your club's accounts are accepted.
What the owner does
Communication → Mobile App (owners, and staff who manage the website):
- QR code, company code and invite link with Copy link and a print-ready Print poster for your reception.
- How your club looks in the app: title (app name), logo, main colour, welcome text, support phone and email, and the company code (4 to 40 letters, numbers or dashes; changing it makes old QR codes stop working). Reset to defaults goes back to your website's name, logo and colour.
- The QR code and store buttons also appear on your website: add the Get our app block to any page (the home page template has one) and switch Show the app QR code and store buttons in the footer on or off in Settings & brand.
What the platform owner (super admin) does
System Settings → Mobile Apps:
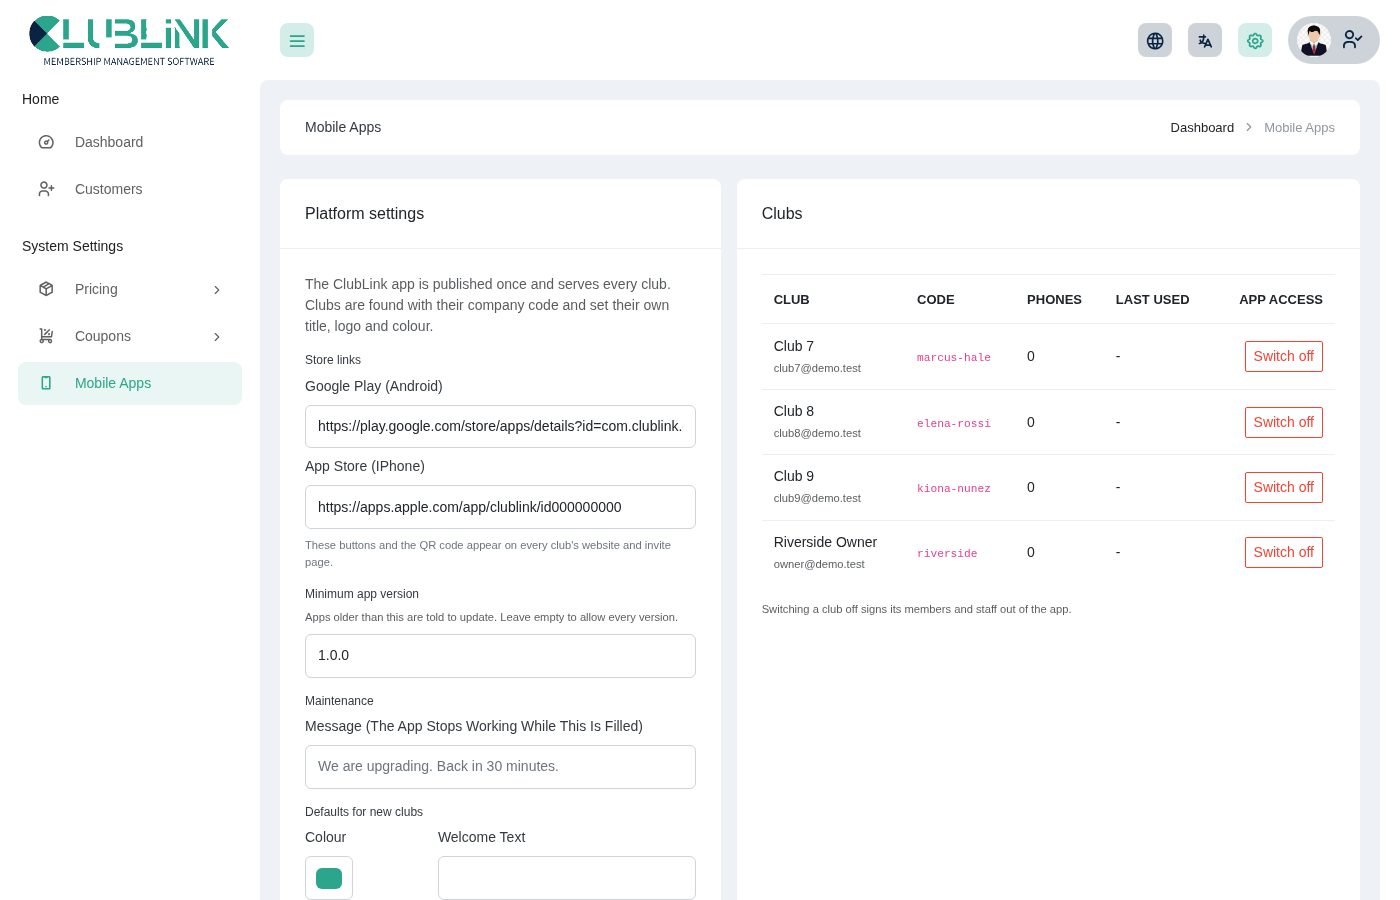
- Google Play and App Store links shown on every club's website, invite page and Mobile App page.
- Minimum app version: older apps are asked to update. Maintenance message: while it is filled the app shows it and pauses.
- Defaults for new clubs (colour and welcome text) and a list of every club with its company code, registered phones and last use, and a switch to turn the app off for one club (its members are signed out).
What members can do
- Home – membership status and days left, what they owe, quick actions, coming events and club news.
- My card – the QR code for the door and events. It is saved on the phone, so it works without a connection.
- Membership, plans and payments – plan details, automatic renewal, pause requests, invoices with instalments and late fees, pay by card and a receipt PDF.
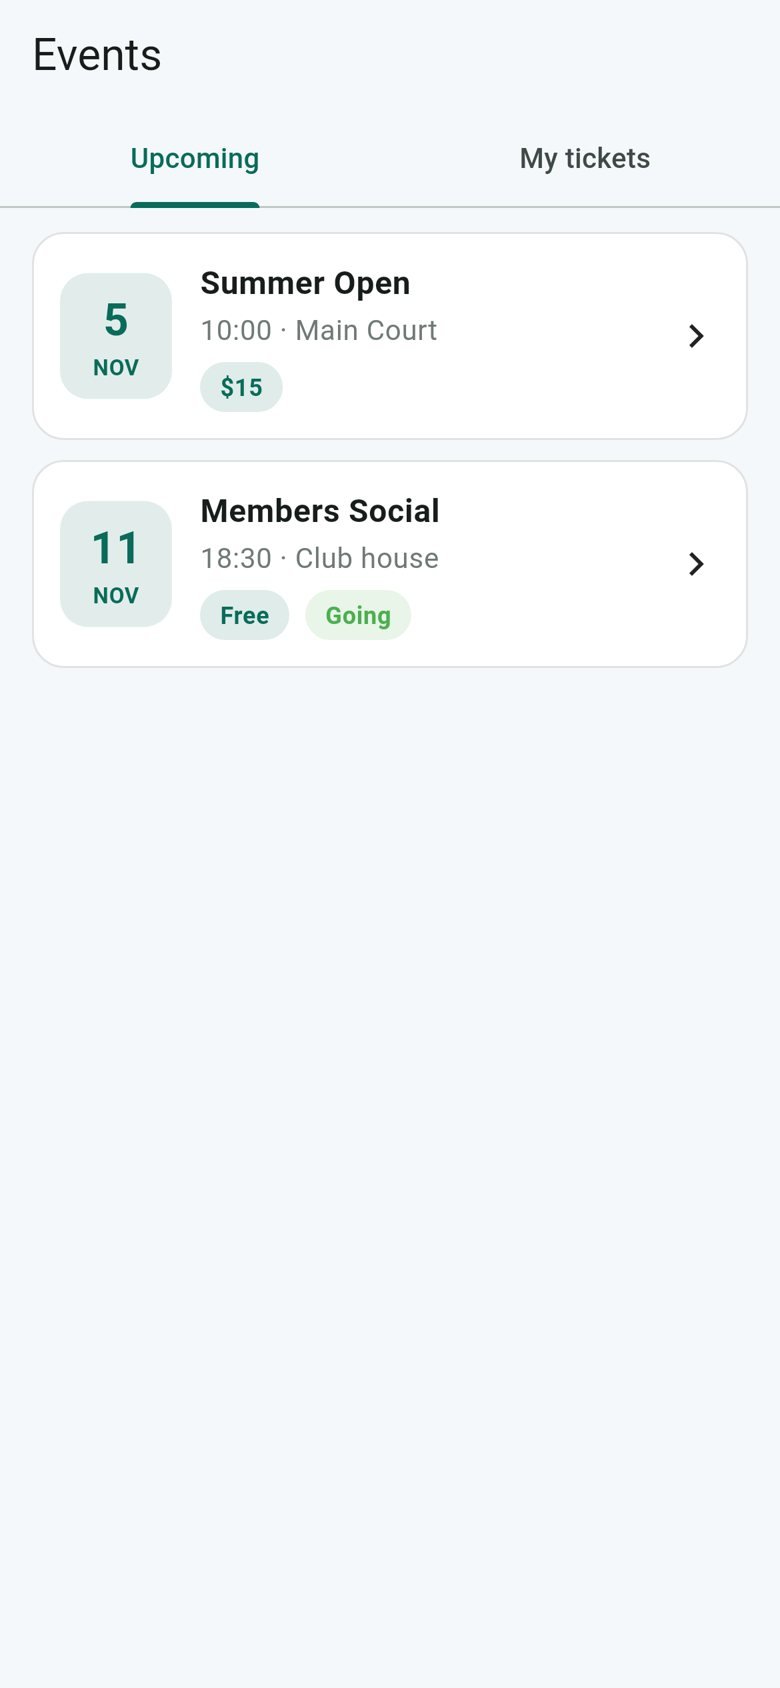
- Events – sign up with guests, join a waiting list, see QR tickets, cancel, and rate an event with a photo.
- Book – pick a facility, a day and a time, and manage bookings.
- Rewards and family – points, share the referral code, and add or edit family members.
- More – messages with push notifications, club news, contact details, documents, profile and notification choices, the AI assistant, a data export and Delete my account.
What owners and staff can do
Each tab shows only when the account has the permission.
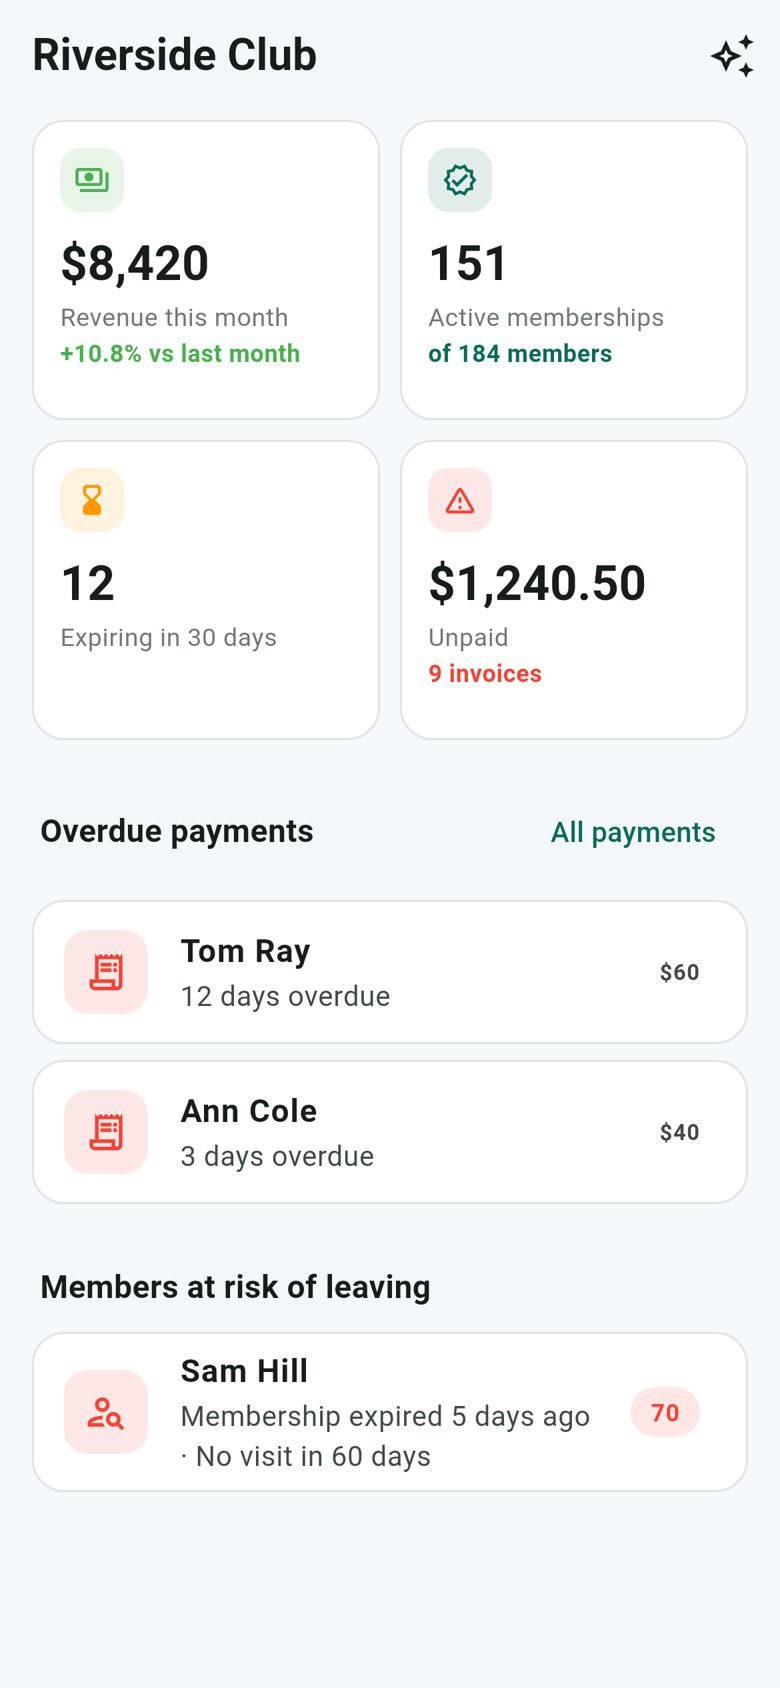
- Dashboard – revenue, active memberships, expiring, unpaid, overdue payments and members at risk.
- Members – search, details, call, WhatsApp or email, and add or edit members.
- Scan – check a member card at the door or check people in to an event. With no connection the scans are saved and sent later.
- Enquiries – from the website and from members: call or message, add a note and mark them new, contacted or closed.
- More – record a payment received at the desk, create and edit events and facilities, see event feedback, message members and post notices.
Paying by card
A member taps Pay by card on an unpaid invoice. The server creates a Stripe Checkout page with the club's own Stripe keys, the app opens it, and when the member taps I have paid the server asks Stripe whether the payment really happened. It only settles the invoice if the payment belongs to that invoice, is paid, covers the amount (late fee included) and has not been used before. Other gateways stay on the website.
Signing in and security
Email and password (and a one-time code if two-factor is on), kept in the phone's secure storage. Members and staff can turn on a fingerprint or face lock, change their password and sign out of every phone. A member's account can be deleted from the app: it needs their password and erases their personal data while the invoices stay.
Links that open the app
clublink://plan/7, clublink://event/3, clublink://payments, clublink://rewards and similar links open the matching screen, also from a tapped push notification.
Build and publish the app
You need the Flutter SDK (flutter doctor). Open a project folder, for example mobile_app/clublink_app/android_app.
flutter pub get
flutter run                      # the first screen asks for the company code
flutter test && flutter analyze
flutter build appbundle          # Android (Google Play)
flutter build ipa                # iPhone, on a Mac with Xcode
Nothing has to be set at build time: members scan the QR code or type the company code, and the server address comes with it. To fix the server at build time add --dart-define=API_BASE=https://your-club.example.com/api/v1 --dart-define=WEB_BASE=https://your-club.example.com, and --dart-define=COMPANY_CODE=<code> for a single-club build that skips the first screen. Debug builds accept plain http:// (use your computer's address on the Wi-Fi, or 10.0.2.2 from the Android emulator); release builds need https.
The folder layout
Each of the two projects is a complete Flutter project with lib/ (api, state, util, screens, widgets), test/, tool/, docs/ (the API contract openapi.yaml and screenshots) and its own android/ or ios/. android_app and iphone_app share the same code; after changing one, run mobile_app/check-sync.sh to be sure the other matches.
Before publishing
- Application id / bundle id –
com.clublink.clublink_app. Change it to your own. - Android signing – create a key with
keytooland put its details inandroid/key.properties(it is git-ignored). - Icons – replace
assets/icon.pngandassets/icon_foreground.png, then rundart run flutter_launcher_icons. - iPhone – open
ios/Runner.xcworkspaceon a Mac, set your team and bundle id, add the Push Notifications capability and Background Modes → Remote notifications.
Push notifications (optional)
- Create a Firebase projectAdd the Android and iOS apps with your application ids.
- Add the app filesAndroid:
google-services.jsoninandroid/app/plus the Google services Gradle plugin. iPhone:GoogleService-Info.plistinios/Runnerin Xcode, and your APNs key in Firebase. - Add the server keyDownload a Firebase service account JSON file, put it outside the web root and set
FCM_CREDENTIALS=/path/to/file.jsonin.env. - Keep the queue runningPush messages are sent through the queue. See Background work.
Members get a push for every message in their inbox (reminders, waiting-list offers, receipts); staff get one for new enquiries. Without the Firebase files the app works and simply does not push.
AI tools
An assistant that answers questions from your own data, and help writing messages. Every club chooses its own AI service and uses its own key.
Connect your AI service
- Open the AI tabSettings → AI (owners only; the platform admin has no AI settings).
- Choose a serviceOpenAI, Anthropic (Claude), Google Gemini, Mistral, Groq, DeepSeek or OpenRouter. Choose a model, or keep the suggested one.
- Paste your key and saveIt is stored encrypted and only the last four characters are shown again. You can keep a separate key for each service.
- Test itPress Test connection (it tests the saved settings, so save first), then switch AI on.
AI by plan
When pricing is switched on for the platform, AI is a feature of the subscription package: the super admin switches AI on or off for each package, and clubs on a package without it see no AI buttons. When pricing is off, every club can use AI. Each club has a daily limit of AI requests (100 by default, set in the AI tab) so a runaway cost is impossible.
What it does
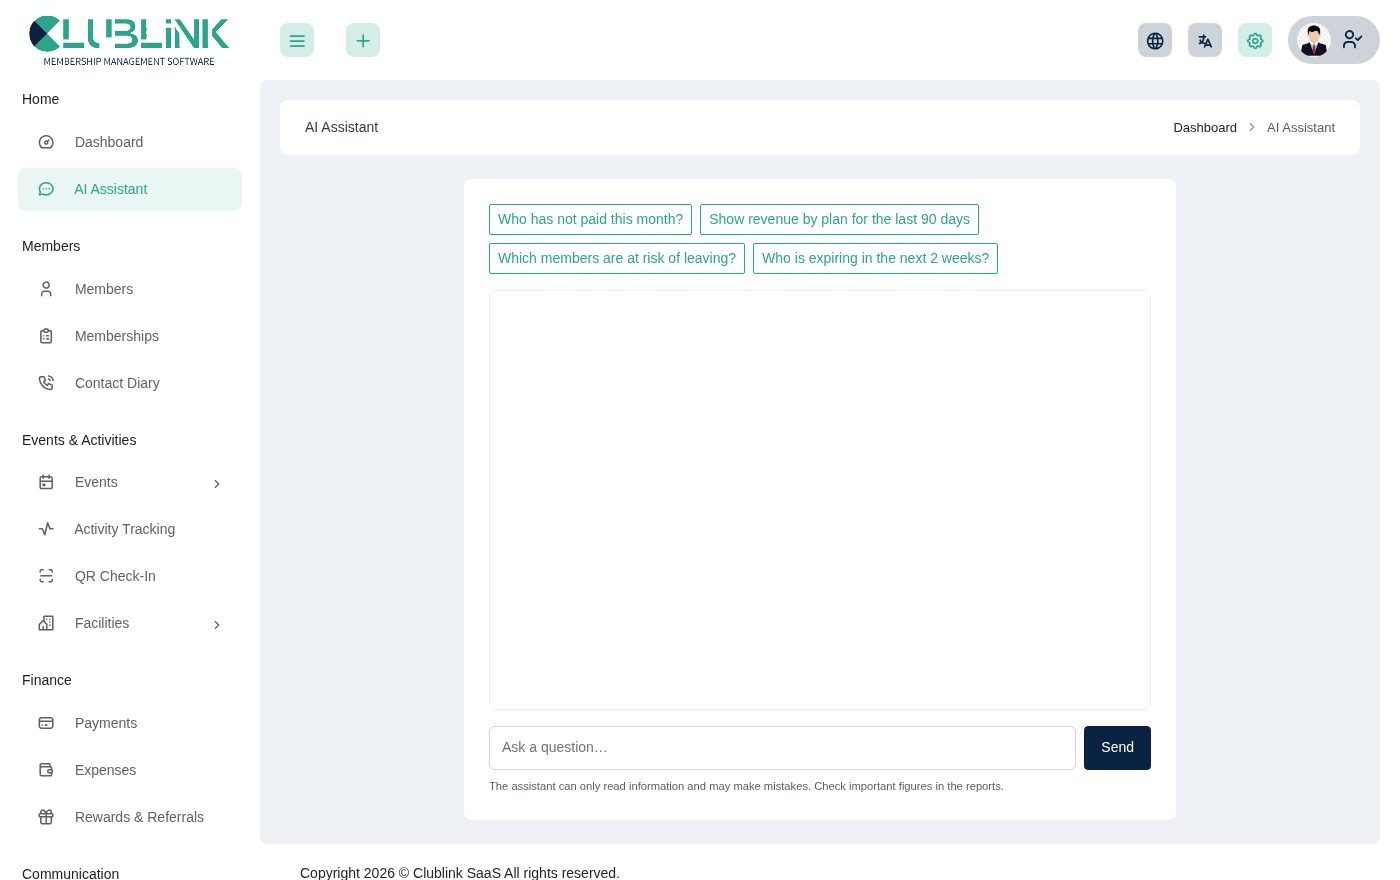
- AI Assistant – owners ask things like who has not paid this month?, which members are at risk of leaving? or revenue by plan for the last 90 days (also in the app). Members ask about their own membership, dues and events. The assistant only reads; it never changes anything.
- Draft a message – on the Broadcast page, describe what you want to say and the assistant writes it for you to edit.
- Weekly summary – on Mondays owners get a short email summary of the week.
Messages and automation
Members hear from you at the right time without anyone remembering to send it.
Email, SMS and WhatsApp
- Email – set up your mail server under Settings → Email SMTP and send a test. Edit the wording of each automatic email under Communication → Email Notification and switch each one on or off.
- SMS and WhatsApp – add your Twilio details under Settings → Twilio. SMS and WhatsApp use the same events as email.
- Members decide – each member can switch email, SMS and WhatsApp off in their profile; those channels are skipped for them.
- The app inbox – every message is also saved in the member's inbox in the portal and the app.
Broadcast
Communication → Broadcast: choose a group (all members, active, expiring in 30 days, expired, with unpaid invoices, or at risk of leaving), the channels and your message ({first_name} is replaced by the person's name), and send. You see how many people will get it first, and past broadcasts are listed. Messages go through the queue. The same is available in the app under More → Message members.

The queue
Set QUEUE_CONNECTION=database in .env so messages are sent in the background; the daily cron task works the queue. With sync they are sent immediately.
n8n
Reports & Automation → N8N sends events from ClubLink to your n8n workflow by webhook, so you can connect other tools.
Settings and integrations
Everything that is set once lives under Settings (the gear icon).
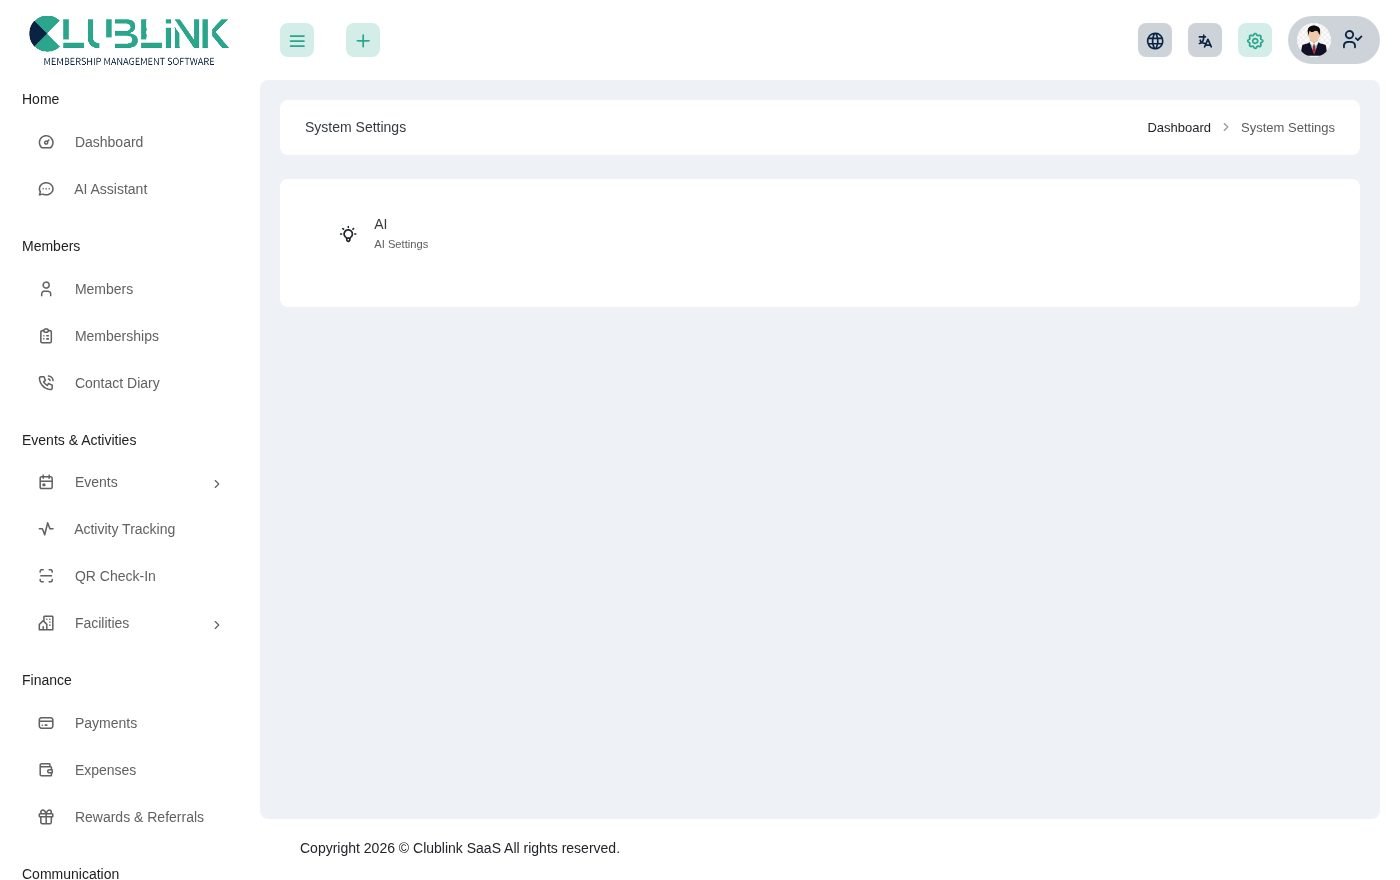
| Tab | What it controls |
|---|---|
| Account (profile) | Your name, email and picture. |
| Password | Change your password. |
| General / Company | Club name, logo, favicon, address, phone, email, currency, date and time format and number prefixes. |
| Email SMTP | The mail server used for every message. Send a test email after saving. |
| Payment | Stripe, PayPal, Flutterwave, Paystack, Razorpay and bank transfer for members' invoices (and for plans, when you run a SaaS). Sandbox or live. |
| Twilio | Details for SMS and WhatsApp messages. |
| AI (owner only) | The AI service, model, key, daily limit and on/off switch. See Connect your AI service. |
| 2FA | Turn on two-factor authentication for your login. |
| Site SEO, reCAPTCHA, Cron job | Super admin only: SEO for the landing page, Google reCAPTCHA on login and register, and the cron web address. |
Languages and themes
Make it feel like yours.
- Languages – ClubLink ships with several languages (including Arabic, Danish, Dutch, French, German, Italian, Japanese, Polish and Portuguese). Users switch language from the top bar. Right-to-left languages flip the layout.
- Themes – choose the colour, light or dark mode, the layout direction and the font from the theme panel (the gear icon in the top bar).
- Translating – language files are in
resources/lang. Keep a copy of any translation you change, because upgrades overwrite these files.
API
A REST API serves the mobile app and is open to your own tools.
- Base address –
https://yourdomain.com/api/v1. Everything is JSON. - Sign in –
POST /loginwith email and password (andotpwhen two-factor is on) returns a token. Send it asAuthorization: Bearer <token>. Tokens last 30 days. Super admins cannot use the API. - Who can do what – members use the
/my/...routes; owners and staff use the staff routes, each needing the same permission as on the web. Another club's data is invisible (404). - Shared –
/me,/club,/plans,/notices,/upcoming-events, password change, push registration and/assistant. - Members – profile, card, memberships, payments (with receipt data and card checkout), family, events and tickets, facilities and bookings, rewards, messages, documents, pause requests, data export and account deletion.
- Staff – dashboard, members (list, add, edit), card scan, event check-in, events and facilities (add, edit), payments (list, mark paid), enquiries, notices and broadcast.
- Errors –
{ "message": "...", "errors": { ... } }with the usual HTTP status codes. Sensitive routes are rate limited.
The full contract is the OpenAPI file mobile_app/clublink_app/android_app/docs/openapi.yaml.
SaaS administration
What the super admin does to run ClubLink as a business.
| Menu | What it does |
|---|---|
| Dashboard and Customers | Signups, subscription income and every owner. Edit, switch on or off, reset a password, change their package, or log in as an owner to help (impersonate). |
| Pricing → Subscription | Packages with their price, billing period and limits (members, users, events) and features (such as AI, n8n and the mobile app). Pricing can be switched off to make every feature free. |
| Pricing → Coupons | Discount codes for packages, with usage history. |
| Pricing → Transactions | Every subscription payment, including bank transfers waiting for your approval. |
| Mobile Apps | Google Play and App Store links, minimum app version, maintenance message, default look, and a list of every club with its company code and an on/off switch for the app. |
| CMS | The landing page: Home Page sections, Custom Pages, FAQ, Footer and Auth Page. The landing page and the register page can each be switched on or off. |
| Contact Diary and Notice Board | Your own notes and notices. |
| Settings | Platform branding, email, payment gateways, SEO, reCAPTCHA, whether new owners must verify their email and whether email notifications are on. |
Upgrading
Always back up first.
- Back upDownload your
.envfile,.htaccess, thestoragefolder andpublic/uploads, and export the database. - Replace the filesUpload and replace everything with the contents of
main_filefrom the new version. - RestorePut your
.env,.htaccess,storageandpublic/uploadsback. - Run the updateLog in and follow the steps in the update wizard, or run
php artisan migrateon the command line. - Clear cachesRun
php artisan optimize:clear(or delete the files inbootstrap/cacheandstorage/framework/views).
resources/lang. Keep a copy of any translation you changed. Changes to core files are also lost, so keep your own customisations separate.Going live checklist
Before real members use it.
APP_ENV=production,APP_DEBUG=falseand the correctAPP_URL(with https).- Change all default passwords and turn on two-factor for owners.
- Use
QUEUE_CONNECTION=databaseand the cron line so emails and push messages are sent in the background. - Set up SMTP and send a test email; set up the payment gateways in live mode.
- Install an SSL certificate (also on every club's own domain), and use
httpsfor the mobile app. - Run the web server and the cron job as the same user, so cached and compiled files can be shared (see Troubleshooting).
- Run
php artisan migrateandphp artisan optimize:clearafter every update. - Take regular database and
storagebackups, includingpublic/uploads. - Never put a
.envfile or session files into a public code repository.
Troubleshooting and FAQ
The problems we see most, and what to do.
A page shows "500 Server Error"
Look at the last lines of storage/logs/laravel.log. The most common cause after an update is a stale compiled page: run php artisan optimize:clear, or delete the files in storage/framework/views. If the log says Permission denied for a file in storage, the web server and the command line run as different users (for example www-data and your own login). Make storage and bootstrap/cache writable by both, or run the commands as the web server's user.
Emails and messages are not arriving
Send the test email under Settings → Email SMTP. If that works but members get nothing, check that the cron line is running and that QUEUE_CONNECTION and the daily task are working the queue. Remember a member can switch a channel off in their profile.
A staff member cannot see a menu
Menus follow permissions. Edit the person's role under Staff & Access → Role and tick what they need. New permissions appear immediately; there is no permission cache to clear.
My website shows 404
Check that Website is live is on (otherwise only your staff can preview it), that the page is published, and that the address is spelled as in Settings & brand. For an own domain, check its DNS and the web server host.
The app cannot connect
The first screen needs the club's website address, which comes with the QR code or invite link. Open the club's Mobile App page using the address members will use (not localhost), because the QR code is built from the address you opened it on. Check https://your-site/api/v1/platform opens in a phone browser. Android emulators reach your computer at 10.0.2.2; a real phone needs your computer's address on the same Wi-Fi, and release builds need https. If the app says Update the app or Back soon, the platform owner set a minimum version or a maintenance message under Mobile Apps.
Push notifications do not arrive
Check the Firebase files are in the app, FCM_CREDENTIALS points at a readable service-account file, the queue is being worked, and the phone allowed notifications.
A card payment in the app does not settle
Card payment needs Stripe switched on with a secret key under Settings → Payment. The member must tap I have paid after the Stripe page confirms. An older duplicate invoice for the same plan cannot be paid before the newest one.
Reminders and late fees do not run
The cron line is missing or wrong. Run php artisan app:run-daily-task by hand and read what it prints.
Environment variables
Set in the .env file. Run php artisan optimize:clear after changing it.
| Key | Default | Purpose |
|---|---|---|
APP_ENV / APP_DEBUG / APP_URL | - | Environment, debug output and the public address. |
DB_* | - | Database host, name, user and password (set by the installer). |
MAIL_* | - | Mail server (also editable in Settings). |
QUEUE_CONNECTION | sync | Use database in production. |
FCM_CREDENTIALS | - | Path to the Firebase service-account JSON for push notifications. Leave empty to switch push off. |
For developers: the PHP tests run against a separate database named in phpunit.xml and rebuild it, so never point them at real data.
Change log
What changed, newest first.
Version 2.0 – 30 October 2026
- Mobile app for Android and iPhone (add-on) with a REST API, card payments, receipts and offline scanning.
- Public website for every club: multi-page builder, plan pages, enquiries and own domain.
- Facility booking, paid event tickets with waiting lists, rewards and referrals.
- Instalments, late fees and automatic renewal invoices.
- New dashboards, reports with CSV export, broadcast messages and member import.
- AI assistant working with the AI service each club chooses (OpenAI, Claude, Gemini, Mistral, Groq, DeepSeek or OpenRouter), included by plan with a daily limit.
- Member portal: digital card, bookings, tickets, pause requests and privacy tools.
- Menu regrouped by workflow; security hardening (tenant isolation, audit trail, queued messages, upload checks).
Version 1.5 – 25 June 2026
- WhatsApp notifications, Razorpay, automatic reminders by cron, and a new dashboard and member modules.
Version 1.4 – 26 March 2026
- n8n and OpenAI integration, and event registration in the member login.
Version 1.3 – 8 September 2025
- Member dashboard, SMS templates with Twilio, membership and expense reports, Paystack.
Support
Stuck? We are happy to help.
Open a ticket at support.smartwebinfotech.com. Please include your purchase code, the page you were on, what you expected and what happened, and, if you can, the last lines of storage/logs/laravel.log.