Overview
This documentation is a complete guide to the Car Booking SaaS: installing it, setting it up, running the platform as super admin, running a rental company as owner, every feature, the public website, the driver and customer mobile apps, integrations, upgrading and troubleshooting.
About the Product
Car Booking is a multi-company (SaaS) car rental management system. One installation serves many rental companies. Each company (an owner) gets its own cars, customers, bookings, staff, website and mobile apps, and can never see another company's data. The platform itself is run by the super admin, who sells subscription plans.
Who uses it
| Role | What they do | Where |
|---|---|---|
| Super admin | Runs the platform: plans and prices, owners (companies), plan payments, system health, backups, platform settings and the store links of the mobile apps. | Admin panel |
| Owner | Runs one rental company: fleet, bookings, customers, drivers, money, website, apps. Can create staff with their own roles. | Admin panel, website, apps |
| Manager / staff | Works inside the owner's company with the permissions the owner gave them (for example only bookings and customers). | Admin panel |
| Driver | Sees only their own jobs, rental agreements, expenses and earnings. Has a trimmed menu (no WhatsApp inbox, branches, reports and so on). | Admin panel (My jobs), driver app |
| Customer | Books and pays on the company's website or the customer app, sees their bookings, documents and rewards. | Website, customer app |
Main parts
- Admin panel for super admin, owners, staff and drivers.
- Public booking website for every company (own pages, blog, FAQ, SEO, own domain, dark mode, many languages).
- Driver app and customer app (Flutter, Android and iPhone) that talk to the same server through a mobile API.
- AI helpers (assistant, insights, photo damage check, pricing suggestions, reply drafts, ID reading) with OpenAI, Claude or Gemini.
- Public API and webhooks (n8n, Zapier or any URL) for connecting other systems.
Server Requirement
Laravel requires certain minimum PHP versions and extensions. Make sure your web server supports the following:
- PHP >= 8.2 (Laravel 12)
- cURL PHP
- DOM PHP
- Fileinfo PHP
- Filter PHP
- Hash PHP
- Mbstring PHP
- OpenSSL PHP
- PCRE PHP
- PDO PHP
- Session PHP
- Tokenizer PHP
- XML PHP
- GD PHP
- Zip PHP
Minimum PHP Version:
Required PHP Extensions:
Server Requirements (full list)
| Item | Needed | Why |
|---|---|---|
| PHP | 8.2 or newer | Laravel 12 |
| PHP extensions | cURL, DOM, Fileinfo, Filter, Hash, Mbstring, OpenSSL, PCRE, PDO (MySQL), Session, Tokenizer, XML, GD, Zip, JSON, Ctype | Framework, image handling (photos, PDF), backups |
| Database | MySQL 5.7+ or MariaDB 10.3+ (utf8mb4) | All data |
| Web server | Apache with mod_rewrite and AllowOverride All (or Nginx with the Laravel rewrite rules) | Clean URLs, the security rules in .htaccess |
| Cron | One cron entry every minute | Reminders, expiry, backups, queue (see "Cron and queue") |
mysqldump | Available to PHP (exec allowed) | Nightly backups (optional but recommended) |
| HTTPS / SSL | Strongly recommended; required for store apps and payment gateways | Security, mobile apps, payments |
| Disk space | At least 2 GB free, more for photos and backups | Vehicle photos, documents, backups |
| Memory / time | PHP memory_limit 256 MB, max_execution_time 120 s | PDF reports, exports |
You do not need Node.js on the server: the compiled assets are included.
How to Create Database
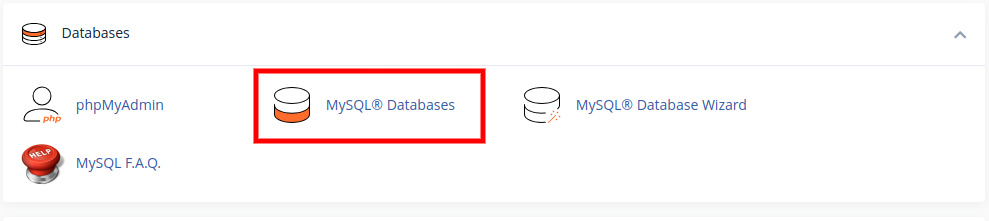
Step 1: Access the Database Creation Tool
First, navigate to the Databases section of your hosting panel. Click on MySQL® Databases to begin the process. This tool allows you to create and manage your databases and database users.
Step 2: Create a New Database
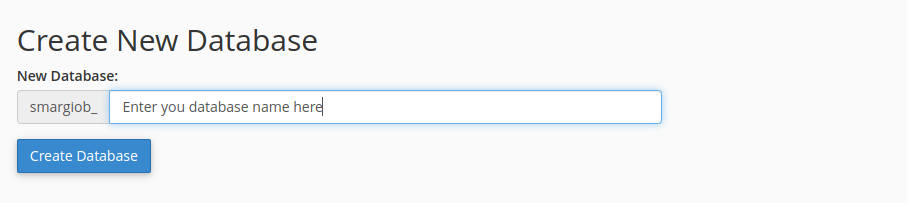
On the next screen, you will be able to create a new database. You will see a field to enter the name of your new database. The hosting provider automatically adds a prefix to the database name for security. After entering the name, click Create Database.
Step 3: Create a New User
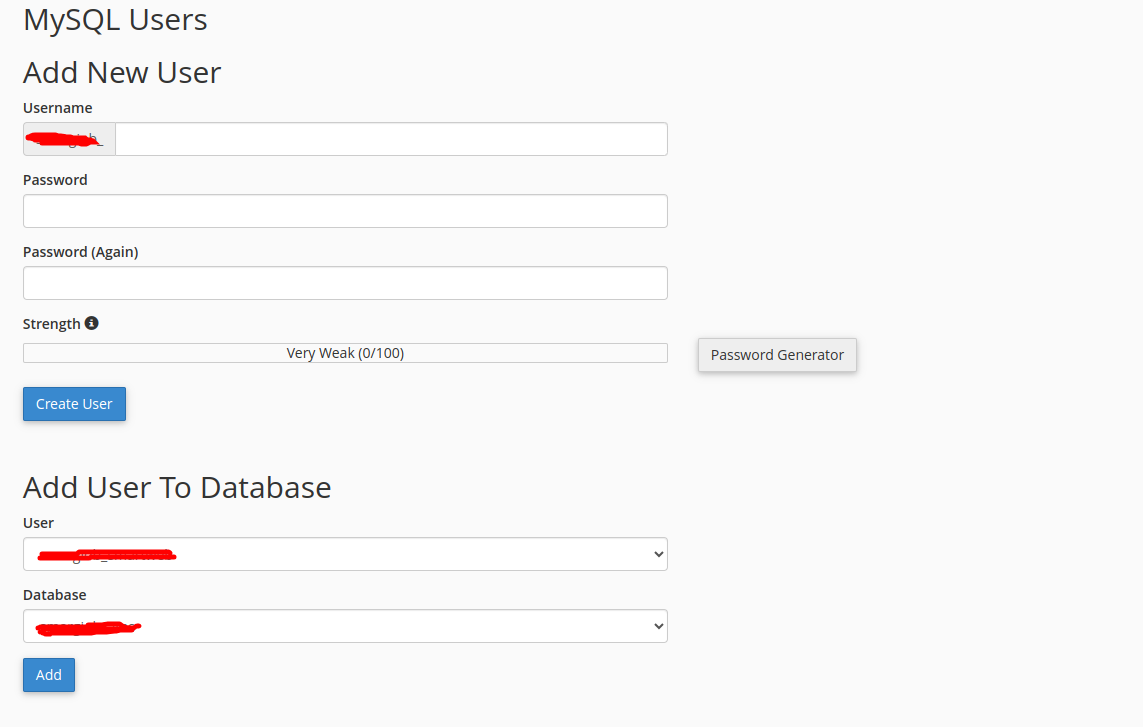
After creating the database, you'll need to create a user for it. Scroll down on the same page to the Add New User section. Enter a Username and a strong Password in the provided fields. Use the Password Generator tool to create a secure password. Click Create User to save the new user.
Step 5: Assign Privileges
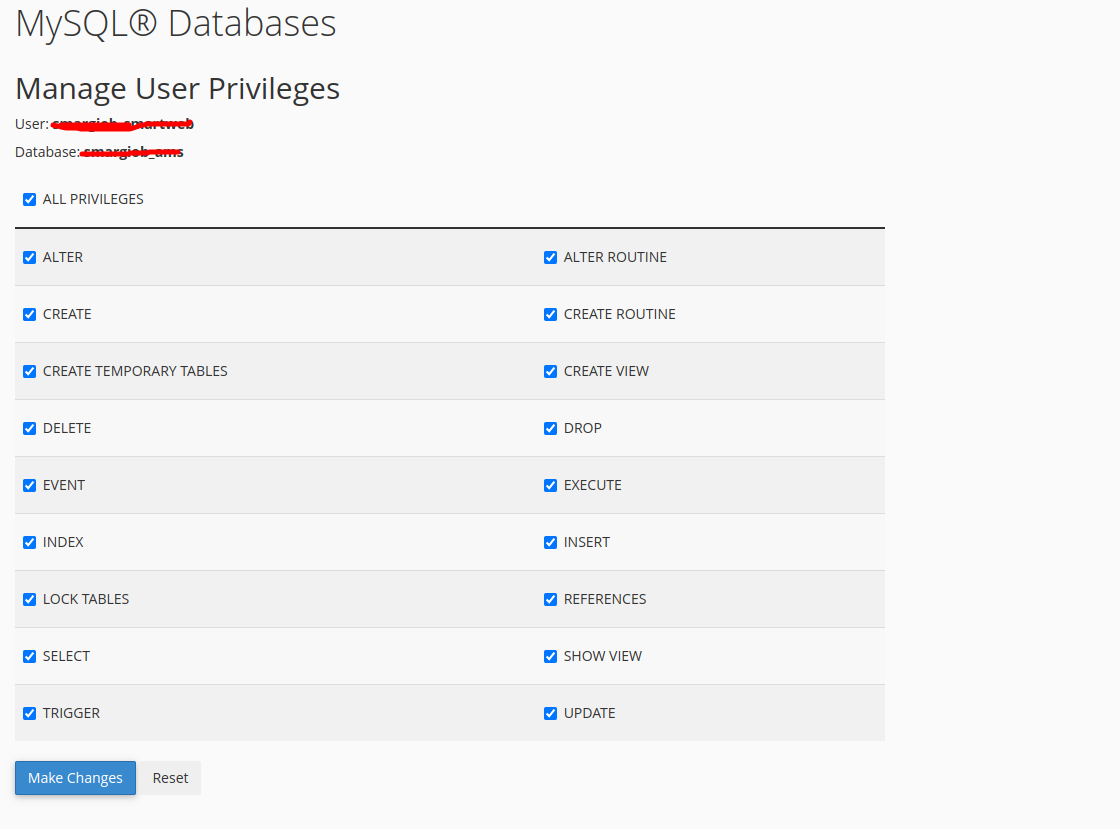
The final step is to grant the new user permissions to manage the database. On the Manage User Privileges page, check the box for ALL PRIVILEGES. This gives the user full control over the database, allowing them to create, modify, and delete tables and data. Click Make Changes to finalize the process. Your database and user are now set up and ready to use.
How to Upload Files
Step 1: Access the File Manager
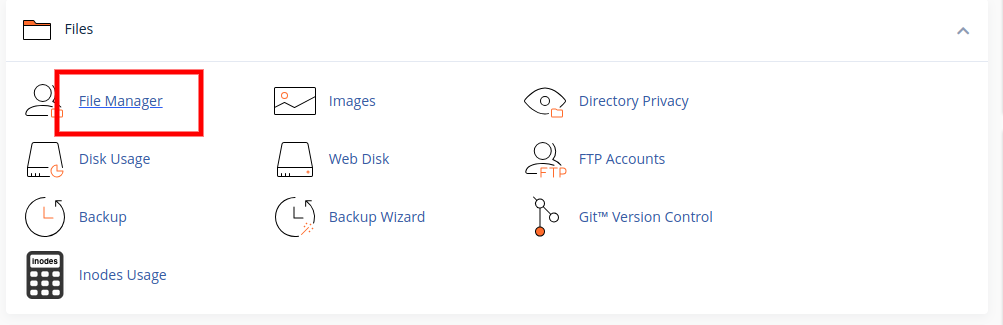
Log in to your cPanel account. In the main menu, look for the Files section and click on File Manager. This will open the file manager interface in a new tab.
Step 2: Navigate to the Correct Folder
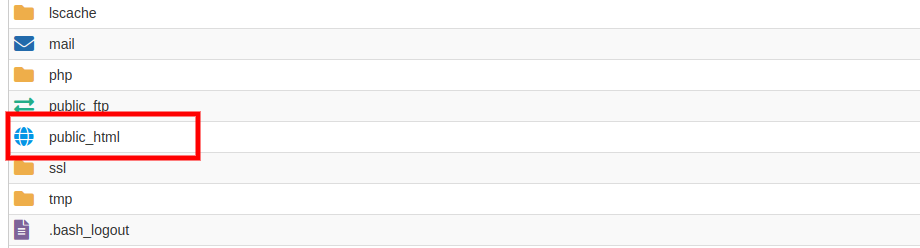
In the File Manager, navigate to the folder where you want to upload your files. For a primary domain, this is typically the public_html folder. This folder is the "web root" and contains all the files that are accessible to the public on your website.
Step 3: Select and Upload Files
Once you are in the correct directory, click the Upload button in the toolbar at the top of the page. This will open a new window where you can drag and drop your files or click Select File to browse for files on your computer.
Step 4: Verify the Upload
After the upload is complete, you should see a 100% progress message. The uploaded file should now appear in the folder you selected in the File Manager.
How to Install
Step 1: Start the Installation
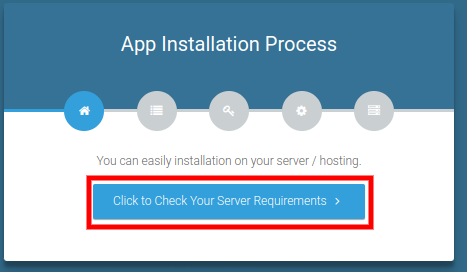
Open a web browser and navigate to your website's installation URL, which is typically yourdomain.com/install. This action will initiate the installation process and lead you to the App Installation Process page.
Step 2: Check Server Requirements
The next step is to ensure your server meets all the necessary requirements for the application. Click the "Click to Check Your Server Requirements" button to proceed.
Step 3: Verify App Permissions
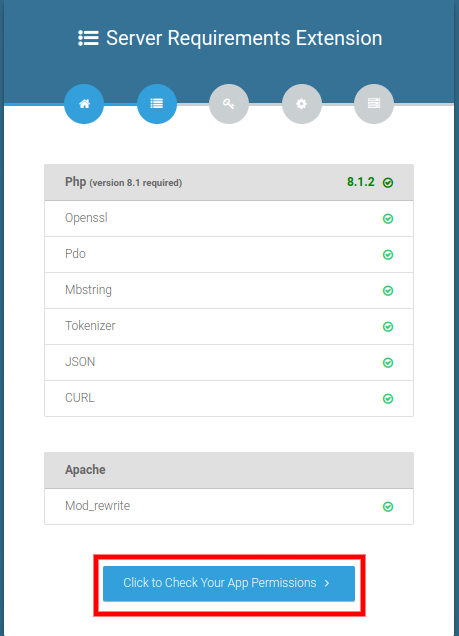
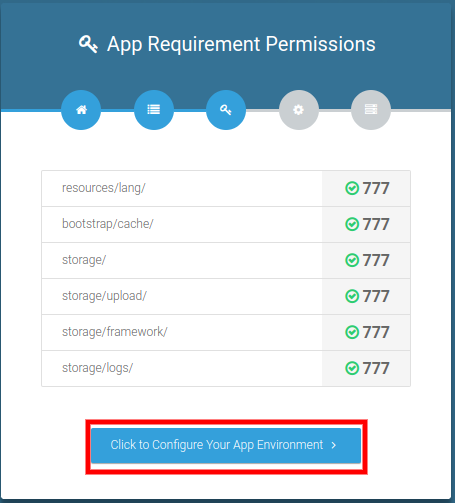
After confirming the server extensions, the installer will check the necessary directory permissions. Ensure all permissions are correct (often shown with a green checkmark next to them) and then click "Click to Configure Your App Environment".
Step 4: Configure App Environment
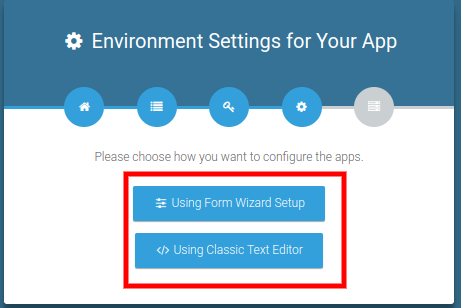
You will be given options to configure the app's environment. For a straightforward installation, select "Using Form Wizard Setup".
Step 5: Enter App and Database Details
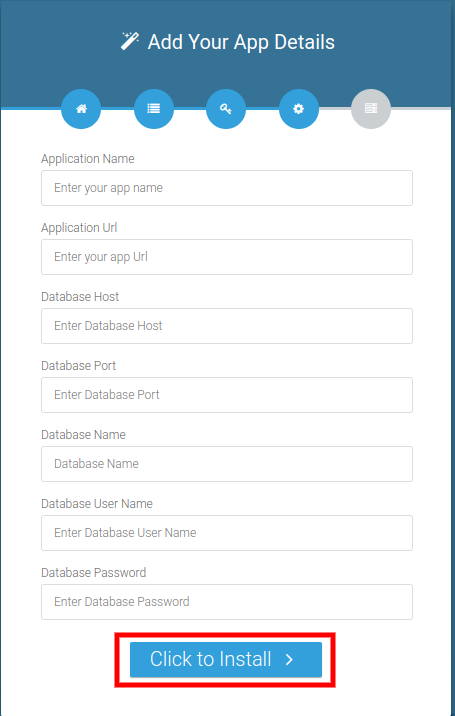
This is a critical step where you link the application to your database. Fill in the required fields with the information you gathered when setting up your database. This includes the Database Host, Database Name, Database User Name, and Database Password. You will also need to enter an Application Name and Application Url. Once all the details are entered, click "Click to Install".
Step 6: Finalize Installation
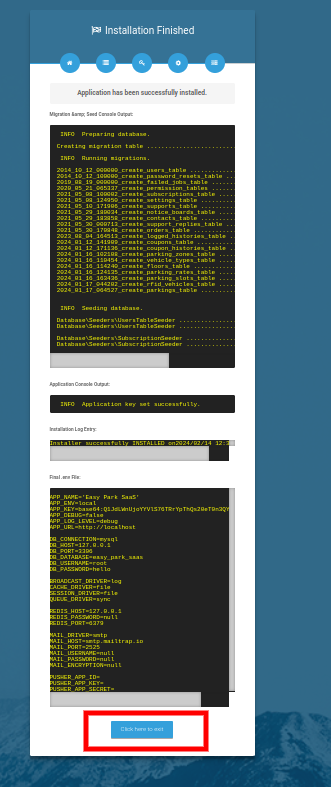
The installer will now run the installation process, which includes preparing the database and running migrations. Once you see the "Application has been successfully installed" message, you have successfully completed the process. Click "Click here to exit" to finish.
Default User Login Details
Email : superadmin@gmail.com
Password : 123456
Email : owner@gmail.com
Password : 123456
Email : manager@gmail.com
Password : 123456
After Installation: Setup Checklist
Do these steps once after the installer has finished. Most problems reported by customers come from skipping one of them.
- Change the default passwords of the super admin, owner and manager accounts (Profile > Password) and the demo email addresses.
- Production settings: in
.envsetAPP_ENV=production,APP_DEBUG=falseand the realAPP_URL(withhttps://). Debug pages leak secrets. - Storage link: run
php artisan storage:link(or create thepublic/storagelink in your host panel). Without it uploaded photos, logos and banners do not show. - Folder permissions: the web server user must be able to write to
storageandbootstrap/cache(usually 775). - Cron: add the scheduler entry (next section). Without it there are no reminders, no expiry, no backups.
- Email: Settings > Email (SMTP) and send a test. Customers receive sign-in codes and booking emails from here.
- Check the security rules: open
https://your-site/.envandhttps://your-site/storage/logs/laravel.log. Both must answer 403. If a file downloads, your web server ignores.htaccess: fix it before going live. - Back up your
.env(it holdsAPP_KEY; without it encrypted settings cannot be read). - Run migrations after every update:
php artisan migrate --forcethenphp artisan optimize:clear.
Cron and Queue
Cron (required)
One entry, every minute. Replace the path with the folder that contains artisan (the main_file folder):
* * * * * cd /path/to/main_file && php artisan schedule:run >> /dev/null 2>&1What the scheduler runs:
| When | Command / job | What it does |
|---|---|---|
| Every minute | heartbeat | Lets "System health" know the scheduler is alive |
| Every minute (only if a real queue is set) | queue:work --stop-when-empty | Sends emails, SMS, WhatsApp, webhooks and push messages in the background |
| Every 5 minutes | bookings:expire-online | Releases unpaid online reservations whose hold time ran out |
| 00:10 | subscriptions:expire | Marks plans that ended as expired |
| 00:20 | maintenance:rollover | Moves repeating maintenance reminders to the next date |
| 02:30 | backup:run | Nightly database + uploads backup (needs mysqldump) |
| 03:10 | prune login attempts | Deletes login history older than 90 days |
| 07:00 | vehicles:expiry-alerts | Alerts for registration / insurance / document expiry |
| 08:00 | bookings:send-reminders | Pick-up and return reminders to customers (email, app push) |
| 09:00 | subscriptions:remind | Plan renewal reminders to owners |
| Monday 06:30 | ai:insights | Weekly AI business briefing for each company that uses AI |
Queue (optional)
With the default QUEUE_CONNECTION=sync emails and webhooks are sent during the request: simple and fine for small installs. To send them in the background set QUEUE_CONNECTION=database in .env; the cron entry above then drains the queue every minute (or run php artisan queue:work under Supervisor on a VPS). The old key QUEUE_DRIVER is ignored by Laravel.
The .env File: Important Keys
The installer writes .env for you. These are the keys you may need to change later:
| Key | Example | Meaning |
|---|---|---|
APP_URL | https://rent.example.com | The public address of the platform. Used in emails, QR codes and payment return links. Must match the real address. |
APP_ENV / APP_DEBUG | production / false | Never leave debug on in production. |
APP_KEY | (generated) | Encrypts saved secrets and sessions. Back it up; do not change it on a live system. |
DB_* | host, database, user, password | Database connection. |
QUEUE_CONNECTION | sync | database | How background jobs run. |
MAIL_* | SMTP host, port, user, password | Fallback mail settings (each company can set its own under Settings). |
SITE_BASE_DOMAIN | example.com | Turns on free subdomains {company}.example.com. Needs a wildcard DNS record and wildcard SSL. Leave empty to switch off. |
CUSTOM_DOMAIN_IP | 203.0.113.10 | The server IP shown to owners who must create an A record for their own domain. |
BACKUP_ENABLED / BACKUP_KEEP | true / 14 | Nightly backups and how many zips to keep. |
FCM_CREDENTIALS | /home/user/firebase.json | Absolute path to the Firebase service-account file for mobile push notifications (keep it outside the web folder). |
SESSION_LIFETIME | 120 | Minutes until an inactive admin session ends. |
.env run php artisan config:clear (or optimize:clear).Web Server, Security Rules and SSL
- The folder with
artisanis the application folder. In this product layout the root.htaccesssends requests toindex.phpand denies access to.env,storage/logs,storage/app/backups,vendorand source files. Keep those rules. - If you can, point the domain's document root at the
publicfolder instead; then these files are never reachable. - Nginx: use the standard Laravel configuration (
try_files $uri $uri/ /index.php?$query_string;) and deny/\.and/storage/logs. - SSL: install a certificate (Let's Encrypt is free). Payment gateways, store apps and sign-in cookies need https.
- Company websites on their own domains need the proxy to keep the original
Hostheader. For certificates on customers' domains use a proxy that issues certificates on demand (Caddyon_demand_tlswithaskpointing at/domain-check?domain=host, which answers 200 only for domains that belong to a company).
APP_KEY.Super Admin: Dashboard and Owners
The super admin sees platform-wide numbers instead of one company's data.
- Dashboard: active and inactive owners, new owners (30 days), trials, plans ending soon, expired plans, plan income (this month and 30 days), totals for vehicles, bookings, customers and drivers, a table per plan, and the latest owners and plan payments.
- Customers (menu): the list of owners (your customers). Create an owner, edit, activate / deactivate, and log in as the owner to help (an impersonation banner lets you go back). An inactive owner cannot sign in, and their website and apps stop working.
- Plan payments: Pricing > Transactions lists every plan payment with a PDF invoice. Coupons (All Coupon, Coupon History) give discounts on plans.
Super Admin: Subscription Plans
Pricing > Packages. Each plan has a price, a duration (monthly, yearly, lifetime) and limits and feature switches. Owners choose a plan on sign-up or from their dashboard.
- Limits: number of users, customers, vehicles (vehicle limit) and so on. When the limit is reached the owner is asked to upgrade.
- Free trial: set trial days on a plan; a new owner starts on the trial and sees the end date.
- Feature switches: for example AI features, n8n webhooks, API access, online booking. A feature that is off in the plan is hidden for the owner.
- Payment methods for plans: bank transfer (needs your approval), Stripe, PayPal and the other gateways you switch on under Settings > Payment.
- Renewal: owners get reminder emails before the plan ends (
subscriptions:remind). Renewal is a reminder with a link: cards are not charged automatically. A plan that ends is marked expired bysubscriptions:expire.
Super Admin: Platform Settings
Settings (top right menu) has one tab per area. The super admin's settings are the platform defaults; each owner has their own copy for their company.
| Tab | What to set |
|---|---|
| Account / Password / 2FA | Your name, photo, password and two-factor authentication. |
| General | Product name, logos (dark, light, landing), favicon, default language, footer text, date and number formats, theme colours. |
| Company | Company name, address, phone, email, currency and symbol, tax number, time zone, numbering of bookings and agreements. |
| Email (SMTP) | Mail server, port, encryption, sender name and address. Use the test button. Required for sign-in codes and booking emails. |
| Payment | Stripe, PayPal, Paystack, Flutterwave, Razorpay and bank transfer for plan payments (super admin) or for rental payments (owner). |
| Site SEO | Meta title, description, keywords, share image of the landing page. |
| Google reCAPTCHA | Site key and secret to protect login and forms from bots. |
| 2 Factor Authentication | Switch on two-factor sign-in for users. |
| Rental Agreement | Default terms and conditions and the text of the agreement. |
| Twilio | Account SID, token, SMS number and WhatsApp number. Used for SMS and WhatsApp messages and for phone sign-in in the customer app. |
| AI Settings | Main and backup AI provider (OpenAI, Claude, Gemini), key and model for each, daily limit, "read ID photos" switch. |
php artisan settings:encrypt-secrets --dry-run and then without --dry-run.Super Admin: System Health, Backups and Login Attempts
- System health: scheduler heartbeat, queue backlog, failed jobs, last backup, free disk space and plans ending soon, each with a green / red state and a hint.
- Backups: nightly
backup:runwrites a zip (database dump + uploads) tostorage/app/backupsand keeps the newestBACKUP_KEEP. Download or run one now from Backups. Copy the zips off the server too. Owners can export their own data as JSON (Backup & data export). - Login attempts: every sign-in try (who, address, result) for 90 days. Five wrong passwords per account and address, and 30 per address, lock sign-in for a while.
- Mobile apps: paste the Google Play and App Store links of the shared apps once (see "Mobile apps").
- Language files:
php artisan lang:syncadds every text used in the code to each language file so translators have a complete list (untranslated texts keep the English words).
Owner: First Steps (in this order)
A new company is ready to take bookings after these steps. Each one is a menu item on the left.
- Settings > Company: company name, address, phone, email, currency, time zone, logo. These appear on invoices, agreements and the website.
- Configuration > Tax: add your tax rates (for example VAT 10%). Bookings can add taxes automatically.
- Configuration > Types: vehicle types (Sedan, SUV, Van), inspection types, expense types and expiration (maintenance) types. Configuration > Booking: Options (air conditioning, GPS, child seat), Addons (extras with a price) and Places (pick-up / drop-off points with an optional price).
- Fleet > Branches: add your branches (offices / depots).
- Fleet > Vehicle: add each car (details below). Add photos: the website and apps use them.
- People > Driver, and System Settings > Staff Management: add drivers (they get the trimmed driver menu), then staff Users and Roles.
- Configuration > Rental Policy: late fees, kilometres, cancellation, deposit. Everything is off until you turn it on.
- Configuration > Pricing Rules: season, weekend, last-minute rules (optional).
- Configuration > Email Notification: choose what is sent by email, SMS, WhatsApp or push, and edit the wording.
- Settings > Payment: your own gateway keys if customers pay online.
- Online Booking: turn it on and choose your web address (for example
sunrentals). This creates your website and your app code. - Website > CMS: write your pages, colours, banner, FAQ, blog and SEO.
- Website > Mobile apps: see your app code and QR code.
Staff, Roles and Permissions
- Roles (Staff Management > Roles): create roles such as "Receptionist" or "Accountant" and tick what each can do (manage / create / edit / delete / show for every module).
- Users: Staff Management > Users: add a user, assign a role, set a password, activate or deactivate.
- Drivers: People > Driver: a driver is a user with the driver role. This role is deliberately small: contacts, notes, vehicles, bookings, inspections, expenses, rental agreements and their own account settings. They do not see WhatsApp inbox, branches, reports, finance and similar areas.
- Permissions are checked everywhere: menu items, pages, buttons, exports and the mobile API. A user who cannot "manage booking" does not see Bookings and cannot open the link by typing it.
- Changing a role takes effect immediately. If a menu item seems missing after an update, open Roles and tick the new permission for that role.
Feature Guide: Vehicles and Fleet
- Vehicle list and details page: every car has a full details page (eye icon): photos, specs, rates, insurance, documents, GPS position, bookings history, income, expenses, maintenance and inspections.
- Fields: name, model, year, colour, plate, engine, gearbox, fuel, seats, odometer, daily / hourly / weekly / monthly rates, purchase price and date, insurance provider, policy number, premium and expiry, registration expiry, tracker id (GPS), branch, out-of-service switch, documents and notes.
- Photos: up to 12 per car (JPG / PNG / WebP, 5 MB each). Drag to reorder, mark the main photo. They show on the website (gallery, swipe, full screen) and in the apps. A car without photos shows a drawn side view.
- Out of service: takes the car out of booking and out of the website.
- Expiration reminders: Fleet > Expiration Reminder tracks registration, insurance and any date you add;
vehicles:expiry-alertssends bell alerts / emails before they end; repeating maintenance moves to its next date on its own. - Branches and transfers: cars belong to a branch; log a one-way transfer to move a car between branches (history is kept).
- Pricing suggestions (AI): see the AI section.
- GPS / tracker: the public API accepts position updates (
trackerability) and shows the last position on the car page.
Feature Guide: Bookings
- Create a booking: Rentals > Booking > Create. Choose customer (or create one), car, dates and times, pick-up and drop-off places, driver, extras (add-ons), discount, tax and notes. The price is worked out by the pricing engine (rates, rules, extras, tax).
- Statuses: Pending (online request waiting), Yet to start, On going, Completed, Cancelled. A booking whose return time passed while still On going shows an Overdue badge.
- Availability: a car cannot be double-booked; the system checks overlaps for staff, the website, the API and drag-and-drop.
- Payments: add payments (cash, card, transfer…) on the booking page; the payment status (unpaid / partly / paid) follows. Refunds are recorded as negative payments so income reports show net figures. A paid booking that is cancelled is flagged Refund due; you send the money and press Mark as refunded.
- Deposit: a default deposit for new bookings. It is held money, not income: mark it collected, later release it, optionally keeping part against the balance.
- Start / finish: the driver (or staff) starts the job with the odometer and fuel level and finishes it with the return reading. Closing the contract adds the late fee and extra-kilometre fee from your Rental Policy and sets the car's odometer.
- Bulk actions: tick rows on the list to export (Excel, PDF, CSV), cancel or delete selected bookings (bookings with payments are never deleted).
- Invoices and PDF: print the invoice or download PDF from the booking page.
- Activity log: who did what on a booking and when.
- Photos and AI check: pick-up and return photos from the driver app show on the booking; "Check photos with AI" compares them (a hint, never proof).
- Overdue and reminders: customers get pick-up and return reminders by email and, with the app, by push.
Planning calendar
Rentals > Planning shows every car as a row. Drag a booking to another day or onto another car, or resize it to change the length. The server checks the car is free, recalculates the price and keeps the draft agreement in step; a refused move snaps back. Completed and cancelled bookings are fixed. Needs the update booking permission.
Feature Guide: Agreements, Inspections, Damage Claims, Fines
- Rental agreement: a draft agreement is created with every booking (and follows the driver). Edit the terms, then send the customer a private e-sign link (
/sign/{token}). The signing page shows the full agreement; the customer draws a signature; name, address (IP) and time are stored. Signed agreements cannot be changed. - Drivers can also sign: the driver signs their own agreement in the driver app or the My jobs page.
- Inspections: checklists for pick-up and return (types are configurable) with photos, amount and notes.
- Damage marks and claims: mark damage on the car diagram, then "Start a damage claim" to record the cost, status and who pays. A claim can be charged to the booking.
- Fines and tolls: record a fine with the vehicle, time and amount; it finds the booking that had the car at that time and can be charged to that customer's booking.
Feature Guide: Customers
- Customer records: name, email, phone, address, ID and licence numbers, licence expiry, notes. Created by staff, the website or the customer app.
- Documents: licence and ID photos or PDFs in private storage (not publicly reachable). Expiry dates are tracked.
- Blacklist: a blacklisted customer cannot book online or sign in to the app.
- Lifetime value: income per customer (Finance > Customer value).
- Privacy (GDPR): Export gives the customer's data; Erase removes personal details and documents but keeps past bookings without the name. The customer app has "Delete my account" with the same result.
- Loyalty and referral: see Marketing.
- AI document reading: optional; see the AI section.
Feature Guide: Drivers and Driver Payouts
- Driver menu: a driver sees My jobs (their jobs for the next 7 days with phone and map links, Start / Finish), their rental agreements, their expenses and their earnings.
- My jobs page:
/driver-app/todaycan be added to a phone's home screen and the last loaded page stays readable offline. The Flutter driver app does the same and more. - Commission: People > Driver payouts: set a commission per driver (percent of the rental before tax, per booking, or per day). It is worked out once when a booking is completed (later rate changes do not alter it). Pay out in one go; paid earnings are never removed. Reopening a completed booking removes an unpaid earning.
- Expenses by drivers: a driver can add fuel, tolls, parking with a receipt photo; the owner sees them in Expense with the driver's name.
Feature Guide: Finance, Expenses and Reports
- Expenses: Expense menu: title, type (Expense types), vehicle, date, amount, receipt, notes.
- Reports (menu Report): Income, Outstanding Balances, Vehicle Utilization, Tax summary (tax collected per period), Customer value (best customers), Expense, Profit/Loss, Vehicle Availability and Damage Incident, each with filters and export to Excel, PDF or CSV where offered. Logged History (Staff Management) shows who signed in.
- Data & sync: Backup & data export, Calendar feed and Accounting export (CSV files for Xero, QuickBooks and Zoho).
- Dashboard: a period filter (for example today, this month, this year or a custom range) drives the money cards (received, expenses, profit, bookings, new customers); fleet counts and the Today section always show today. Also top vehicles, upcoming pick-ups, overdue returns, outstanding balances, online requests waiting, utilisation and the AI insight card.
- Other currencies: on the website visitors can view approximate prices in another currency using rates you type (display only; bookings stay in your currency).
Feature Guide: Promotions, Loyalty, Reviews, WhatsApp and More
- Promotions: percent or fixed codes with dates, minimum amount, cap, total and per-customer limits and a channel (everywhere / website and API / staff). One discount per booking. Customers type the code on the website or in the app.
- Loyalty and referrals: points are earned when a booking is completed, spent by staff as a discount, and returned if the booking is cancelled. Every customer has a referral code; a friend using it gets a discount on the first booking and the referrer gets points after the friend's first completed rental.
- Reviews: a request email is sent after a rental; reviews wait for your approval, can get a reply, and show on the website.
- WhatsApp inbox: customers' replies arrive in a shared inbox and staff answer from it (free replies are allowed 24 hours after the customer's message). Needs Twilio WhatsApp; see "Integrations".
- Contact diary and Notice board: contacts and notes for the team; the notice board is shown to staff and drivers (also in the driver app).
- Email notifications: Configuration > Email Notification lists every email the system sends; for each one choose the channels (email, SMS, WhatsApp, phone push) and edit the wording, per company.
- Calendar feed: a private
.icslink for Google / Apple / Outlook calendars. Creating a new link disables the old one.
Feature Guide: AI Features
Switch AI on under Settings > AI Settings (needs a plan that includes AI). Choose a main provider (OpenAI, Claude or Gemini) and an optional backup; if the main one fails the request is tried once on the backup. Keys are stored encrypted; leave a key empty to keep it, or tick "remove this key". A daily limit per company protects your costs. The permission use ai assistant controls who can use the features.
| Feature | Where | What it does |
|---|---|---|
| Owner assistant | Home > AI assistant | Ask questions about your business in plain words ("which cars earned least this month?"). It uses fixed read-only tools on your own data, so it cannot change anything. |
| Business insights | Dashboard card, weekly email / push | Finds facts with plain SQL (money trend, idle cars, unpaid finished rentals, late returns, expiring papers, waiting online requests…) and turns them into a headline and suggested actions. Works without AI as facts only. |
| Photo damage check | Booking page > Vehicle photos | Compares pick-up and return photos and gives a verdict (no new damage / possible new damage / cannot tell) with findings. A hint, never proof; no charge is made automatically. |
| Pricing suggestions | Fleet > Pricing suggestions | Which cars to raise or lower and a weekend rule, calculated from your own bookings; changes capped at 20%. Apply recalculates on the server and can be undone for 14 days. |
| Reply drafts | WhatsApp inbox, CMS inbox | Suggests a reply from the conversation and the customer's bookings. It flags complaints, refunds or disputes for a human. Nothing is sent by the AI. |
| ID and licence reading | Customer > Documents | Reads printed fields from a photo and lets staff copy chosen fields to the record. Off by default because the photo is sent to the AI provider. |
| Website chat helper | Online booking settings | A chat on the public site that knows your cars and rules; cannot book anything; capped per day. |
| Write with AI | Email templates and AI templates | Drafts template text. |
Feature Guide: Public API, Webhooks and Integrations
- API Access: create tokens under Configuration > API Access. Abilities:
read,bookings:write,tracker. Base address/api/v1. Tokens can be revoked at any time. - Webhooks (n8n / Zapier / any URL): Configuration > N8N lists every event with a sample payload and a send test button. Events: online_booking_created, booking_created, booking_updated, booking_cancelled, payment_received, refund_recorded, contract_closed, deposit_released, review_submitted, fine_charged, damage_claim_created and more. Every call carries
eventandoccurred_at. With a signing secret the call includesX-Signature: sha256=<HMAC-SHA256 of the raw body>. - Mobile API: documented in
main_file/docs/mobile-api.md(login, driver, staff and customer endpoints).
Online Booking and Online Payments
- Open Online Booking, switch it on and choose a web address (lowercase letters, numbers, dashes). Your site is
https://platform/book/{address}. - Choose whether bookings are confirmed automatically or need your approval, the free-cancellation hours (0 = no online cancellation), whether payment is required, hold time for unpaid reservations, the intro text and the AI chat helper.
- Add payment keys under Settings > Payment. Supported: Stripe, PayPal, Paystack, Flutterwave, Razorpay. When several are on, the renter picks one. A payment is checked with the provider (never trusted from the browser) and recorded once.
- Stripe webhook (recommended): in Stripe add the endpoint shown on the Online Booking settings page for the
checkout.session.completedevent and paste its signing secret there. Payments are then recorded even if the renter closes the tab before returning. - Cancellation: renters can cancel until N hours before pick-up. A paid booking cancelled this way is flagged Refund due; gateways are not asked to refund automatically.
- Unpaid online reservations are released automatically when the hold time ends (
bookings:expire-online). - Staff see an online booking in Bookings (source "online"). It has no driver until you assign one.
Website CMS (Website > CMS)
Each tab saves on its own. Empty text falls back to good defaults.
| Tab | Controls |
|---|---|
| Page sections | Banner (headline, highlights, picture, layout classic / centered / split), switches for every home block, fleet, how it works, why us, call to action. |
| About & locations | About text with picture and bullet points, pick-up locations block. |
| Offers & stats | Numbers band and offers from active online promotion codes. |
| Pages | Extra pages (rental terms, privacy, cancellation…). Each can be in the footer and/or menu. Basic formatting and pictures are allowed; scripts are removed. |
| Blog | Posts with reading time, share buttons, author box and car suggestions. |
| FAQ | Questions and answers shown on the home page. |
| Theme & colors | Five colours, font, button shape, home layout, dark mode (off / switch / default dark). |
| Footer & social | Footer text, social links, Google Maps embed link for the contact page. |
| SEO | Meta title and description, share image, and the switch "Let search engines list my website". Search engines are blocked until you turn it on. Sitemap and robots.txt are created per company. |
| Inbox | Messages from the contact form (email copy too), with an AI reply draft. |
| Subscribers | Newsletter signups with CSV export. |
- The header menu is fixed: Home, Cars, Our fleet, How it works, About us, Contact us. Everything else (Blog, extra pages, My bookings, Get our app) is in the footer.
- The site follows the owner's language; visitors can switch language (
?lang=). Arabic switches the whole layout to right-to-left. Language files live inresources/lang; runphp artisan lang:syncafter adding texts. - Pages: home, cars (filters, sort, grid / list), car page (gallery, specs, features, price table, policies, reviews, similar cars, sticky booking panel), wishlist, compare, contact, blog, my bookings (find bookings by email link), booking confirmation and invoice.
Website Addresses: Standard Link, Subdomain, Own Domain
Every company's website can be opened on up to three addresses, all showing the same site:
- Standard link:
https://platform/book/{address}. Always on. - Free subdomain:
https://{address}.example.com. The super admin setsSITE_BASE_DOMAIN=example.comin.envand creates a wildcard DNS record*.example.comto the server (and a wildcard SSL certificate). - Own domain: the owner opens Website > Website address, types
rent.theircompany.com, creates the shown CNAME (or an A record to yourCUSTOM_DOMAIN_IP) and the TXT record_carbook-verify.rent.theircompany.comwith the shown value, then presses Verify. Only after verification does the domain serve the site.
- The owner can choose a main address; the other addresses then redirect to it (GET requests only; signed links are never redirected).
- On a company's own host the links are clean (
/cars,/blog,/contact,/my-bookings,/app), robots.txt and sitemap.xml use the host, and login, admin and other companies are not served there (404). The mobile apps always talk to the platform address, never to a company's own domain. - The page also lists a one-click copy of each address ("My website" in the header menu).
Mobile Apps: Overview and Best Way to Publish
There are two Flutter apps (Android and iPhone) in the mobile folder: the driver app and the customer app. Both talk to the server's /api/mobile/v1 (documented in main_file/docs/mobile-api.md). A staff app is not part of the product.
Recommended model: one shared app for everyone
- You (the super admin) publish one customer app and one driver app under your own Apple and Google developer accounts, built with your domain.
- The driver signs in with email and password; the server knows the company, so no code is needed.
- The customer picks the company once (scan the QR on the company's website, search by name or city, or type the company code), then the app shows that company's name, logo, colour, cars, prices and rules.
- One update reaches every company; one set of store fees and reviews.
Why not a separate store app per company?
Apple's guideline 4.2.6 rejects apps made from a template by a service provider on behalf of clients, and Google Play's repetitive-content policy discourages many near-identical apps; Google also does not allow tool-generated apps to be submitted by the tool's operator for others. The accepted ways are the shared "picker" app above, or an own-brand app that the company publishes from its own developer accounts. The build script in "Own-brand app" prepares that. Check the stores' current rules before launch.
What the owner gives customers
- The app code (the website address name, for example
sunrentals), shown on Website > Mobile apps with a QR code, a "copy message" button and the page customers see. - Every company website has a public page
/book/{address}/app("Get our app") with the QR code, the code in plain text and the store buttons. A "Get our app" link appears in the footer once store links are set. - On iPhone the App Store cannot pass the code through the install, so the customer scans the QR or types the code after the first start. This is normal.
Driver App Features
- Home: today, in progress, coming up and done-this-month counts; commission to be paid, earned this month, paid out, expenses this month; a 7-day bar chart; today's jobs; alerts for overdue returns and agreements waiting for a signature.
- Bookings: Open, Today, Coming up, Done, Cancelled, All history, with search by booking number, car or customer. Each card shows customer, places, amount and payment status. The booking page has notes, map navigation, call and WhatsApp the customer, start and finish with odometer and fuel, photos, and the linked agreement.
- Photos: pick-up, return and damage photos with the camera or gallery; long-press to delete your own.
- Agreements: list (To sign / Signed / All), read the terms, sign with a finger. A blank signature is refused; a signed agreement cannot be signed again.
- Expenses: add fuel, tolls or parking with type, car, date, amount, notes and a receipt photo; see this month's total; delete your own.
- Earnings and notices: commission and payouts; the company notice board.
- Push: new job and cancelled job (needs Firebase; see below).
Customer App Features
- Find your company: scan QR, search by name or city, or type the code (a pasted website link or the company's own domain also works). Companies can switch listing in the search off (Website > Mobile apps).
- Sign in (three ways, owner can switch password and phone off): (1) email code: a 6-digit code by email, valid 10 minutes, 5 tries, new customers also give their name; (2) password: set in Profile, 5 wrong tries pause it for 15 minutes, "Forgot password" sends an email code; (3) phone number + text message: needs the owner's Twilio SMS; 3 texts per phone and hour, daily company cap 200. Biometric / PIN app lock is optional in Profile.
- Home: trip happening now or next trip with countdown and directions, amount still to pay, "book the last car again", offers (tap to copy the code), trips / spent / points, unread notifications bell.
- Cars: pick-up and return date and time, only free cars with the trip price, sort (price, seats, name), filters (type, gearbox, fuel), favourites, and a car page with photos, extras, places, promo or friend code, price breakdown and the company's rules.
- Booking and payment: book, then pay on the company's secure payment page (the gateway you set up), confirmation screen.
- My bookings: Upcoming / Past / Cancelled; on a booking: status, dates, places, extras, money, payments, extra charges, deposit, your driver (call), pick-up and return maps, add to calendar, Pay, Extend this rental (with new price), Rate your rental, Invoice PDF, Car photos (take pick-up and return photos), Report a problem (breakdown, accident, damage, running late), call the company, cancel inside the free window.
- Profile: details, password, My companies (stay signed in to several companies and switch), My documents (licence and ID photos with expiry), Rewards and offers (points, history, friend code, promo codes), Contact us, AI helper (when the company has it on), Light / Dark / Auto, app lock, sign out, delete my account.
- Notifications: an in-app inbox that keeps every message (also when push is off) and push for booking confirmed / cancelled and reminders the day before pick-up and return.
- Not included: paying by card inside the app (payment opens the company's page), saved cards, Google / Apple sign-in.
Building and Publishing the Apps
Build
- Install Flutter (flutter.dev) and Android Studio (Android) or Xcode on a Mac (iPhone).
- Open a terminal in
mobile/driver_appormobile/customer_app:
flutter pub get
# test on a device or emulator
flutter run --dart-define=API_BASE=https://your-domain.com/api/mobile/v1
# Android release files
flutter build apk --release --dart-define=API_BASE=https://your-domain.com/api/mobile/v1
flutter build appbundle --release --dart-define=API_BASE=https://your-domain.com/api/mobile/v1   # Google Play
# iPhone (on a Mac)
flutter build ipa --release --dart-define=API_BASE=https://your-domain.com/api/mobile/v1API_BASEmust be your platform address (not a company's own domain). Plainhttp://works in debug builds only; store builds need https. The Android emulator reaches a server on your PC athttp://10.0.2.2/...(the default inlib/config.dart).- Change the package id before publishing (
com.carbooking.driver_app,com.carbooking.customer_appinandroid/app/build.gradle*and in Xcode) and replace the launcher icons / names if you rebrand: the apps use the system logo (assets/logo.png,assets/mark.png). - Names: driver app "Car Booking Driver App", customer app "Car Booking".
- The app is tested by unit tests (
flutter test) andflutter analyzeis clean, but run it on a real phone before release.
Publish
- Create a Google Play Console account and an Apple Developer account (yours, as the platform owner).
- Upload the app bundle / IPA, add screenshots, privacy policy and the data-safety answers (the apps use the camera, photos, and optionally location-free push).
- When they are live, open Mobile apps in the super admin menu and paste the four store links (customer Android / iPhone, driver Android / iPhone). Every company's "Get our app" page then shows them.
Own-brand app for one company (optional, paid extra)
The company must publish it from its own Apple and Google developer accounts. Prepare the project with the script (needs Python 3 and pip install pillow):
cd mobile/customer_app
python3 tools/build_branded.py --company sunrentals --name "Sun Rentals" --logo logo.png \
    --api https://your-domain.com/api/mobile/v1 --package com.sunrentals.app --build appbundle
It copies the app to build_branded/sunrentals/ with the company's name, icons, package id, fixed company code (no code screen) and your API address. The company then enters its own store links under Website > Mobile apps, and those links win on its website.
Push Notifications (Firebase)
Push is optional. Without these steps both apps work, only without push messages.
- In the Firebase console create a project and add an Android app and an iOS app with your package / bundle ids.
- Download
google-services.jsonintoandroid/app/andGoogleService-Info.plistintoios/Runner/(add it to the Runner target in Xcode) of each app. Do this for both apps. - iPhone only: upload your Apple APNs key in Firebase (Project settings > Cloud Messaging) and in Xcode enable Push Notifications and Background Modes > Remote notifications.
- Server: Firebase console > Project settings > Service accounts > Generate new private key. Save the JSON on the server outside the web folder and set
FCM_CREDENTIALS=/path/to/file.jsonin.env. - Keep the queue running (or
QUEUE_CONNECTION=sync). Rebuild the apps and test on a real phone (push does not work on most emulators).
Who gets what: drivers get a push for a new or cancelled job; staff get the bell alerts; customers get booking confirmed / cancelled and reminders. The owner can switch each push on or off under Configuration > Email Notification (Phone app notifications).
Integration: Twilio (SMS and WhatsApp)
- Settings > Twilio: enter the Account SID, Auth token, the SMS "from" number and the WhatsApp number.
- In Twilio set the WhatsApp sender's When a message comes in webhook (POST) to the address shown on the WhatsApp inbox page. Every call is checked against the company's Twilio auth token.
- Email Notification: choose SMS and/or WhatsApp for the events you want.
- Customer app phone sign-in uses the same SMS number. Every text costs the owner what Twilio charges; limits protect against abuse (3 texts per phone and hour, 10 per device address and hour, a daily company cap of 200).
Integration: Email (SMTP)
- Settings > Email: host, port (587 TLS or 465 SSL), username, password, sender name and address, then press the test button.
- Use an address on your own domain with SPF / DKIM set up, otherwise sign-in codes and booking emails may land in spam.
- Emails sent: sign-in codes, booking confirmation, reminders, invoices, review requests, plan reminders, contact form copies, vehicle-expiry alerts. Every email the system sends is a row in Configuration > Email Notification: new user and driver, booking and agreement updates, online booking received / confirmed / cancelled, pickup and return reminders, payment due, review request, "My bookings" link, agreement signing, the customer app sign-in code, new website messages and vehicle-paper expiry alerts. For each row switch the channels (email, SMS, WhatsApp, push) on or off and edit the wording with the placeholders it shows. The built-in text is used until you change it.
- With
QUEUE_CONNECTION=databaseemails go out in the background (cron drains the queue).
Integration: AI Providers
| Provider | Key from | Default model (editable) |
|---|---|---|
| OpenAI | platform.openai.com | gpt-4o-mini |
| Anthropic (Claude) | console.anthropic.com | claude-sonnet-5-5 |
| Google (Gemini) | aistudio.google.com | gemini-2.5-flash |
Settings > AI Settings: pick the main provider and an optional backup, paste a key and model for each, set the daily limit, and decide on "Let AI read ID and licence photos". The Claude and Gemini connections were tested with simulated replies; try each key once after entering it.
Software Upgrade Process
Before proceeding with the update, ensure that you have completed a full backup of your software.
Important Notes:
1. Language Files Modifications:
- If you have modified any language files, your changes will be overwritten. The new version will come with updated language files, and your previous customizations in resources/lang will be lost.
- It's highly recommended that you back up your edited language files for future reference.
2. File Modifications:
- Any changes made to the software's core files will be lost after the update. Ensure that you have backed up any customizations or modifications.
3. Disclaimer:
- We are not responsible for any data loss that occurs during a manual update. Please ensure that you follow the backup instructions carefully.
Backup Instructions:
1. Files to Back Up:
- .env file
- .htaccess file
- storage directory
2. Update Process:
- Upload and replace all the files & folders on your server with the contents of the main_file folder from the new version.
- Restore your .env, .htaccess, storage files and folder back onto your server.
- Log in to the software and follow the steps in the update wizard to complete the process.
- If you have shell access run
php artisan migrate --forceandphp artisan optimize:clear. Check thatpublic/storagestill links tostorageand that the cron entry is still in place. - Mobile apps: rebuild and publish new versions of the apps when the release notes say the app changed. The server stays compatible with the previous app version.
Troubleshooting
| Problem | Likely cause and fix |
|---|---|
| Photos, logos or banners do not show | The storage link is missing: run php artisan storage:link and check the public/storage link exists. |
| White page / error 500 | Check storage/logs/laravel.log; make storage and bootstrap/cache writable; run php artisan optimize:clear. After an update run php artisan migrate --force. |
| Emails or sign-in codes are not arriving | Check Settings > Email and press the test button; look at spam; if QUEUE_CONNECTION=database make sure the cron runs; check System health > failed jobs. |
| Reminders, expiry or backups never happen | The cron entry is missing or wrong. System health shows "scheduler never ran". Add the entry from "Cron and queue". |
| A menu item is missing for a user | Open System Settings > Roles and tick the permission for that role. |
/.env or logs can be downloaded | The server ignores .htaccess. Enable AllowOverride All or deny those paths in the server configuration, and change the database password and APP_KEY. |
| The website of a company shows "not found" | Online Booking must be switched on, the web address saved, the owner active and the plan not expired. |
| Own domain does not verify | The TXT record must be exactly the name and value shown; DNS can take up to a few hours. Then press Verify again. |
| Online payment not recorded | Add the Stripe webhook shown on the Online Booking page; check the gateway keys and that the site uses https. |
| The app says "company not found" | Check the code (the website address name), that Online Booking is on and the owner is active. A pasted link or the company's own domain also works. |
| The app cannot reach the server | The build uses the wrong API_BASE, the server has no https (store builds need it), or a firewall blocks the phone. Open API_BASE/company/your-code in a phone browser to test. |
| Push notifications do not arrive | Firebase files missing in the app, FCM_CREDENTIALS missing or wrong path, queue not running, or testing on an emulator. |
| Text message sign-in is not offered | The owner has not saved Twilio SMS details, or switched it off under Website > Mobile apps. |
| AI says it is not available | AI is off in Settings > AI Settings, the plan has no AI feature, the key is missing or the daily limit is reached. |
| Dates are off by hours | Set the time zone in Settings > Company and in config/app.php if needed. |
| Language texts are in English | Add the translation to the language file and run php artisan lang:sync; untranslated texts fall back to English. |
Security and Maintenance Checklist
- Use https everywhere, keep
APP_DEBUG=false, strong passwords, and enable two-factor sign-in for admins. - Keep backups: the nightly zip is on the same server, so copy it elsewhere (another server or cloud storage) regularly, and test a restore once.
- Back up
.env(APP_KEY) and thestoragefolder before every update. - Check System health weekly (scheduler, queue, failed jobs, last backup, disk space).
- Review Login attempts for suspicious activity; the platform locks repeated wrong passwords.
- Uploaded customer documents are stored privately and are served only to signed-in staff with permission.
- Keep PHP and the server packages updated. After updating the product run migrations and clear caches.
- Not covered by automated tests: real payment gateways, real email / SMS / WhatsApp delivery, real AI calls, DNS verification of own domains, push notifications, and the apps on real phones. Test these once on your server.
Support
If you have any queries, please create a support ticket, and our support team will respond as soon as possible.